Wednesday, November 12, 2008

Tips on <Wildlife in B&W>

Is not so hard to choose when a scene might be better suited for B&W or a color composition. Scenes where animals have colorful characteristics, or the entire scene has very saturated colors are better snapped in color, on the other hand, moody skies, harsh sunlight or interesting textures might be better suited for B&W

Its easy to select when to leave color

Textures and abstracts can make interesting B&W shots

When the weather takes a turn for the “worse”, low light, moody cloudy skies are usually the best opportunities to go for B&W. Remember you are trying to convey a mood, not any specific details of the animal or subject you are shooting.

Because of their color and textures, elephants, rhinos, gorillas and chimpanzees make for great portraits in B&W

Another trip to remember is that the more contrast the better so don't be afraid to shoot on harsh conditions which will accentuate this contrast.

Visit my pictures at http://www.flickr.com/a207001392

Tuesday, November 4, 2008

My next purchase is announced! Olympus E-30

image

Wednesday, October 29, 2008

Tips on <Using Reflections>

Using reflections can add a new dimension of creativity to your photography. From Mirror, glass buildings, puddles, there is always a possibility to leverage them both in and outdoors. They can be used on any type of photography from landscapes (reflections on lakes), urban (glass windows, puddles)

Puddles

In urban settings, after a storm puddles will be created on the pavement, that can be leveraged to create great pictures of reflections. Dont worry about how clean the water is, sometimes all you need is an outline,

Unusual forms

Certain objects with interesting and complicated shapes will create a great shot if standing next to the reflective surface, as if they were join together. Framing is important in this kind of shot

Refractions

Using water droplets, make sure you get glycerin and either use it instead of water or mix it up half and half. This will allow the droplets to keep their shape for much longer, use a pipette if you want to make sure you get even shape droplets.

For this type of shot a close up macro lens is essential, you will also need a study tripod. Focusing is the most tricky part of this type of shot, focus in a single droplet, and focus on the image reflected not on the water itself. Around f/11 is recommended, this will you a sharp refraction.

Use tranquil waters to reflect the scene
Glass buildings and puddles are great for creating a composition with reflections


visit my pics at http://www.flickr.com/a207001392 
Using glycerin and an interesting background can make for a very interesting composition.

Tuesday, October 28, 2008

Tips on <Making the most of Landscapes>

These are some tips from professional photographers if you want a better chance to get your landscape shots published:

1) Shot Vertical and Horizontals.

Most of the magazines print vertical shots and most calendars use horizontal pictures. For maximizing each scene and if the scene can work both ways ensure you take both.

2) Compose with text in mind

Most of the photos on printed media will include text one way or another, it is wise when composing leave ample space so that editors can build a message or a magazine cover around it

3) Concentrate on the details

Shooting landscape photography is not always about wide angle lenses or huge vistas, focus on the details around you, sand ripples, waves, shells, .

focus on interesting items on the skyline

4) Work with the light

Usually is better to focus on your landscape when is being light sideways, rather than with the sun behind you. This will bring up interesting details

5) Leverage places of interest

While nature shots are very common, focusing on common places of interest like castles, buildings, markets will increase the possibility of editors using your pictures. Try to be creative and capture the building on a different light

6) Use a remote

Minimize camera shake as much as you can, if you dont have one, use the camera timer  for this

7) Develop a system

Some people use landscape in manual that way you have full range of settings. A common aperture would be f/16 as a smaller aperture sometimes sacrifice sharpness on some lenses. Focus a third of the way into the shoot, and dial a shutter speed as recommended from the metering system. Take a shot and check your histogram, remember to keep checking your settings as light can change in a matter of minutes specially at dawn and dusk.

Use a wide aperture, dont go all the way to f/22 and focus a third on the shot

8) Include people in the shot.

As a matter of sense, sometimes a pure shot of the landscape would be more pleasant, however the great majority of shots that get published on magazines include a “living” creature, people, pets, animals, insects, etc.

Monday, October 27, 2008

Tips on <Halloween>

I saw this great tip for creating Jack-O-Lanters thanks to the friends of Photojojo.They are basically using Photography to come up with a very cool way to create a design that you can carve on your pumpkin. Here is the summary in their own words:

carving your own scary photos onto that pumpkin instead of the usual triangle eyes and pointy teeth. All you need is a scary picture and a little know-how. Read on for the full details on how to make your own photo pumpkins.

Enjoy

Monday, October 13, 2008

Vote for the 1st Mostly Lisa Photog Contest Winner | MostlyLisa.com

Hi…vote for my picture on the contest featured below. There are lots of good pictures, but if you like mine, why dont you drop a vote for me?…  :)

Vote for the 1st Mostly Lisa Photog Contest Winner | MostlyLisa.com

Here is the picture and a link to the photostream:

Wednesday, October 8, 2008

Another great Lightroom preset…

A few days ago I wrote here on some useful presets I have used before. One of my favorite blogs (Photoshop Lightroom Killer tips) has added a new presets which I found is great for portraits.

Here is the link. It includes a great set of tools to enhance white eyes, red lips, and enhance the iris.

Here is an example of what it can do. I have exaggerated some of the effects on the eyes (iris and white) as well as the lips

Fierce smoker


Before
Fierce smoker


After


Here is the final shot

del.icio.us Tags: ,,,

Soccer Matches

Shooting soccer matches at the professional level, will prove difficult due to the permits required, so is better to start with your kids little league

  • You will need a good DSLR with a good AF system, and at least a good camera with 4 frames per second. A good lense such as a 70-300 mm should be enough.
  • In some countries there are some local adult teams, is best to request their permissions, most of the time a phone all is all that's needed.
  • Is basic you need to understand the rules of the game, need to know when certain positions will be moving up or down the field
  • In most games, the action happens in midfield, so find yourself a good spot on the center of the field.
  • Your speed should be around 1/640 secs if you want to freeze the action. Ensure you are using AF and use continuous shooting mode.
  • If you have a lens shorter than 250mm then think of staying midfield, if you have longer than 300mm then it might be worth spending some time behind one of the goals, this will allow you to capture action midfield, and great opportunities for goals.
  • Ensure you are filling the entire frame, if you are going for an entire body shoot then ensure you are not cutting arms or legs, and make sure you are capturing the ball on the shot.
  • Try to predict the action, for example start shooting when the players jump for the ball, so you will capture right at the moment they hit it. Pictures that denote contact are the most dramatic ones.
  • Don't forget to keep an eye on the coach or the crowd to capture reactions to any referee calls.
  • Once you have the shots, it might be a good idea to contact the local club to share some of them, for promotional material, display on the local bar this is a good way to say thanks to the club.
  • Another place to promote your shots is contacting the local newspaper.
del.icio.us Tags: ,,,,

Tuesday, October 7, 2008

People in public places

People in Public Places

  • Be ready to potentially be confrontational and potential intense conversation
  • Be ready to freeze the action, shoot in shutter priority to ensure you can freeze the movement of people walking, running or cars and bicycles
  • A good recommendation to be is to set the shutter speed at least twice the focal length of the long end of the lens. Use AF mode and metering mode to center weighted
  • As a recommendation your aperture shouldn't be more than 5.6, otherwise be ready to crank up your ISO.
  • A good lens recommendation would be an f2.8 at 300 or 400mm
  • The hardest thing to do when shooting people on the street, would be to ensure that other people don't cross your shot. As a recommendation shoot with the flow, not across it.
  • As for legal ramifications know that in the US and the UK you are allowed to take a picture to whoever you want, Ireland might be a different story. Be careful and avoid shooting kids in public places due to the controversy
  • Remember to be courteous, while you are looking at the viewfinder, somebody might be looking at you. If someone sees you taking their picture simply raise your hand in thanks as a courteous gesture, if they ask what you are doing tell them, show them the picture on your camera. As a good way would be to have a card handy with your details so you can share the picture with them later, this could be a good way to give them a model release in case you a have a great shot.
   

Some people might not like their shot taken.. Suggest you look at this story. Also know your rights.

del.icio.us Tags: ,,,,

Shoot great buildings

Focus on your composition

  • Use the basic rules, but when shooting a building from afar, pay special attention to your foreground, middle ground and background.
  • Leverage roads, pathways that lead to your building.
  • Use elements to frame up your buildings, Branches, other buildings can help you frame the subject. Lay low to exaggerate shots and converging lines
  • Fitting a whole building could be difficult to fit on the frame. Make sure you set your camera upwards to accomplish this. Trying to fit the entire building could drive the verticals to lean in. Some people don't like this, but it could be fixed later on post processing, also some specific lenses can help you fix this on the camera.
  • As for the times, be careful on the lighting. As many times dawn and dusk will allow for the best shots, during midday harsh shadows could ruin your shots making them look flat. This could be a good time to focus on specific architectural details you might be interested, or focus your shooting indoors.
  • The use of a warm up filter could help, but this could be done on post processing. Make sure you shoot RAW to get freedom on setting up the right WB
  • If you are shooting near a body of water, try and get the reflection of the building on the water. This works best on tranquil waters as any movement from animals or wind could cause the reflection to be ruined. Use a polarizer to bring out the colors, but use it wisely to ensure you dont eliminate the reflection. If its windy a good idea is to go for an abstract shot on the reflection only and get the reflection trough the water ripples
  • If your building has some stained glass, this is better shot under a overcast day. If you are taking the entire window, then meter carefully from the bright spot set your exposure to manual and recompose.
  • A good idea is to focus on the details. Dont only look for the detail, but looks for patterns from stone work, pathways, etc. Usually a tripod here is a good idea
  • If you are shooting at night, ensure to meter for the highlights and watch out for your white balance.
  • Indoor buildings are a good target to try HDR due to their uneven lighting.
Look for interesting shapes Focus on architectural details
 
When lighting is not good, indoor shooting can generate lots of opportunities 
Try out HDR indoors and play with different lighting opportunities

Friday, October 3, 2008

Silhouettes

The best time of the year to take this shots is during the fall, since the position of the sun is lower, and it will allow you to keep the sun on that position for longer.

All you need to do is to place your subject in front of a very bright light source so they are in the shadow. Meter and lock the sky’s exposure in Aperture Priority Mode with the subject out of the frame, then recompose and take the shot.  If you are shooting manual you can get even more creative, underexposing for 1 or 2 stops can deepen shadows and create very dramatic images.

Be aware of merging shapes: you want to make sure that your silhouettes are not merging with other ones. For example a person walking and his shape getting mixed with a street pole.In some cases this merging can work to your advantage, for example a couple’s silhouettes showing their individual shapes but merging in some areas can convey the message of togetherness.

As for composition make sure you locate yourself where the sun or your light source are strong. Is better if you spot meter as its more accurate, meter off the brightest cloud or lightest point in the sky. Check your histogram and ensure you are skewing to the left reflecting more and deeper shadows.

You have to be careful and be creative on your skies, sometimes with these technique they can be flat and lose their punch, is recommended the use of some sort of color filter on the camera, or work around this on the digital darkroom.

Some creative ideas for silhouettes

Shoot indoors: places like churches can create great images, source your light from a colorful stained glass window.

Fill the frame with a full silhouette shape, as the sky can get flat a more complex shape will make the image more interesting

Keep the silhouettes simple, people need to recognize them right away, otherwise people will lose interest

Here is an example: (this was meter off from the outer light from the sun)

Photo walk in San Francisco…

As part of a business trip I decided to spend a couple of days taking photos around one of the most photogenic cities in the US. Be prepare to find all kinds of people, places and diversity. We tried to hit the major sites, but did also quite a bit of walking around hunting for photo opportunities.

I use my Rotation360 bag and my 2 Olympus bodies (E3, E410). Took out as well my 50-200mm 2.8, 11-22mm 2.8 and my 8mm fisheye. Also took my AMOD GPS receiver here is the route followed the first day…(This view was developed with Microsoft Pro Photo tools)

Day 1

  image

We started early morning (6:00 AM) to take shots of the golden gate bridge from the San Francisco side. There is a place called Vista Access, you can either drive or take a cab to this spot. There is a spot that provides a view to the bridge. From there you can hike your way down a path to Marine Drive. All along the path there are different perspectives to the bridge, lots of great opportunity shots, Unfortunately for us, fog didn't clear at all. Prepare yourself for a hike, we walked down Marine Drive, then down to Mason Street, passed the San Francisco Bay and Palace of Fine Arts. (We didn't stop on what it could be great shot opportunities including the San Francisco National cemetery). We walked down to Divisadero Street and took the bus for route 30 to take us to Ghirardelli Square (I recommend the transit pass for a day which would include also the famous street cars). I also recommend the little breakfast place there after a really long walk.

After breakfast we walked to Lombard Street (the famous crocked street). If you arrive from Hyde Street be ready for a hike upwards, you can take the street car. If you come down Leavenworth street you will arrive to the lower level of Lombard Street. I was disappointed as there was too many people already so get there early, but there are no really good vintage points to take a good photo that shows the street features.

We walked down Leavenworth and right on Jefferson to Fisherman Wharf. On your way there, there are lots of opportunities from the food stalls preparing sea food as well as all the colorful people hanging there. You can walk down Pier39 to see all the seals, it was very crowded on the side of the sea lions so I took a vintage point on the other side, setup my tripod with a 2.0 Teleconverter.

Fisherman’s wharf is loaded with little touristy shops great candid shot opportunities. After a break we decided to go back to the Golden Gate Bridge on the other side to see the sunset and some bridge night shots.We took a cab and were dropped off at the Golden Gate Vista. We looked for different vintage points, one thing we didn't try is to walk around the Golden Gate National Recreation Area which has some tall hills and could provide very unique vintage points to the bridge, but at night is not illuminated and seems you can lose your way very easily at night. My last advice is drive there, we were stranded there for 90 minutes waiting for a cab at 9:45PM and bring some layers as is very windy and very cold.

Day 2

  image

Our last day we decided to walk around and look at other possible nice sites on the city. Certain GPS devices might have a problem keeping a lock on the location due to the proximity and height of the buildings, as you can see on the map.

We went down to Sansome Street off of Market Street to take some shots of the large number of bikes parked on the streets, there are several of this bike parking lots that provide great photo opportunities.

We later went to Yerba Buena Park which provided great opportunities to show San Francisco’s architecture as well as great candid people shots.  Go to the fountain on the second level of the park and spend some time looking for the little details.After that we walked down on Mission Street towards the bay and had lunch in the best Mexican Restaurant I have eaten in the US called Mexico DF on Steuart St. We arrived at Pier 2 and walked down the bay for a couple of hours before going to the airport.

We didn't get to visit all places, but San Francisco is definitely a place to take candid shots, lots of lively people and great modern architecture.

Wednesday, September 17, 2008

Tips on...<Horse Racing>

First thing to do is get yourself a race card.Apart from listing the horses and the riders it will also give you a map of the horse track and usually will display which areas of the race track are open to the public. Choose at least a couple of positions

Locate the parade ring, winners enclosure and weighing rooms. These all provide great opportunities for shots of jockeys with or without the horses, the trainers, owners and members of the public.

There is a lot of waiting between races, usually it can be as much as 30 mins within each race so bring some food and a book

AS the horses canter down the center to start its a good time to take solo shots of horse and rider, as opposed to groups of galloping horses. This is the time to try panning, zooming and slow shutter speeds. Flash isn't allowed because it will scare the horses so slow sync flash is out of the question. Try putting some tape on your flash, just in case you have a mishap with the settings and you get booted out

One way is to use shutter speed mode to freeze the action and doe some panning, another one is to set it up on Aperture Priority do matrix metering and adjust the ISO to allow a fast enough shutter speed to freeze the movement at your chosen aperture.

Shutter speeds of 1/30 sec are slow enough to blur the action for artistic effects

Using AF on continuous keeps the front runner sharp and barriers can help you frame the composition.

A classic shot is to wait for the penultimate race, rush to the winning line to capture the horses as they past the post.

del.icio.us Tags: ,,,

Tuesday, September 9, 2008

Motocross racing

Motocross Racing

One of the big advantage o this sport, is that you dont need special access to get close to the action, therefore a regular kit zoom can do most of the time to capture great images

Every race usually comprises of a few practice sessions in the morning, followed by a race in the afternoon

Focusing

Getting sharp shots of fast moving motorcycles can be very difficult. AF mode is okay if you can keep the focus point positioned on the bike before you taker the shot, or if they are going slowly. In more difficult situations such as shooting the bikes head-on over jumps; its better to use manual focus to get sharp results at the top of the hill. This takes practice to get the hang of, but allows you to get shots that auto focus might find impossible

Viewpoints

Choosing the right viewpoint will make a massive difference to any sports and action shots. Rather than simply stand where you can see the action ,look for vantage points where the background doesnt detract from the main subject. For uncluttered backgrounds, try finding a spot where you can use the sky or track as a backdrop, to concentrate all the attention on the subject

Protect your kit

Even in good weather motocross bikes are going to send plenty of dirt mud and slut your way, so you need to protect your kit. A towel or dry cloth is handy for throwing over the camera while you are not using it, and also for wiping off any gobbets of first that end up on the body of the camera. In very bad conditions it might make sense to use an entire rain cover for the camera

One good thing to do is to get familiar with curse, look at where the sun will beat the time of the race so that you dont get too many shots with the highlight of the sun on the bikers, also look after practice for the little canals that the riders leave behind, since they will tend to reuse those over and over when they hit a curve, you can choose a spot close to that as this will be an indication of where the riders will be going trough

One good location is to choose a jump area, sit there and wait for the bikes to come into view, use Shutter Priority Mode or Manual, focus manually on the top of the rise and set your shutter speed to 1/1000 second. this should freeze the action on the jump

Another good location as well is standing slightly above the track around the bends on the corners of the circuit. You can get away with using a smaller lens, 18-70mm as the riders will be much closer as well as they will be slowing down to take the curve, this viewpoint will provide you with a much better backdrop of the dirt. Here with the new speed of the bikes you can go down to 1/125 secs you could also use flash to help you freeze some of the movement.Also try your panning technique.


Sunday, September 7, 2008

Macro (Flowers)

Shooting flowers (Macro)

Don’t start snapping the first flower you come across. Even if you re standing on a field full of them, take the time to seek out the specimen that offers the best photographic potential, wether that is due to the quality of the bloom or its location

Once you have found the flower in its prime, explore the subject from all angles to find the shooting position that delivers the best composition

While your flower will be the central subject if your image, the background will play an enormous  role in the final success of the photograph. In any floral image, the background or surroundings will fill a large proportion of the frame. This isn't just empty space to e ignored, its an integral part of the picture. Your key decision will be wether you want to capture the flower in content and therefore present a clear view of the surroundings trees, plants and foliage or wether you want to focus on the flower in isolation.

As a general rule of thumb a close up fo individual flower using a macro lens will demand an unclutered background so that nothing distracts from the shape and texture of the flower itself.

Direction

If you are shooting flowers have been shot with the sun falling on them from the front. The results gives highly saturated colors but an element of flatness in the picture, and texture will be sacrificed. Alternatively standing so that the sunlight hits your subject from the right hand side will mean you get more textural detail as the beams skim over the petals from an angle. You will get a more interesting though uneven shot. For an even more dramatic effect, opt for backlighting. With your subject positioned between you and the sun, the delicate nature, the spines, hairs and translucency of your flower will be emphasized because of the light shining trough the petals from behind. Ultimately this works best on subjects with a translucent quality, such as buttercups and poppies, giving an etheral effect. Keep the background darkest than your subject and take the meter reading from the shaded side of your subject for a more even exposure

Reflect and Diffuse

The type of reflector you use in your outdoor photograph will have different effect on the end result. Careful arrangement of home-make white card reflectors or professional reflector sheets will bounce crucial light back into areas of shadow to get a more creative and controlled end result

Using gold reflectors on the other hand will imbue a warm cast over the frame for a summery effect. For a particularly dreamy image, and to take the edge off bright sunspots so as not to burn out plate flowers, position a diffuser in between your subject and the subject to soften the lighting. Tracking paper acts as an efficient diffuser material, the closer your position to your subject, the brighter the appearance and the higher the contrast.

Use your knowledge

Your skills as a photographer will grow if you use your macro work win conjunction with another area, anywhere you have inside knowledge that gives you an insight into what would make a good image and the spur to work at it

Learn patience

Macro iis not the immediate gratification type of photography. There will be successes and failures but you lean from both

Equipment

Dont make equipment or lack of it an excuse. After all, you wll only need good lighting and Aperture Priority Mode.

Have respect

The welfare of living things is of paramount importance. Lean all you can about the things you photograph


del.icio.us Tags: ,,,

Macro Photography

Macro Photography

Fruit and Veg

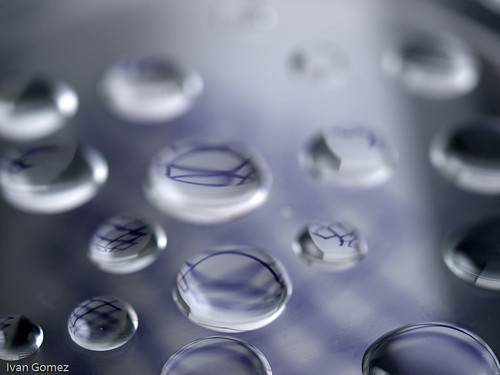
With a vast array of wonderful colors available, fruit and veg can make a great macro subject. Arrange to create attractive graphical shapes and experiment with over and underexposed images

Know your settings

The quality of your close up photography will only be as good as your technical capabilities, so mastering these skills should be top priority. For more amateur shooters get acquainted with your cameras macro mode.

Avoid cliches

Use tour imagination and take note only the obvious shot but a range of images that show your subject in a new light. Changing your angle is the quickest way to avoid  an unimaginative shot

World in focus

The defining characteristic of a successful macro shot is razor sharp focus. A handy trick recommended by professionals is to try and compose your shot so that the camera boy is parallel to the length of the subject, This ensures all areas are of equal distance to the lens.

Color

If you want to achieve a level of deep saturation of the colors, use front lighting if you would like to bring out the texture of your subject, side lighting is the way to go

In a flash

Be careful when using flash for macro work. Most on board flash systems are too harsh for close up photography and you will bleach out your subject or cause glare. However when used carefully flash will enable you yo use a smaller aperture for greater depth of field and create shots with greater clarity.

Light and color

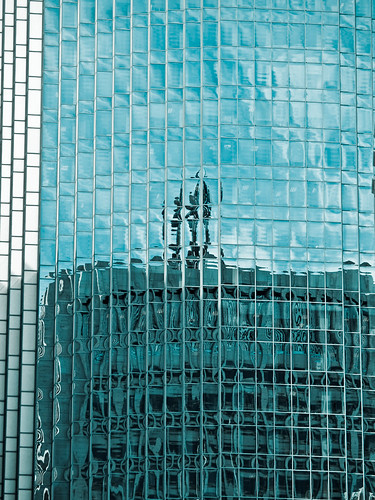
its easy to get carried away wit ha subjects form when looking for a close up opportunity and forget about light and color as compositional tools. You can find beautiful tones in the most unlikely of places

Fill the frame

When shooting macro you will need to decide upon the technique that will enable your subject to fill the frame adequately. Choose the right lens, zoom, wide angle, or macro. then think about composition

Some simple rules

Sharp focus is a mist. Shoot from the different angles to get more unique images. Think about color, composition and lighting always

Dont rely on autofocusing, always try manual focusing. If you have Live View capabilities, its perfect here for macro work

It is vital to get lighting exact when photographing in macro. If you want to avoid using a flash and are instead going to stick to ambient light sources, the opt for natural lighting first. This will involve the least amount of fuss. Its possible to setup a simple studio environment using your artificial lighting sources around  the hime, but you need to avoid using harsh light lamps that are difficult to angle in order to avoid unsightly shadows. One false move may result in an image needing hefty image editing post capture.

Using your camera flash is a no-no

More tips

Lenses

Its worth looking into purchasing a macro lens, if you own a DSLR.

Steady shots

If you are capturing macro images you will need to make sure that a sturdy tripod supports your camera. A minitripod might be a good idea that you can put on top of your table as a regular size tripod will push your camera away from the object

Exposure tricks

In order to achieve great exposure its a good trick to bracket your shots, Make sure that you take note of which image looks good and what setting you used

Focus

When using creative DOF take a good look at your subject. Pick an area that you want to highlight and concentrate your focus to this point If you are using a large aperture this will throw the rest out of focus

Macro Subjects

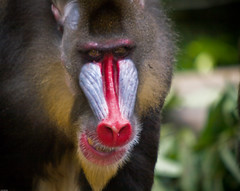
Everybody photographs flowers when trying out macro photography. A rose may look beautiful up close but so can everyday objects Be different and try to snap up ordinary in terms in a creative way

Lighting

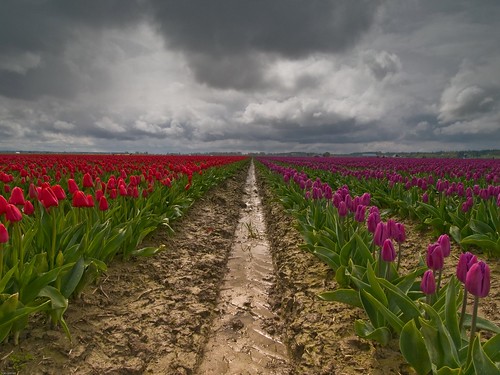
Bring conditions will cast heavy shadows on your subject. Get rid of this by diffusing the light with tracing paper or a Last olite diffuser. If shooting outdoors you will get the best effects when its overcast

Composition

Try and be creative with your shooting angles. It will give you more scope for a macro shots with punch. If you can place your objects on a glass surface, you can capture your shot from underneath

Out of the ordinary

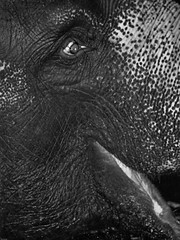
Concentrate on making your object look out of the ordinary. If you can take a common subject and capture it making your audience look twice, then you know you have succeeded

Lens shift

Don't get addicted to using the same lens and the same setup. Change your setup now and see if you can capture the same object with a different effect

Experiment

Some of the best images come from experimentation. You might want to tweak your composition, exposure and lighting to capture a shot with a macro pizzazz

The kitchen is a good place to start, as there is so much scope for interesting textures and shapes. Take a look at the latest supermarket advertising campaigns or sit in a high street coffee bar and you will see that is  very fashionable  to capture close ups of food and in your home. The key to creating a great macros till life is to keep your shots simple. Try out macro effects on unusual objects such as cross sections of fruit or cutlery/ Don’t try and capture elaborate images, as you will detract the attention away from your subject. Remember its important to keep background as clean cut and fuss free as possible, by using a white cloth or piece of card in the background. You will then be able to clean up your shots easily in your image editing software program.


Closer to Home (Macro)

Closer to Home (Macro)

Everyday objects around the home offer plenty of potential for interesting close ups, the key is to keep your eyes open for the possibilities of colors, textures and shapes. Even if you run out of ideas for photographing objects in your home, it is possible to bring interesting objects from outdoors for still life shooting

Consider investing on a mini tripod that will allow you to get closer to your objects, a larger tripod my interfere with the table

Creating a table top studio

  • A sturdy table
  • A white sheet or selection of large colored cards
  • A minimum of two, but ideally three or four separate lamps
  • Small pieces of card
  • Tin foil
  • Two objects large enough to prop up the card or sheets
  • A tripod

Setting up your studio

  • Lay a well ironed sheet or large piece of card over a table and prop the rear end up so it falls in a curve. Position the object you want photograph in the center of the table and change your lamps in such a position to eliminate any unruly shadows.
  • If you have more than 2 lamps this should be easier In a professional studio darker shadows are field with the use of reflectors.
  • You can use your cards wrapped with tin foils to create reflectors.

Try using a water spray bottle to add fine droplets to the petals and leaves. By photographing at such a close proximity to the subject you may capture some nice reflections.

The most everyday or mundane subjects can turn into  inspirational photos if you capture their details in abstract.

By learning to view the world around you in terms of its various patterns, colours and textures rather than the nature of the subject matter itself, you will undoubtedly discover a whole new world of photographic opportunities lurking in even the most unexpected places


del.icio.us Tags: ,,,

Friday, September 5, 2008

First "Photowalk" with my Zuiko 8mm

At last I was able to put my new purchase for lenses with my new backpack the Think Tank 360. You can read that review here.

As far as the lense goes, I really like it and I would defintely recommend the purchase of a fish eye as part of your kit.  Usually when I am having a photo only trip, I take 2 camera bodies with me. My Oly 410 and the Oly E-3. Most of the time I kept the fish eye lens in the 410 since I take advantage of the IS in the E3 for telephoto shots.

The most impressive thing about the lens is its sharpness and ability to capture lots of colors and dynamic range. I know this is also in due part of the body itself, but I haven't seen this tone range in any other of the Zuiko lenses. I guess it helps  that its a prime lens as well. Here is an example...

This picture only has a little bit of retouching in Lightroom 2. One thing to note is taking pictures takes a little to get used to. You have to mind ALL of the space around the frame, being careful on not to include your own feet, a friend standing next to you, etc. Its almost as you can take a picture of the back of your head with this lens.

One of the objectives for this trip was to "overuse" my 8mm just to get the most out of it. From now on, I will always carry this lense with me but it will be reserved for special effects, panoramas, and force myself to first work with my other lens and then close a spot with this specific effect.  I will try in the future to use this for panoramas to take advantage of the distortion or to fix it on Post Processing with the help of photoshop or PTLens . This lense if denitely not designed to replace your regular wide angle lense, but to bring out special effects and perspectives.

You can create different and eye-pleasing perspective with this lense, but one of the things I have learned is that with this type of distortion you really have to mind your surroundings and how you are standing in front of them, as all of this will get accentuated on the final exposure. Look at this example..

I should have stood right in front of the center of the middle lane, right now the picture shows an unbalance and an awkward distortion in the center lane, the parallel lanes and the pandas on the sides do not have the same level of distortion. Regardless of this, I think the colors were excellent

Here are some of the examples of the pics I liked and the effects you can manage..


One of the things that really caught my eye was when shooting up to a structure, is amazing the amount of sky you can capture, this should lend itself really well for using HDR. (I will try this next time I am carrying my tripod). I then switched from my 420 to my E3 using the fisheye, IS helped me capture the carrousel movement by hand...

Overall I really recommend using this lense, I would love to try this on panorama shots with a single shot covering a large amount of space, then removing the distortion with PTLens and see what happens..

The entire set of this pictures is here...

Primer "Photowalk" con mi Zuiko 8mm.

Por fin pusimos a prueba de campo mi nueva adqusición en cuanto a lentes y mi nueva backpack para acarrear todo mi equipo. Si quieren ver un review de mi nueva maleta, veanla aqui (En Ingles).

En cuanto al lente, me gusto bastanto y lo recomendaria. Cuando tengo la oportunidad de llevar 2 cámaras, lo hago. Esta vez lleve mi Oly 410 y mi E-3. La mayoría del tiempo use el 8mm con la 410, ya que reservo el uso de la E-3 para mi telefoto aprovechando el IS.

Así fue como un amigo y yo nos lanzamos a las calles del Centro de Seattle a buscar varias oportunidades antes de que acabe el verano.

Lo que mas me impresiono del lente junto con la 410, es la nitidez de los colores y el dynamic range. Aqui una prueba que creo que refleja la habilidad del lente y la cámara para capturar detalles y una gran tonalidad de colores...

La foto solo tiene un poco de retocado en lightroom. Lo que si es que lleva un poco de tiempo acostumbrarse al lente, debido a la distorción que genera se debe de buscar algo que sea agradable a la vista, pero que tambien demuestre las capacidades del lente. Me llevaron como 10 intentos para lograr esta foto, estaba acostado en el piso y muchas veces tuve que reacomodarme para no mostrar mis pies.

Por otro lado, en esta sesión me puse como objectivo "abusar" un poco del lente para poder ver sus capacidades, de ahora en adelante siempre llevaré el lente conmigo, pero lo usaré para ciertas ocasiones, realmente este lente es más para efectos especiales, o para panoramas con distorción o elimando la distorción usando post processing en Photosop o PTLens.Pero no puede reemplazar un lente como el Zuiko 11-22mm

Definitivamente se pueden lograr efectos muy agradables con el lente, pero unas cosas que aprendí que más que con otros lentes, es importante fijarse en todos los aspectos de la exposición antes de tirar la foto. Por ejemplo aquí:

Debí haber tenido mas cuidado de pararme al centro del carril, ya que se demarca en este tipo de distorción lo desbalanceado de la foto. Parandome más al centro, hubiera hecho las líneas aún más paralelas, y la distorción de los osos panda en los lados similar, creando un mejor balance en la foto. Aunque como se puede ver, los colores salieron geniales.

He aquí de algunos ejemplos de fotos que me gustaron...


Una de las cosas que me llamo mucho la atención fue el hecho de cuando se toma una foto al cielo, es impresionante la cantidad de espacio que se puede abarcar, con un tripié (o tripoide para los espanoles) se presta muy bien para efectos HDR.

Aqui cambié de camara con la E3 con el de 8mm. no noté muchas diferencias, aunque el IS en la E-3 me ayudó bastante para poder reflejar el movimiento del carrusel ya que dejé el tripié en el carro. Creo que la exposición fue de 1 segundo. El efecto en la consola em gusto bastante...

Recomiendo bastante este lente, intentaré tomar algunos panoramas en el futuro y usar alguna aplicación como PTLens para remover la distorción y haber que tal queda.

El Set completo de mi sesión se encuentra aquí...

Tuesday, September 2, 2008

The Best Camera Bag Ever...

Think Tank Rotation 360

Think Tank is a company that makes photo accessories focusing more on bags, cases and they proud themselves by being the brand that a lot of professionals use. A lot of their bag designs take into consideration input from professionals either sports photography, nature, etc. I will tell you right now, that they are pricey, very pricey but as you will see in my view they are worth the $$.

They have a lot of models for carrying on the field, bags for transporting equipment on airports, etc. I wasn't specifically looking for another bag, but the Rotation 360 caught my eye.

The bag is a very comfortable backpack which it also has a waist buckle. This becomes a deep "fanny" bag that rotates by detaching itself from the main body of the backpack. This rotational bag is very deep and can hold a lot of stuff. You can put lenses, batteries, filters without having to remove it, making access to your equipment much, much easier, better and more comfortable that a slingshot concept. The other major differential for this bag is that it can be enhanced with different attachment containers that can be used to stored extra lenses, filters, etc. I bought an expandable digital holster that can be attached to the bag belt. There are other minor features that are great, the construction is outstanding (zippers, Velcro, etc) other than that is a common backpack.

Setting up the bag

The camera has some features that require some setup, but they are great.

Camera strap: The bag comes with a special camera strap. So in order to use the camera support strap on your back pack, you need to use their camera strap. The camera strap is comfortable, it has some rings that allows you to attach it to the backpack for support.

Camera Support Strap: These are a set of 2 snap clips that go into the shoulder straps in the bag, this takes 2 minutes to setup.

Attaching One Camera: Basically you put your camera around your neck, use the snap clips on the backpack to clip to the rings on the camera strap. This allows your camera not to hang, or jump around giving your hands some freedom of movement.

Attaching 2 cameras: Same approach as before, you can attach one camera a single support strap on one side, and another camera on the other.

Hold down strap: the camera also comes with a strap that can be attached to the buckles on the shoulder straps. This long lens strap joins the shoulder straps together so when your camera is hanging on your chest you put this hold down strap over the camera forcing the lens to point downwards.

Loading the bag.

The bag can hold A LOT of equipment. Here is a list of what I was able to carry:

Top part:

After arranging the strong velcro dividers here is what I was able to put in:

Olympus E3 Flash FR-36 2.0X Teleconverter
Energizer Batteries Set of Filters (Polarizer different sizes) Zuiko 50-200mm 2.8 lens
  IMGP1100  

Front Bag

Cokin ND filters ND filter attachment rings Storm Jacket
     

Rotation Bag

Olympus 410 with 8mm Fish eye lens attached Sigma 30mm lens Zuiko 11-22mm lens
3 Tripod quick release plates Camera Batteries 2 pouches with memory cards
IMGP1106   IMGP1107

The camera has a rain cover that wraps the entire backpack around, and finally you can comfortable set a tripod with a buckle on top of the bag and using the net pocket at the bottom of the bag.

Now, I didn’t use the expandable holster which can fit my

Sigma 50-500mm.

I did not manage to fill up the bag, specially the top part, which could fit still a lot more small stuff like cable release, levels, etc.

IMGP1105

Hauling the bag around

The bag is very comfortable to carry around. I took it out of for a 3 hour spin and my back or shoulders felt great. Obviously the best thing is the waist bag. Here is how it works:

Once you have de attached the bag buckles that holds it in place, you need to pull this strap from the bag waist belt which shifts a velcro IMGP1109 mechanism in place inside the bag. This allows the free motion around the waist allowing the bag to rotate to the front. Once you have done this, you have free access to the waist bag that opens with a zipper. You can use this bag for easy access to reach lenses, another camera body, batteries, etc.  In order to put it back you just need to pull this lock strap again to the lock position (this makes the velcro inside the body bag to appear again) and push the waist back with the handles back into position "shake it" a couple of times so the velcro attaches again, and you are good to go.

The only thing missing from this bag is the capability to carry a small laptop, but overall is the most comfortable, better built camera I own. Is great for long photo walks, nature and hauling equipment for any event.

del.icio.us Tags: ,,,

Friday, August 29, 2008

Tip on... Hostile climates

Here are some tips when going to extremes in relation to climate

For cold temperatures

Batteries dont like cold weather. If you look at your camera manual you will usually see 2 different sets of values for battery life, one for normal conditions and another one for freezing point. Usually battery life is reduce by half on near freezing temperatures. For example the Canon EOS 400D battery can take 500 shots at 23degrees centigrade but only 370 at 0 degrees.

One good tip is to keep your battery inside your coat, this way it can use your body's temperature.

Another concern in some cameras are leaf shutters on traditional large format cameras where the lubricants have become viscous in low temperatures. Some plastics can become brittle, and while not a problem for camera, it could be for accessories

When taking pictures in the snow and things like skiing or snowboarding there shouldn't be a problem with the snow if it remains frozen, problem is when you move indoors. This water could sip into the lens joints and other areas. So be careful of wiping your camera before you go indoors or putting it inside your coat.

Condensation can also be a big problem. At best it is a nuisance. the lens becomes misted up and the camera body become damp. At worth though the condensation may penetrate the camera and damage the electronic if the camera is stored damp, cause mould and fungus to appear

What you need to do is put the camera away in a bag or case before you bring it indoors, and then let it warm up naturally for an hour or so before opening up the bag, it doesn't have to be airtight because there is no pressure difference, you are simply preventing the warm air from circulating around cold equipment

For hot weather

When it comes to the sun, cameras are pretty hardy the only big nuisance is that the black plastic on which cameras are built, attract the hear, which could cause your camera to become so hot that it cannot be operated for a few minutes.

For hot weather your worst enemies are moisture and dust

Sand is a real killer when it comes to lenese, any grit can lock up a precise and delicate mechanism of the camera and or lens

This is critical when trying to exchange lens in the middle of a dusty environment. If you have to, you should turn away from the wind, and face the camera downwards to minimize the risk of particles getting into the camera body.

In some environments, fine dust particles are suspended in the air and will enter the camera body even if perfectly still conditions.

Never put your camera away damp.

Thursday, August 28, 2008

Herramientas para lightroom

No soy un experto en Lightroom pero queria compartir algunas de las herramientas que usado para maximizar la funcionalidad de LightRoom 2.0. Aqui esta una lista de lo que he usado..

Matt's Dramatic Sky Presets

Este preset hace una gran diferencia en cuanto a incrementar los tonos azules del cielo, funciona a un mejor cuando el cielo tiene nubes. Aqui hay una muestra

image

image image

Original Picture

Using Dramatic Sky Level 3

ND Graduated filters..

Este set de presets son un grupo de presets que ayudan a contrarestar el problema de dynamic range que muchas camaras no pueden controlar (Cielo demasiado claro, con una exposicion correcta en el objetivo). Estos presets tratan de copiar la utilizacion de filtros ND en el campo. Los presets son de 1, 2 o 3 stops algunos de ellos son horizontales y otros verticales.

Aqui una muestra de como se ven.. cada uno incluye alrededor de 18 diferentes presets

image

image image

Original Picture

Using ND L 2 stops

Presets Edge Darkening

Estos simplemente usan la funcionalidad de Vignettes en LR 2.0 Son presets para crear vignetting.

Perfiles para camaras en LR

Esta funcionalidad para LR, crea un nuevo grupo de prpfiles en el menu de Camara Calibration del modulo de Develop en LR. Estos son profiles creados por las companias que manufacturan las camaras que representan el mejor profile para cada camara. Esto trata de solucionar el problema donde una imagen se "ve" mejor cuando es abierto por primera vez en el SW nativo del proveedor que con LR. (por ejemplo Olympus Master2.

image

Mejorando el flujo de trabajo con Smart Collections

Esto es probablemente la funcionalidad que mas me ha ayudado, el uso de esta nueva funcionalidad en Smart Collections de LR2.0 crea una serie de filtros basados en Smart Collections que pueden ser customizados para el workflow de cada quien.

image

Para alguna pregunta dejen un comentario en el blog...

Wednesday, August 27, 2008

Tips on...<Panning>

Select a location

You want a location that offers a relatively homogeneous background but not a solid color. A bald white sky wont show paning streaks.

The background can be a hue of colors with a dominant one or a mix of colors, but look for a palette that contrasts with the subject

Avoid isolated vertical objects such as telephone poles, with vertical energy that will break the flow of the panning

Select a position that allows the subjects line of travel to be roughly parallel to your cameras imaging plane

Use your whole body

Start by aiming your feet where you think the pan will end. Next from your hip, twist to point toward the oncoming suvbject. AS your subject passes by simply unwind around your body's center of gravity. Panning happens in the torso, your arms, wrists and hands are stationary.

Hold the camera level and as tight in as possible, dont move your feet.

Practice untwisting in advance, and as your suvbject approaches try to pick it up before opening the shutter

Set the shutter speed

Its critical to use shutter priority or manual,. Shutter speeds can range from 1/125 down to 1/8 secs depending on the spoeed of the subject. The slower the shutter speed the more dramatic the shot but also the fewer successes you will ge.

For cycling 1/15 or 1/30 should be good.

Set an ISO that provides good exposure at one of those speeds.

Turn autofocus off

Pre focus manually on the subject's mark

Shoot in continuous mode

Fire off as many shots as possible during a single pass of the subject

One reason to use manual instead of shutter priority exposure is to ensure that the exposures in these sequences will match

If subjects are still not sharp here are some other tricks

Set a higher shutter speed

Hold the camera tight bracing your elbows against your body

If you use a wide angle lense and get in close to the action you will increase your chance of success. Also both to sharpen and to open uo your subject, pop a flash

del.icio.us Tags: ,,,

Tips on..<Time of the day (Urban)>

Dawn

The cold blue light of dawn is extremely complementary to urban landscape shots, accentuating the steely exteriors and the smooth glass facias, This soft light is great for shooting images that yo dont want over-ridden with shadow.

Check the weather forecast and pack your gear the night before instead of crashing around in the morning forgetting stuff.

Meter for the sky to maximize colors which will also maintain the rich hues.

A warm up filter in a color such as coral will also help create a sense of vibrancy in your shot. Obviously at this time you will face less hazel from security guards and police so make the most of this time. And make sure to bring a tripod

Midday

At midday the sun is at its brightest and creating harsh shadows. Use this to your advantage creating a contrast punchy look where the highlights and shadows conflict. Make sure you select your WB for a daylight setting and meter carefully for the midtones. Bracketing is a particular important at this time in the das as it might only be a matter of stops between a flat washed out image and a really striking one. To darken the blue lights bring a polarizer. This i also a great time to go inside the buildings and look for details and capture abstract shoots of things like foyers or office blocks

Nighttime

This lends itself to the more creative appraoch enabling for long exposures, lighting effects and reflections.

Riverbanks are a great location to capture city scapes as the reflection of the lights on the water creates a double impact.

Nighttime is about making the most of shapes and silhouettes, rather than intricate details, so cast an eye across the skyline for strong outlines and forms.

Usually the most dramatic ones are captured just before nightfall when there is still a touch of color in the sky

del.icio.us Tags: ,,,,

Tips on... <Urban Landscape>

Early bird catches the worm

Prospective perspectives

Your perspective should differ depending on the shape and form of what's before you. For square buildings try to shot at a 40-60 degree angle to avoid a flat image, for domes or curved shapes its important to feature some background in order to the viewer to appreciate the form

Up and coming

Should not only be dedicated to the built environment, take a look around you and see what's happening construction wise. Documenting a building going up can make a for a great addition to your portfolio, while renovations are always an interesting subject to shoot

Permission to shoot

Be aware that many places require you to possess a licence before you can shoot on its grounds. Just like a model release form these building release forms cover how the images will be used and determines who holds the copyright. You can often negotiate to exchange images in return for a photo pass.

Angle attack

The best way to find new approaches to shooting well known buildings is to approach them from all angles, Search for unusual features or crevices that are rarely seen in the usual publicity shots of that place, and go in from that angle instead. Look out for patterns, reflections and textures to really bring out the buildings characteristics

Once you have found a location the next stage is being able to approach your scene in a variety of ways photographically, playing on perspective, viewpoint and light. Look for places that will look great close up as abstract images but also will produce impact as a full frame image

Some prefer to shoot from a distance some prefer to accentuate angles and other shoot for pattern or repetition.

Place yourself where the reflective rays do not directly shine onto your lens, or else your images will be a complete whitewash. Sometimes a polarizing filter will help you manipulate reflective scenes to your advantage. It will enable you to suppress subtle reflections and darken any blue sky mirrored in the building's glass.

Many prestigious buildings will be flood light at night, which represents some challenges, The bright light coupled with harsh shadows makes it a tricky subject to choose. Underexpose then tweak if needed. Is better also to bracket your shots. Find a midtone and then use spot metering

Panoramas

Lens selection

Opt for a standard len to ensure threre is no distortion, Wide angle lenses are more susceptible to this than normal lenses

Steady now

Choose a tripod with a panning head to ensure a smooth transition that is level and lined up correctly for each shot

Shoot in line

Being taking your shots starting from one side and progressing to the other. Make sure you overlap your last shot by a third each time, to ensure they line up afterwards.

Make it merge

Upload your shots in Photoshop or a similar program. No matter the program, some editing will be required to make the images match

Use manual

To ensure that no readings are changed between lights, such as fstop, shutter speed, etc that could alter one of the shots you can use and make it look different from the rest

del.icio.us Tags: ,,,

Tips on...<Travel, Creative>

Unforgettable Images..travel

Heading off the beaten track is a guaranteed method for limiting your chances of cliched travel images, but remember that in this day and age you would have to be very quick to snap something that hasn't been photographed.

Boosting creativity

  • The use of unusual perspective is an obvious option for boosting creativity. Getting down low with a wide-angle lens of 24-42mm will give an extreme edge to any landscape, as will using a fish eye lens which will work to distort the trye dimensions of the scene in front of you
  • Timing of photography is another key factor in determining the result image. You could for example wait for what is assumed to be a remote untouched location to become swamped in rush hour traffic and then shoot for impact.

In detail

  • Homing in on small details is a superb stylistic point in many travel photography portfolios, whether it happens to be the people, a street sign, local product or something that springs to your attention just as you are about to the press the shutter button. Something as simple as a door knocker, a plate of food or even a ceramic tile provided it is photographed well and in focus, can reveal a lot about a different culture

Avoid the crowds

Get up early, the light is fantastic at sunrise.

Create a contrast

Always use a lens hoodon your camera lens. This way you will avoid flare and create better contrast in your photos, specially on hot sunny locations

Back Up

Remember to back up everything you shoot at least twice. If not you run the risk of losing your images.

Get involved

Aim to be part of your photographs specially when you are photographing people.Get them to react and relate to you and your personality and you will find creating unique pictures comes easier

del.icio.us Tags: ,,

Places I've shot in