Showing posts with label camera. Show all posts

Saturday, August 29, 2009

Olympus EP-1 Walk about Dublin

I just shot my first video with the recently released Olympus EP-1 camera. I purchased it in the US trough Amazon.com, visit the link to see the kit that includes the 17mm f/2.8 and the Olympus Optical Viewfinder.

I decided to go for the 17mm lens as I already own several wide angle and telephoto lenses for other Olympus cameras so I am eagerly awaiting the 4/3 converter in pre-order also in Amazon. Not sure if all sw functionality will be available trough the converter but we will see.

I am looking at this camera as a way to have a high-quality point and shoot when I don't want to haul all my equipment and long lenses for a few quick and dirty shots, so downgrading from SLR to this is a though proposition but I can see how somebody trying to upgrade from a regular point and shoot can be more than pleased with the high quality shots u can get out of this baby.

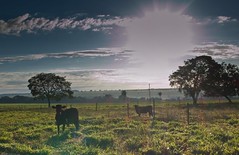
After taking the camera to its first trip, here is what I have to say…

The good:

  1. It shots on RAW (there are still no converters for Lightroom but Adobe has come up with a beta version of camera RAW that can convert the EP-1 files into DNG so then you can manipulate anywhere. Follow this thread to get the download of Adobe Raw RC 5.5 which will allow the conversion of .ORF from the EP-1 to DNG to be used anywhere including LightRoom.
  2. Feels very sturdy with the metallic body
  3. Viewfinder is great where the sun is out (not very common in Ireland) and you need to take a shot
  4. Fast autofocus
  5. The 17mm 2.8 lens is pretty fast
  6. Good video quality, even in low light
  7. Art filters are fun to use both with video and stills
  8. Very original, retro look
  9. Is fun to use the same concepts of still cameras to video such as f-stop, ISO, etc.
  10. iAUTO mode pretty accurate on the settings
  11. Large, nice big display on the back. Wish my E-3 had something similar
  12. Level is very useful when shooting trough the LCD, gives you a good idea how straight your shot will be
  13. Very impressive quality on high-ISO (for an Olympus) I think it has better quality shots at ISO3200 than my E-3 or E-30
  14. Using the SanDisk 32GB memory card the writing of both RAW and Video happens very smoothly and quick. I can record video, switch to camera without even noticing
  15. The feature to take a still at the end of the video comes pretty handy
  16. Can control aperture when recording video

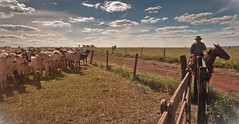
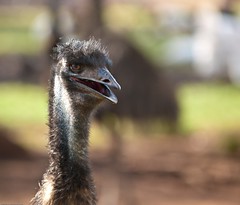
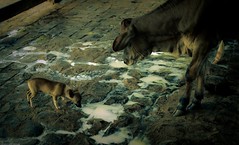
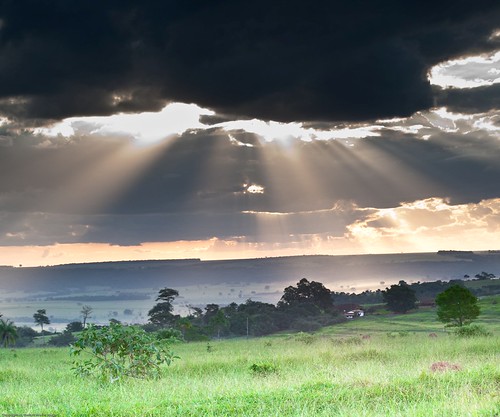
I have never shot video (as you can see on the quality of the footage, but this will give you an idea of the quality of both stills as well as video).


Things to improve on 2nd release:

  1. When using art filters autofocus takes quite a while
  2. Video with some art filters can be a little jerky (slow motion kind of look)
  3. For a small camera it feels heavy, heavier than the Oly E-420 if comparing just bodies
  4. Strap seem a little heavier and gets in the way of shots
  5. Would it have been nice to have a wrist strap as well
  6. Small lens cap for the 17mm is too small without any attachment to the camera, I am sure I am bound to lose it
  7. SW takes a little bit to get used to even if you use Olympus cameras, the dial on the top and on the back to access and manipulate various controls can be confusing or not very intuitive at times.
  8. For the price, they should have included some screen or camera pouch!
  9. Not having on the screen or the viewfinder the focus points being displayed can be very challenging when trying to use autofocus or MF.
  10. Video sound is OK, as soon as the lens needs to autofocus the sound of it can overtake ambience sound, very bad issue I think

Sunday, July 19, 2009

Bull Island Seals Dublin Photo shoot

Bull Island is located just south of Howth, around a 10 min drive from Howth harbor. It is a nature reserve, so make sure to follow the rules listed there. In order to find the seals you need to park on the northern part of the Island (Second bridge if you are coming from Dublin)

Park your car in the sand parking lot, and get ready for a 20-30 min walk. Here is a quick map on where you will find the seals my location is marked with the purple marker.

For Olympus RAW file usage with GPS I recently discovered GeoSetter, great tool that can work with the .ORF files, write the .xmp card or directly into the file to accommodate GPS data. Highly recommended.

Funny enough this map shows the exact GPS location where I was located, but bear in mind that the tide changes, so that area could be covered with water any other day, but I have been there 3 times and the seals are always located on the northernmost corner of the island, but not all the time laying on the sand, which was the shot I was looking for. After a couple of tries, here is what I managed to get prior to this day..just a few head shots.

I believe that in order to get shots from the seals outside of the water there must be a reasonable amount of sun and a low tide, this last time I went was around 9AM, so I dont think the hour in the day matters that much.

My Gear:

  • Olympus E3
  • Olympus E30
  • Zuiko 50-200mm 2.8
  • Zuiko Teleconverter 2X EC-20
  • Hoya Polarizer Filters
  • Lowepro FastPack 250
  • Wind resistant pants and jacket
  • Wellies

    After a good 30 minute walk,  and depending on the tide you will find the seals at the northeast corner, approach very slowly and be very careful of the sand. I misjudged some weed and sand banks and went right in all the way to my knees covered with weed,sand and I am sure smell liked shit.  Once you are 50-75 meters away from the seals lay down on the sand, take your gear out and start approaching them by dragging yourself trough the sand, if the seals see something taller or something similar to a human shape they will dive right into the water.

    Take a few shots and get closer, make the seals comfortable, and then get closer again, if some of them get scared and dive into the water stop immediately, stay still for a few minutes and move again. I saw a group of 15-20 seals but as I got closer and the tide rose few and few seals remained.

    Use your bag as a bean bag and start shooting, I used Shutter and Aperture Priority Mode, low ISO (100) and a polarizer filter. I tried some shots with the tele-converter but I thought I was sacrificing too much sharpness, so decided to get closer and also crop some of the images to close-in the seals.

    Being gray seals, the metering system will struggle with the light measuring of both the harsh light reflecting on the sea and the dark features on the seals faces, so compensated with EV+1 to bring some details on the face, or try and fix on post processing.

    Puppies are very curious so they are the ones that will be the most active and will get closer to you, but be careful in never getting between the puppy and the mom, as they will feel threatened. Also as some seals go in the water be aware always of where they are, they can come out behind you and you dont want to be too close, a seal bite can be very nasty and have lots of bacteria in their mouths that can cause a big infection.

    I lost a very good shot of a fight between 2 adult seals. If you see a seal approaching another one, and their heads are close to each other,  one of them will open its mouth that’s the beggining, put your camera on burst mode and do some manual focusing as you will see a fight that will only last for a few seconds.

    Always be mindful of the tide, if you think that the waves are getting closer and closer you are right. Usually the seals are on a spot higher than the tide, that means that if you are not careful you will end up on a little sand island surrounded by water that is rising, believe me I was stuck once and had to walk with water up to my knees hauling my gear, hence the wellies. Once you get home, clean your equipment right away, there will be sand between the extension part of your lenses and all around the buttons, even though the E-3 is weather sealed, clean this with an air brush as you dont want corrosion. For your bag, wait for the sand to dry and then shake all the sand off, there will be a lot of sand accumulated on the back area of the backpack that you wont see but once it dries it will come off rather easily. If you want to see the whole set of pictures visit my site at flickr here..

  • Saturday, July 11, 2009

    AIB Street Performance World Championship

    During the month of June (18th to 21st) there is an event in Dublin at Merrion Square sponsored by AIB that brings together street performance from all over the world. You can visit their website here, and follow them on facebook as well.

    I didn't manage to get many shots but was able to get a couple of good pictures, here are some tips on the event if you want to try it next year .

    First of all bring a telephoto lens, unless you are looking for a specific shot a wide angle lense might not do you much help as the crowds, sun might make it hard to get a good photo.

    Plan in advance what you want to see, as for location, here is a good tip: get there early, is very crowded and not much space to move. Here is a piece of good advice, locate yourself in the corner of the park marked below, it has a grassy hill that people use as a seating area, if you get there early you will be able to get clear shots of the show. The green arrow shows the corner of Marrion square where you should be position yourself. Download the schedule and wait for the show you are interested to arrive there, across the 4 days all shows would have hit that single stage.

    image

    I was able to get clear shots of a couple of acts such as these:


    As always in Dublin, be prepare for the rain, the organizers will provide ponchos for the crowds to use as seat covers for the wet grass, but bring something for the camera.

    Once the shows starts, crowds start to gather, pay attention not only to the performer but people’s reactions make for great candid shots.

    If you are interested on the whole photo set visit my site at flickr

    Sunday, April 26, 2009

    Photoshoot near Quirianopolis, Goias, Brasil

    I managed to take a week off while in Sao Paulo to go visit the Fazenda Engenho São Francisco near Quirianopolis. Here are my tips and mistakes made while shooting pictures in a farm.

    Here is the equipment taken

    Here was my journey:

    image Ireland to Brasil
    Map picture
    then to Goiania and Quirinopolis in Goias State
     image


    Fazenda Engenho São Francisco  (click on the link and zoom in you can actually see the cattle)

    BTW for Olympus RAW file usage with GPS I recently discovered GeoSetter, great tool that can work with the .ORF files, write the .xmp card or directly into the file to accommodate GPS data. Highly recommended.


    Most Important tip…

    Always talk to the person that runs the place day in and day out. They will give you good tips around the behavior of some of animals, which ones are approachable, and which ones to be careful (I managed to piss off a cow with her calf and it wasn't pretty)

    Bola and cattle

    Learn beforehand what kind of animals will you get to see (in my case was mostly cattle but managed a nice surprise to see exotic animals.

    Emu look

    For cattle, learn what type of cattle it is you will be seeing, behavior will change depending on the breed and how is managed by the ranch.

    The gang

    If you want cattle to get close to you, as I wanted a very low close-up shot of some grown cows or bulls you need to get into the containment area, get down or sit down on the floor and wait. Cattle can be very curious and only takes one to come closer, for the other ones to follow. Be very careful once they are close, sudden moves can make them jump (very high) and you don't want to get stomped or worse your equipment be crushed

    Courious calf

    Clothes: depending on where you are going, will vary your clothing, but regardless of weather bring very old dirty jeans. If you can manage some cheap boots do as well, as you have to be ready to step, kneel and sit on cow dong, piss and milk and dirt. Same goes for your camera bag, be ready for it to get dirty and gnawed by curious calves

    Spilled milk

    Bring your equipment for landscape photography, either on hills or flat land ranches tend to be in open spaces and you can capture great sunsets, sunrises and cloud formations.

    Storm in Sta Cecilia

    Get up early, not only because of the great light during that time, farm work starts at 5am the animals are quite awake and is the time before a lot of the cattle is being driven to eat at the grass lands. Also in the case of Brasil is when you can manage best to carry all your equipment with the sun.

    Sunrise

    If you get to ride a horse: Taking pictures on top of a horse is not so hard if you: a) Have IS on your lense or the camera 2) Shoot either using manual or at least shutter priority mode. The faster the horse, the faster the shutter speed if you want sharp images.

    Find out what other ranches around the area you are visiting. We managed to visit a neighboring ranch that sells and raises exotic animals and manage to get great shots. They were very nice and let us walk inside the containment area and take our time on getting to know the animals and wait for the best shots.(So here is a free commercial  :) )

    Also depending on where you are you might manage to view animals not very common to your area, I was very intrigued by Pipoca a cateto pork which tend to be very mean, except him.

    Amigo Pipoca

    Missed opportunities:

    Some of the shots or things missed:

    Not all the cattle behaves the same, while buying and marking some recently purchased cattle, a bull wouldn't come into the containment area, 4 workers chase after him but he managed to jump a fence of at least 1.5 meters, it would have been a great shot.

    I should have brought my Manfrotto tripod I missed some good sunset and late opportunities because of not bring it. I have the 190X which is not too heavy but maybe I should invest on a gorillapod or at the very least a smaller tripod I can travel easier

    I was so concentrated on the cattle, that I missed some good opportunities for portraits with the workers at the ranches. Brasilians tend to be very open on getting their picture taken and the clothes they wear are very distinct and interesting and could make great portrait subjects.

    Fazenda hands

    Same as above, make sure to take pictures for remembering the trip, take pictures with family and friends, not everything is about getting the best shot.

    See the rest of the shots here

    Tuesday, September 9, 2008

    Motocross racing

    Motocross Racing

    One of the big advantage o this sport, is that you dont need special access to get close to the action, therefore a regular kit zoom can do most of the time to capture great images

    Every race usually comprises of a few practice sessions in the morning, followed by a race in the afternoon

    Focusing

    Getting sharp shots of fast moving motorcycles can be very difficult. AF mode is okay if you can keep the focus point positioned on the bike before you taker the shot, or if they are going slowly. In more difficult situations such as shooting the bikes head-on over jumps; its better to use manual focus to get sharp results at the top of the hill. This takes practice to get the hang of, but allows you to get shots that auto focus might find impossible

    Viewpoints

    Choosing the right viewpoint will make a massive difference to any sports and action shots. Rather than simply stand where you can see the action ,look for vantage points where the background doesnt detract from the main subject. For uncluttered backgrounds, try finding a spot where you can use the sky or track as a backdrop, to concentrate all the attention on the subject

    Protect your kit

    Even in good weather motocross bikes are going to send plenty of dirt mud and slut your way, so you need to protect your kit. A towel or dry cloth is handy for throwing over the camera while you are not using it, and also for wiping off any gobbets of first that end up on the body of the camera. In very bad conditions it might make sense to use an entire rain cover for the camera

    One good thing to do is to get familiar with curse, look at where the sun will beat the time of the race so that you dont get too many shots with the highlight of the sun on the bikers, also look after practice for the little canals that the riders leave behind, since they will tend to reuse those over and over when they hit a curve, you can choose a spot close to that as this will be an indication of where the riders will be going trough

    One good location is to choose a jump area, sit there and wait for the bikes to come into view, use Shutter Priority Mode or Manual, focus manually on the top of the rise and set your shutter speed to 1/1000 second. this should freeze the action on the jump

    Another good location as well is standing slightly above the track around the bends on the corners of the circuit. You can get away with using a smaller lens, 18-70mm as the riders will be much closer as well as they will be slowing down to take the curve, this viewpoint will provide you with a much better backdrop of the dirt. Here with the new speed of the bikes you can go down to 1/125 secs you could also use flash to help you freeze some of the movement.Also try your panning technique.


    Sunday, September 7, 2008

    Macro (Flowers)

    Shooting flowers (Macro)

    Don’t start snapping the first flower you come across. Even if you re standing on a field full of them, take the time to seek out the specimen that offers the best photographic potential, wether that is due to the quality of the bloom or its location

    Once you have found the flower in its prime, explore the subject from all angles to find the shooting position that delivers the best composition

    While your flower will be the central subject if your image, the background will play an enormous  role in the final success of the photograph. In any floral image, the background or surroundings will fill a large proportion of the frame. This isn't just empty space to e ignored, its an integral part of the picture. Your key decision will be wether you want to capture the flower in content and therefore present a clear view of the surroundings trees, plants and foliage or wether you want to focus on the flower in isolation.

    As a general rule of thumb a close up fo individual flower using a macro lens will demand an unclutered background so that nothing distracts from the shape and texture of the flower itself.

    Direction

    If you are shooting flowers have been shot with the sun falling on them from the front. The results gives highly saturated colors but an element of flatness in the picture, and texture will be sacrificed. Alternatively standing so that the sunlight hits your subject from the right hand side will mean you get more textural detail as the beams skim over the petals from an angle. You will get a more interesting though uneven shot. For an even more dramatic effect, opt for backlighting. With your subject positioned between you and the sun, the delicate nature, the spines, hairs and translucency of your flower will be emphasized because of the light shining trough the petals from behind. Ultimately this works best on subjects with a translucent quality, such as buttercups and poppies, giving an etheral effect. Keep the background darkest than your subject and take the meter reading from the shaded side of your subject for a more even exposure

    Reflect and Diffuse

    The type of reflector you use in your outdoor photograph will have different effect on the end result. Careful arrangement of home-make white card reflectors or professional reflector sheets will bounce crucial light back into areas of shadow to get a more creative and controlled end result

    Using gold reflectors on the other hand will imbue a warm cast over the frame for a summery effect. For a particularly dreamy image, and to take the edge off bright sunspots so as not to burn out plate flowers, position a diffuser in between your subject and the subject to soften the lighting. Tracking paper acts as an efficient diffuser material, the closer your position to your subject, the brighter the appearance and the higher the contrast.

    Use your knowledge

    Your skills as a photographer will grow if you use your macro work win conjunction with another area, anywhere you have inside knowledge that gives you an insight into what would make a good image and the spur to work at it

    Learn patience

    Macro iis not the immediate gratification type of photography. There will be successes and failures but you lean from both

    Equipment

    Dont make equipment or lack of it an excuse. After all, you wll only need good lighting and Aperture Priority Mode.

    Have respect

    The welfare of living things is of paramount importance. Lean all you can about the things you photograph


    del.icio.us Tags: ,,,

    Tuesday, September 2, 2008

    The Best Camera Bag Ever...

    Think Tank Rotation 360

    Think Tank is a company that makes photo accessories focusing more on bags, cases and they proud themselves by being the brand that a lot of professionals use. A lot of their bag designs take into consideration input from professionals either sports photography, nature, etc. I will tell you right now, that they are pricey, very pricey but as you will see in my view they are worth the $$.

    They have a lot of models for carrying on the field, bags for transporting equipment on airports, etc. I wasn't specifically looking for another bag, but the Rotation 360 caught my eye.

    The bag is a very comfortable backpack which it also has a waist buckle. This becomes a deep "fanny" bag that rotates by detaching itself from the main body of the backpack. This rotational bag is very deep and can hold a lot of stuff. You can put lenses, batteries, filters without having to remove it, making access to your equipment much, much easier, better and more comfortable that a slingshot concept. The other major differential for this bag is that it can be enhanced with different attachment containers that can be used to stored extra lenses, filters, etc. I bought an expandable digital holster that can be attached to the bag belt. There are other minor features that are great, the construction is outstanding (zippers, Velcro, etc) other than that is a common backpack.

    Setting up the bag

    The camera has some features that require some setup, but they are great.

    Camera strap: The bag comes with a special camera strap. So in order to use the camera support strap on your back pack, you need to use their camera strap. The camera strap is comfortable, it has some rings that allows you to attach it to the backpack for support.

    Camera Support Strap: These are a set of 2 snap clips that go into the shoulder straps in the bag, this takes 2 minutes to setup.

    Attaching One Camera: Basically you put your camera around your neck, use the snap clips on the backpack to clip to the rings on the camera strap. This allows your camera not to hang, or jump around giving your hands some freedom of movement.

    Attaching 2 cameras: Same approach as before, you can attach one camera a single support strap on one side, and another camera on the other.

    Hold down strap: the camera also comes with a strap that can be attached to the buckles on the shoulder straps. This long lens strap joins the shoulder straps together so when your camera is hanging on your chest you put this hold down strap over the camera forcing the lens to point downwards.

    Loading the bag.

    The bag can hold A LOT of equipment. Here is a list of what I was able to carry:

    Top part:

    After arranging the strong velcro dividers here is what I was able to put in:

    Olympus E3 Flash FR-36 2.0X Teleconverter
    Energizer Batteries Set of Filters (Polarizer different sizes) Zuiko 50-200mm 2.8 lens
      IMGP1100  

    Front Bag

    Cokin ND filters ND filter attachment rings Storm Jacket
         

    Rotation Bag

    Olympus 410 with 8mm Fish eye lens attached Sigma 30mm lens Zuiko 11-22mm lens
    3 Tripod quick release plates Camera Batteries 2 pouches with memory cards
    IMGP1106   IMGP1107

    The camera has a rain cover that wraps the entire backpack around, and finally you can comfortable set a tripod with a buckle on top of the bag and using the net pocket at the bottom of the bag.

    Now, I didn’t use the expandable holster which can fit my

    Sigma 50-500mm.

    I did not manage to fill up the bag, specially the top part, which could fit still a lot more small stuff like cable release, levels, etc.

    IMGP1105

    Hauling the bag around

    The bag is very comfortable to carry around. I took it out of for a 3 hour spin and my back or shoulders felt great. Obviously the best thing is the waist bag. Here is how it works:

    Once you have de attached the bag buckles that holds it in place, you need to pull this strap from the bag waist belt which shifts a velcro IMGP1109 mechanism in place inside the bag. This allows the free motion around the waist allowing the bag to rotate to the front. Once you have done this, you have free access to the waist bag that opens with a zipper. You can use this bag for easy access to reach lenses, another camera body, batteries, etc.  In order to put it back you just need to pull this lock strap again to the lock position (this makes the velcro inside the body bag to appear again) and push the waist back with the handles back into position "shake it" a couple of times so the velcro attaches again, and you are good to go.

    The only thing missing from this bag is the capability to carry a small laptop, but overall is the most comfortable, better built camera I own. Is great for long photo walks, nature and hauling equipment for any event.

    del.icio.us Tags: ,,,

    Places I've shot in