Showing posts with label action. Show all posts

Sunday, July 19, 2009

Bull Island Seals Dublin Photo shoot

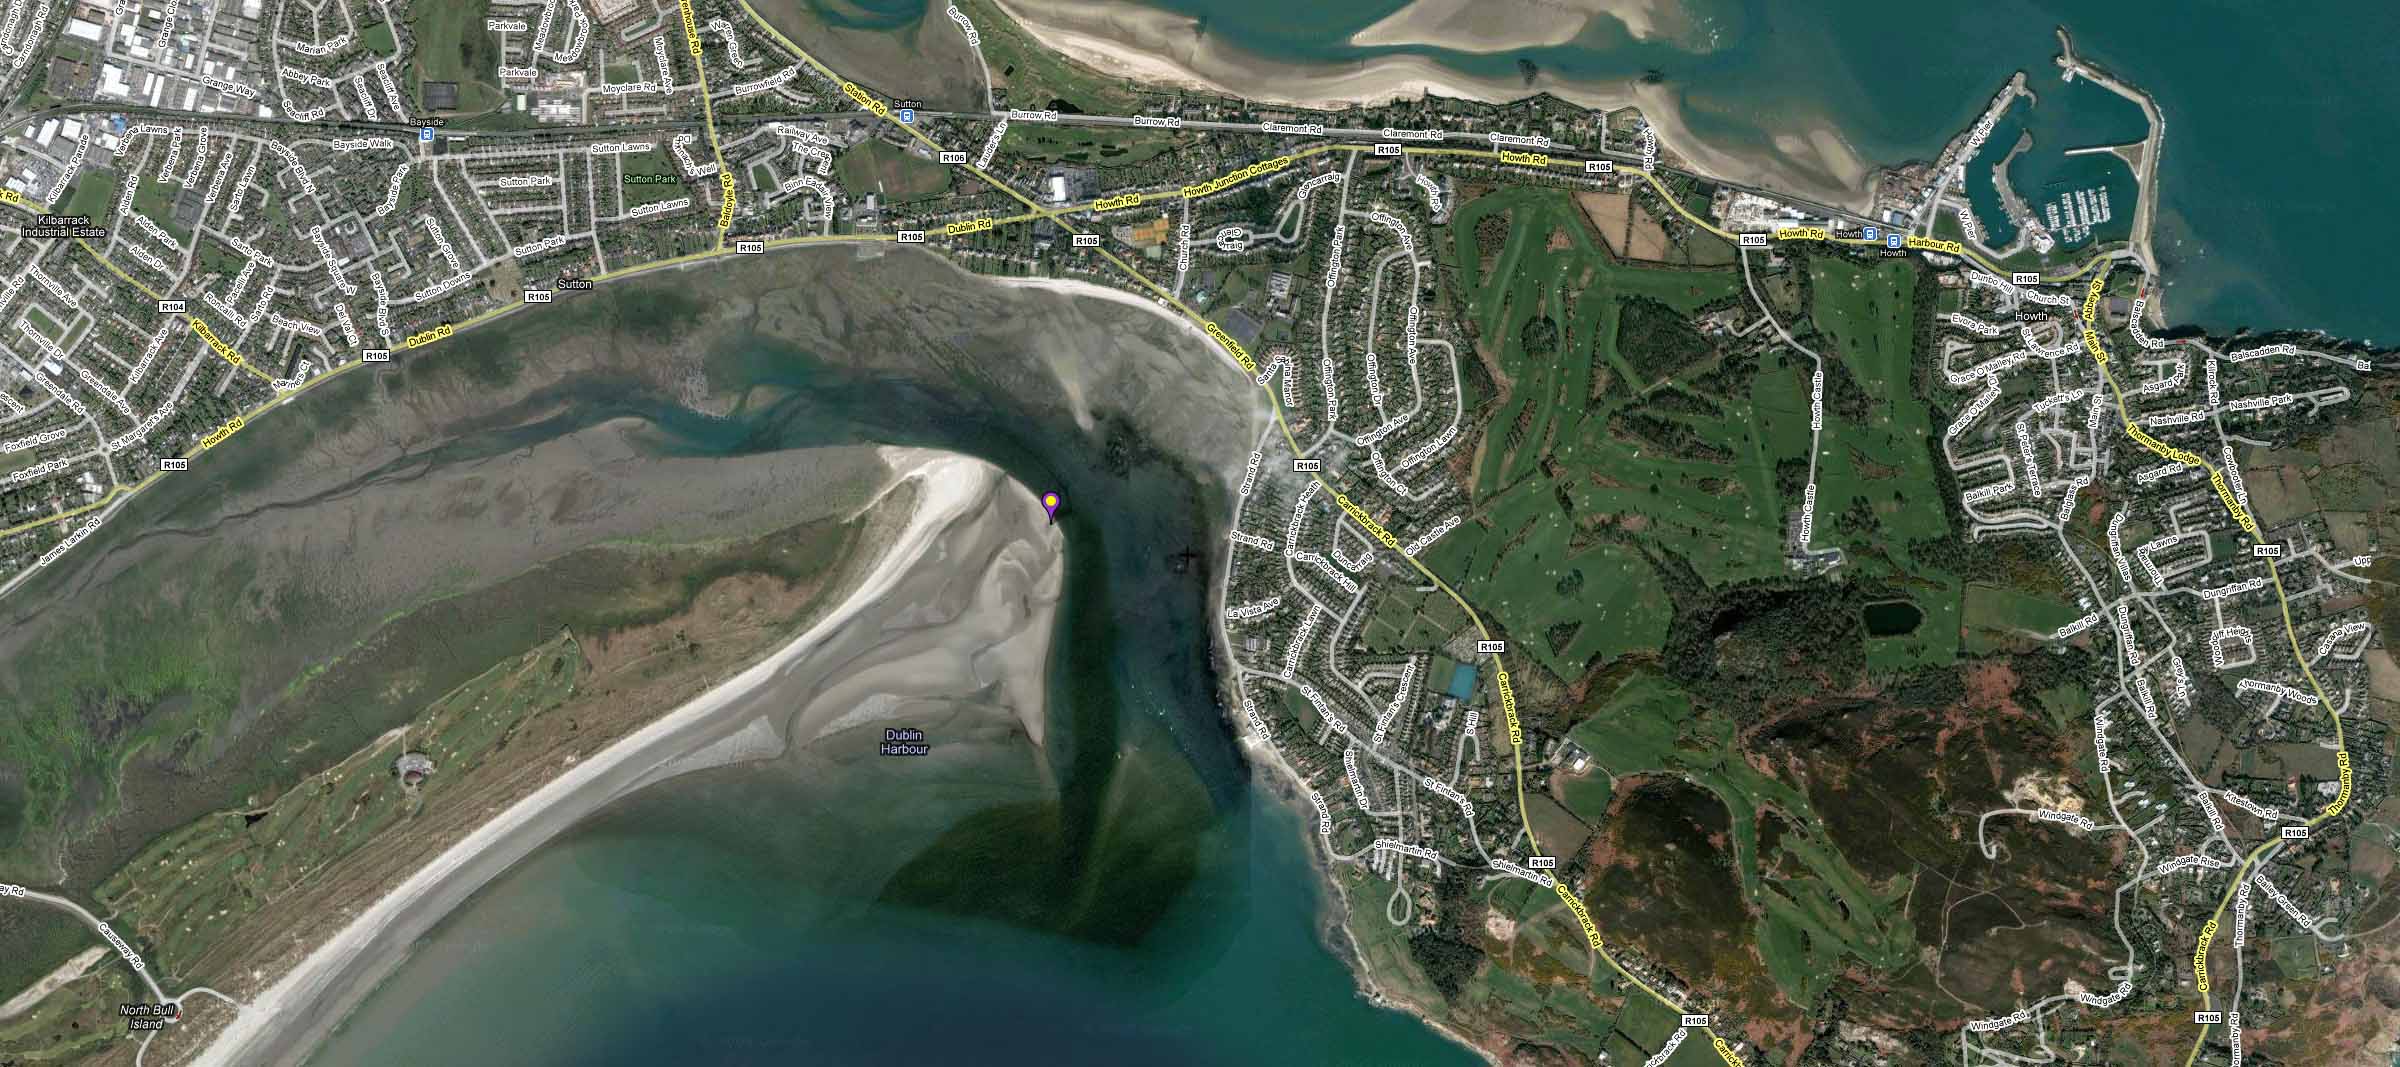
Bull Island is located just south of Howth, around a 10 min drive from Howth harbor. It is a nature reserve, so make sure to follow the rules listed there. In order to find the seals you need to park on the northern part of the Island (Second bridge if you are coming from Dublin)

Park your car in the sand parking lot, and get ready for a 20-30 min walk. Here is a quick map on where you will find the seals my location is marked with the purple marker.

For Olympus RAW file usage with GPS I recently discovered GeoSetter, great tool that can work with the .ORF files, write the .xmp card or directly into the file to accommodate GPS data. Highly recommended.

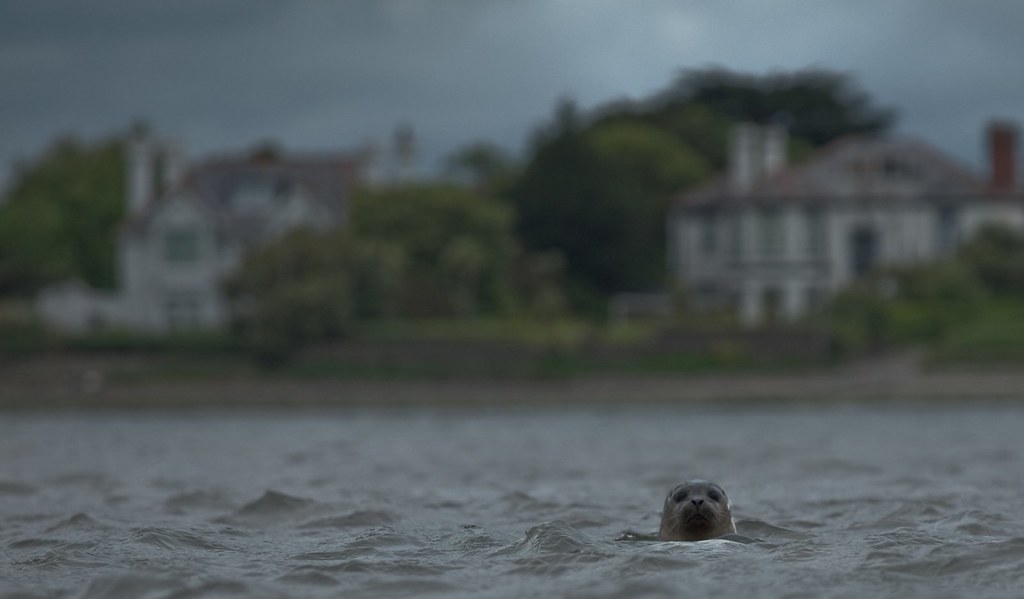
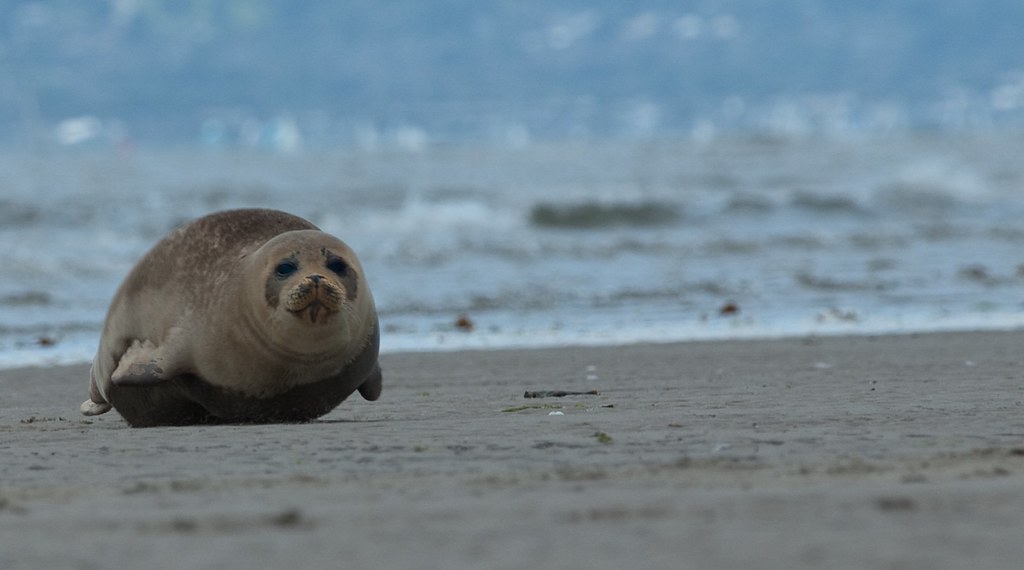
Funny enough this map shows the exact GPS location where I was located, but bear in mind that the tide changes, so that area could be covered with water any other day, but I have been there 3 times and the seals are always located on the northernmost corner of the island, but not all the time laying on the sand, which was the shot I was looking for. After a couple of tries, here is what I managed to get prior to this day..just a few head shots.

I believe that in order to get shots from the seals outside of the water there must be a reasonable amount of sun and a low tide, this last time I went was around 9AM, so I dont think the hour in the day matters that much.

My Gear:

  • Olympus E3
  • Olympus E30
  • Zuiko 50-200mm 2.8
  • Zuiko Teleconverter 2X EC-20
  • Hoya Polarizer Filters
  • Lowepro FastPack 250
  • Wind resistant pants and jacket
  • Wellies

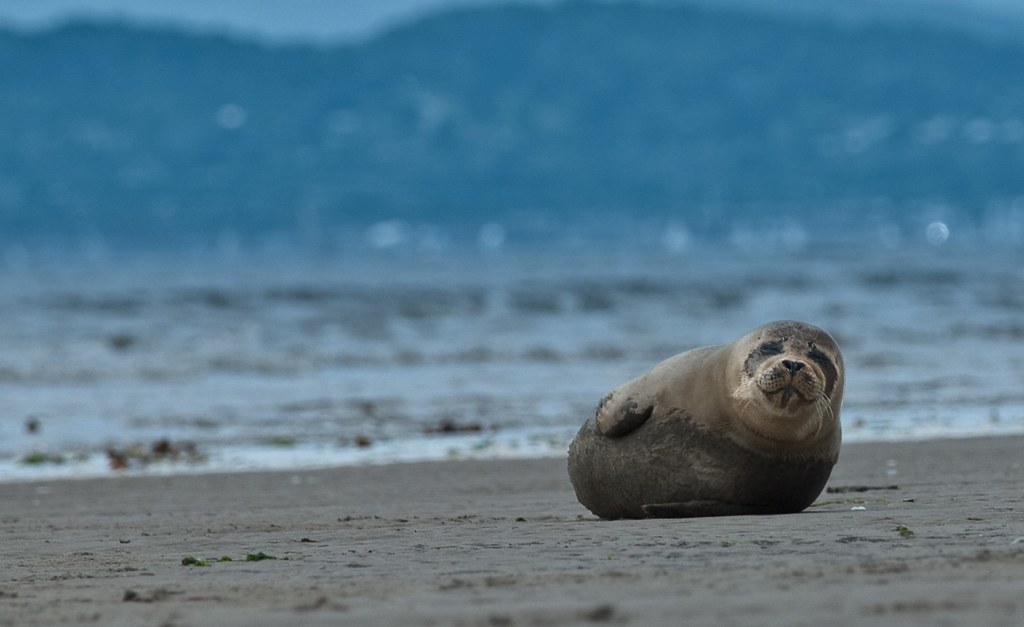
    After a good 30 minute walk,  and depending on the tide you will find the seals at the northeast corner, approach very slowly and be very careful of the sand. I misjudged some weed and sand banks and went right in all the way to my knees covered with weed,sand and I am sure smell liked shit.  Once you are 50-75 meters away from the seals lay down on the sand, take your gear out and start approaching them by dragging yourself trough the sand, if the seals see something taller or something similar to a human shape they will dive right into the water.

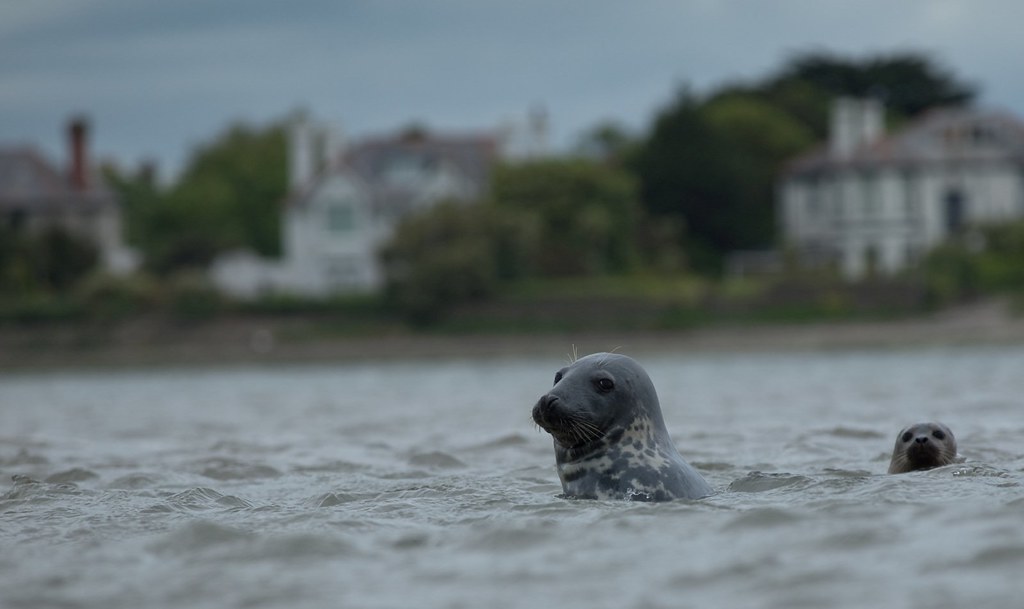
    Take a few shots and get closer, make the seals comfortable, and then get closer again, if some of them get scared and dive into the water stop immediately, stay still for a few minutes and move again. I saw a group of 15-20 seals but as I got closer and the tide rose few and few seals remained.

    Use your bag as a bean bag and start shooting, I used Shutter and Aperture Priority Mode, low ISO (100) and a polarizer filter. I tried some shots with the tele-converter but I thought I was sacrificing too much sharpness, so decided to get closer and also crop some of the images to close-in the seals.

    Being gray seals, the metering system will struggle with the light measuring of both the harsh light reflecting on the sea and the dark features on the seals faces, so compensated with EV+1 to bring some details on the face, or try and fix on post processing.

    Puppies are very curious so they are the ones that will be the most active and will get closer to you, but be careful in never getting between the puppy and the mom, as they will feel threatened. Also as some seals go in the water be aware always of where they are, they can come out behind you and you dont want to be too close, a seal bite can be very nasty and have lots of bacteria in their mouths that can cause a big infection.

    I lost a very good shot of a fight between 2 adult seals. If you see a seal approaching another one, and their heads are close to each other,  one of them will open its mouth that’s the beggining, put your camera on burst mode and do some manual focusing as you will see a fight that will only last for a few seconds.

    Always be mindful of the tide, if you think that the waves are getting closer and closer you are right. Usually the seals are on a spot higher than the tide, that means that if you are not careful you will end up on a little sand island surrounded by water that is rising, believe me I was stuck once and had to walk with water up to my knees hauling my gear, hence the wellies. 
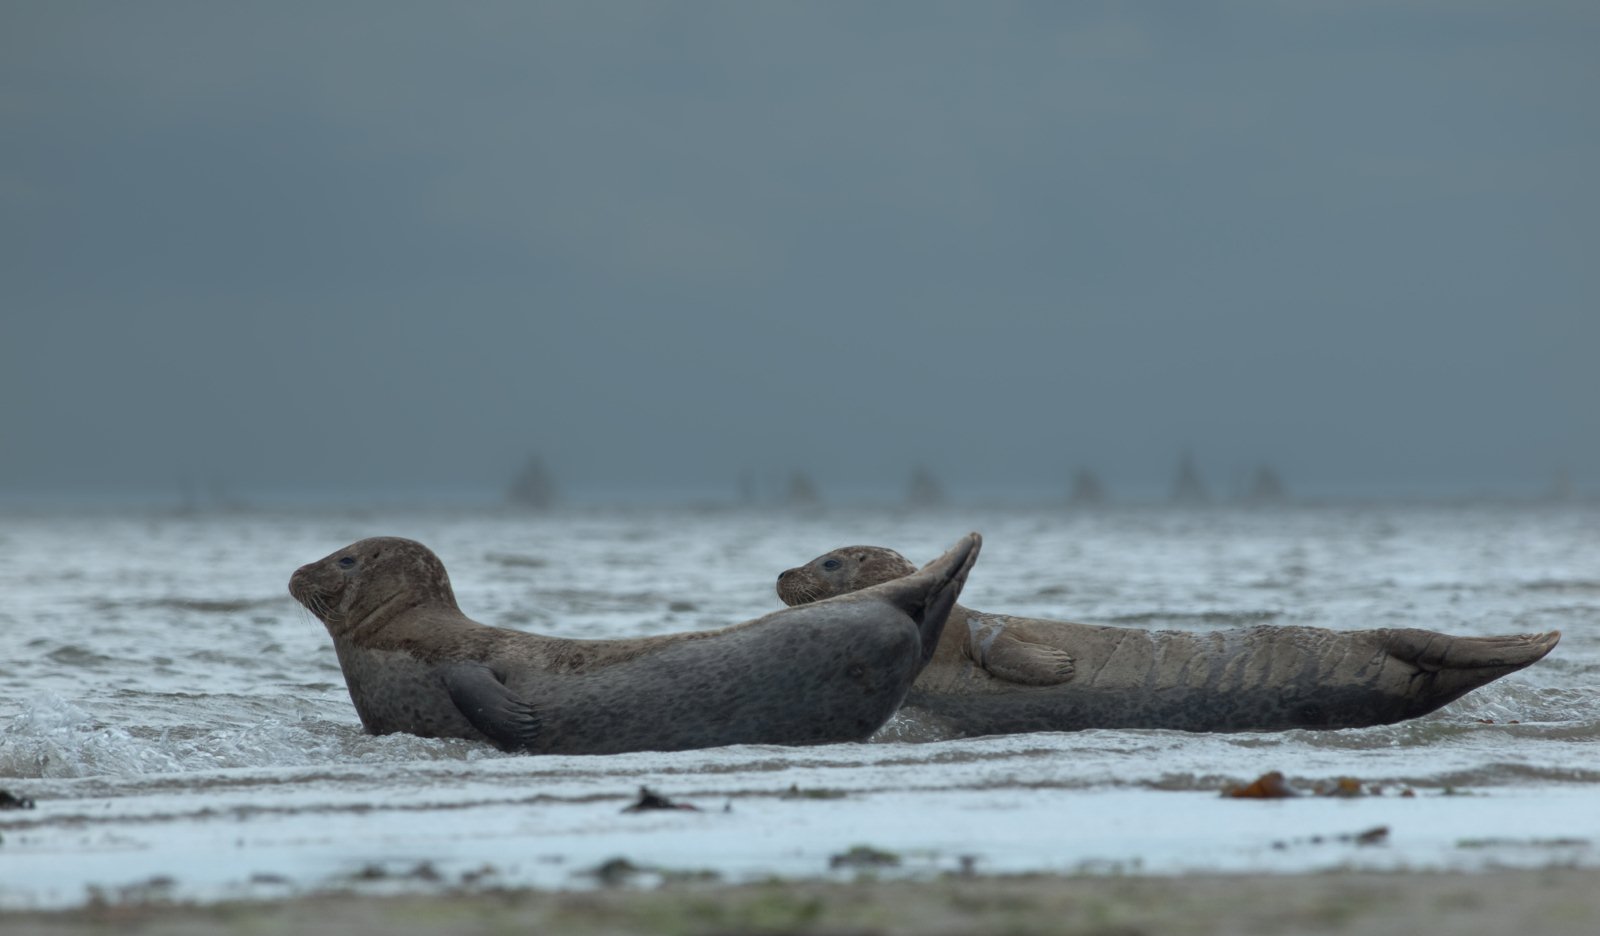
Once you get home, clean your equipment right away, there will be sand between the extension part of your lenses and all around the buttons, even though the E-3 is weather sealed, clean this with an air brush as you dont want corrosion. For your bag, wait for the sand to dry and then shake all the sand off, there will be a lot of sand accumulated on the back area of the backpack that you wont see but once it dries it will come off rather easily. If you want to see the whole set of pictures visit my site at flickr here..

  • Saturday, July 11, 2009

    AIB Street Performance World Championship

    During the month of June (18th to 21st) there is an event in Dublin at Merrion Square sponsored by AIB that brings together street performance from all over the world. You can visit their website here, and follow them on facebook as well.

    I didn't manage to get many shots but was able to get a couple of good pictures, here are some tips on the event if you want to try it next year .

    First of all bring a telephoto lens, unless you are looking for a specific shot a wide angle lense might not do you much help as the crowds, sun might make it hard to get a good photo.

    Plan in advance what you want to see, as for location, here is a good tip: get there early, is very crowded and not much space to move. Here is a piece of good advice, locate yourself in the corner of the park marked below, it has a grassy hill that people use as a seating area, if you get there early you will be able to get clear shots of the show. The green arrow shows the corner of Marrion square where you should be position yourself. Download the schedule and wait for the show you are interested to arrive there, across the 4 days all shows would have hit that single stage.

    image

    I was able to get clear shots of a couple of acts such as these:


    As always in Dublin, be prepare for the rain, the organizers will provide ponchos for the crowds to use as seat covers for the wet grass, but bring something for the camera.

    Once the shows starts, crowds start to gather, pay attention not only to the performer but people’s reactions make for great candid shots.

    If you are interested on the whole photo set visit my site at flickr

    Tuesday, September 9, 2008

    Motocross racing

    Motocross Racing

    One of the big advantage o this sport, is that you dont need special access to get close to the action, therefore a regular kit zoom can do most of the time to capture great images

    Every race usually comprises of a few practice sessions in the morning, followed by a race in the afternoon

    Focusing

    Getting sharp shots of fast moving motorcycles can be very difficult. AF mode is okay if you can keep the focus point positioned on the bike before you taker the shot, or if they are going slowly. In more difficult situations such as shooting the bikes head-on over jumps; its better to use manual focus to get sharp results at the top of the hill. This takes practice to get the hang of, but allows you to get shots that auto focus might find impossible

    Viewpoints

    Choosing the right viewpoint will make a massive difference to any sports and action shots. Rather than simply stand where you can see the action ,look for vantage points where the background doesnt detract from the main subject. For uncluttered backgrounds, try finding a spot where you can use the sky or track as a backdrop, to concentrate all the attention on the subject

    Protect your kit

    Even in good weather motocross bikes are going to send plenty of dirt mud and slut your way, so you need to protect your kit. A towel or dry cloth is handy for throwing over the camera while you are not using it, and also for wiping off any gobbets of first that end up on the body of the camera. In very bad conditions it might make sense to use an entire rain cover for the camera

    One good thing to do is to get familiar with curse, look at where the sun will beat the time of the race so that you dont get too many shots with the highlight of the sun on the bikers, also look after practice for the little canals that the riders leave behind, since they will tend to reuse those over and over when they hit a curve, you can choose a spot close to that as this will be an indication of where the riders will be going trough

    One good location is to choose a jump area, sit there and wait for the bikes to come into view, use Shutter Priority Mode or Manual, focus manually on the top of the rise and set your shutter speed to 1/1000 second. this should freeze the action on the jump

    Another good location as well is standing slightly above the track around the bends on the corners of the circuit. You can get away with using a smaller lens, 18-70mm as the riders will be much closer as well as they will be slowing down to take the curve, this viewpoint will provide you with a much better backdrop of the dirt. Here with the new speed of the bikes you can go down to 1/125 secs you could also use flash to help you freeze some of the movement.Also try your panning technique.


    Wednesday, August 27, 2008

    Tips on...<Panning>

    Select a location

    You want a location that offers a relatively homogeneous background but not a solid color. A bald white sky wont show paning streaks.

    The background can be a hue of colors with a dominant one or a mix of colors, but look for a palette that contrasts with the subject

    Avoid isolated vertical objects such as telephone poles, with vertical energy that will break the flow of the panning

    Select a position that allows the subjects line of travel to be roughly parallel to your cameras imaging plane

    Use your whole body

    Start by aiming your feet where you think the pan will end. Next from your hip, twist to point toward the oncoming suvbject. AS your subject passes by simply unwind around your body's center of gravity. Panning happens in the torso, your arms, wrists and hands are stationary.

    Hold the camera level and as tight in as possible, dont move your feet.

    Practice untwisting in advance, and as your suvbject approaches try to pick it up before opening the shutter

    Set the shutter speed

    Its critical to use shutter priority or manual,. Shutter speeds can range from 1/125 down to 1/8 secs depending on the spoeed of the subject. The slower the shutter speed the more dramatic the shot but also the fewer successes you will ge.

    For cycling 1/15 or 1/30 should be good.

    Set an ISO that provides good exposure at one of those speeds.

    Turn autofocus off

    Pre focus manually on the subject's mark

    Shoot in continuous mode

    Fire off as many shots as possible during a single pass of the subject

    One reason to use manual instead of shutter priority exposure is to ensure that the exposures in these sequences will match

    If subjects are still not sharp here are some other tricks

    Set a higher shutter speed

    Hold the camera tight bracing your elbows against your body

    If you use a wide angle lense and get in close to the action you will increase your chance of success. Also both to sharpen and to open uo your subject, pop a flash

    del.icio.us Tags: ,,,

    Tuesday, August 26, 2008

    Tips on...<Underwater Shoots>

    Develop basic diving skills

    The most important thing is buoyancy control,the ability to hold yourself steady on a floating position

    Shoot upward

    Photographing from below a subject makes it look large and real,shooting down makes it look smaller, and it can get lost on the background

    Shoot close

    Twenty four inches is an outside working distance. Water can suck up lighting, flash falloff is much greater underwater

    Shoot for small reflection in the eyes

    Catchlights are important for any wildlife photography but underwater are more important for dimensionality

    Choose a place and subject and work it al ot

    It can take many attempts to get a single good shot

    Respect your subjects

    Tips on...<Panning>

    Select a location

    You want a location that offers a relatively homogeneous background bnut not a solid color. A bald white sky wont show paning streaks.

    The background can be a hue of colors with a dominant one or a mix of colors, but look for a palette that contrasts with the subject

    Avoid isolated vertical objects such as telephone poles, with vertical energy that will break the flow of the panning

    Select a position that allows the subjects line of travel to be roughly parallel to your cameras imaging plane

    Use your whole body

    Start by aiming your feet where you think the pan will end. Next from your hip, twist to point toward the oncoming suvbject. AS your subject passes by simply unwind around your body's center of gravity. Panning happens in the torso, your arms, wrists and hands are stationary.

    Hold the camera level and as tight in as possible, don’t move your feet.

    Practice untwisting in advance, and as your subject approaches try to pick it up before opening the shutter

    Set the shutter speed

    Its critical to use shutter priority or manual,. Shutter speeds can range from 1/125 down to 1/8 secs depending on the speed of the subject. The slower the shutter speed the more dramatic the shot but also the fewer successes you will get.

    For cycling 1/15 or 1/30 should be good.

    Set an ISO that provides good exposure at one of those speeds.

    Turn autofocus off

    Prefocus manually on the subject's mark

    Shoot in continuos mode

    Fire off as many shots as possible during a single pass of the subject

    One reason to use manual instead of shutter priority exposure is to ensure that the exposures in these sequences will match

    If subjects are still not sharp here are some other tricks

    Set a higher shutter speed

    Hold the camera tight bracing your elbows against your body

    If you use a wide angle lense and get in close to the action you will increase your chance of success. Also both to sharpen and to open uo your subject, pop a flash

    Tips on..<Animals in Action>

    Have patience

    Eye contact

    • Good eye contact helps the viewer to make a connection with the subject, adding impact
    • Whenever possible try to get at same eye level of your subject
    • Make slow deliverate movements to ensure you are not perceived as a threat and wait until you see catchlights in the eyes

    Panning

    • Convey the feeling of speed as your subject runs or flies by your sreen
    • It will take practive, start by a shutter speed of 1/30, 1/125 seconds)
    • Prefocus on the sport where the creature will pass in front of you and fire the shutter.
    • Your settings will need tweaking according to the lighting conditions speed of the animal.

    Relieve stress

    • Make sure you give the animal time to relax, such as dogs. In case of dogs, let them be dogs before you start shooting them, play around with them
    • Once you begin if it begins yawning lor laying down he is showing signs pf stress and just needs to be a dog again.

    The right lens

    • Go for the fastest lense you can aford
    • Image Stabilization either on lense or camera can make a big difference
    • In some situations a monopod can help achieve sharp shoots
    • If you can justify the cost, a prime lense offers unrivalledmimage quality and sharpness

    Be invisible

    • For cerain species that are hard to capture, weate quite clothes in natural subdued colors, steer clear of perfurmed soaps and lay off afteshave the day of the shot
    • Use bushes and trees for cover or invest in scrim netting to drape over you and your camera, disguising your outline

    Add water

    • Any body of water can make great aditions to your photographers acting as a foreground interest or prodiving a reflective surface to add another dimension to your subject
    • Calm water often works best for reflections of wildlife.

    Aperture

    • A fast aperture may be necessary in dim conditions in order to maintain image sharpness, but shooting with your lense wide open generates a shallow DOF, recommended is at an f/8 to allow plenty of light to nter the lense as well as to create enough separation Boost your ISO slightly so u can still shoot with a fast shutter speed.

    The right light

    • The midday sun flattens fitures and reduces contrast so is better to stay until the sun hangs lower.
    • If you position yourself correctly, you should find that this creates dramatic, high contrast lighting, with deep shadows cast across the landscape.
    • Capture your subject in full sun against a shadowy background and you have a recipe for a moody spectacular show

    Freeze the Action

    • Some actions can look great when frozen completely but be aware that this mean you lose some of the drama. This is a good approach when trying to capture a decisive moment. Such as the apex of a horse jump, a cat jumpng filling the frame, try 1/1000 sec shutter speed

    Flash

    • Sometimes a burst of fill-flash can make a real difference to your shot, lifting your subject out of the shadows or simply adding a glint to their eyes.
    • You are not using the flash to illuminate your subject entirely, merely to fill in some of the harsher shadows and inject some life into your photo, so dont over do it. Always be aware of your subjects disposition; if they are nervous its not worth the risk of causing them stress - find another subject.

    Filters

    • A soft focus filter can work really well for some subjects, particularly when ytou want to add a warm glow or soft nostalgic feel to the image. This filter doesnt cut the amount of light entering the lens, so you can use it without affecting your exposure settings. It also works really well with light subjhectsm bathed in sunlight.
    • An ND grad is essential for balancing compositions with dark subjects agaunst bright backgrounds and a ND filter helps to cut the amount of light entering your lens allowing you to extend your exposure time without overexposing the image

    Blur the action

    • Sometiomes a more abstract approach to photographing your moving subject can yield a very pleasing shot. Mount your camera up on a tripod set the shutter speed of 1/8, 1/2 secs, predocus on a point that your subject will pass and fire the sutter just as they sweep past your lense withou trying to track them, the result should be a colorful blur of movement across the frame, capturing the speed and drama of the animals movement. You can vary this technique by panning the camera slightly to achieve an overall blurred effect, but still retain some of the subject's distinguishin feature.

    Autofocusing

    • For some subjects select a single central focusing point, but this doesnt always work. The solution is to select several focus points around the center so even if part of a wing crosses that rectangle of points the AF mechanism can lock onto it. This can be a very useful way to accurately tracking the fast moving birds by using continuos auto focus.

    Birds in flight

    • Its best to set to either Aperture, or Shutter Speed, set your ISO according to the light conditions.
    • Use a shutter of around 1/500 seconds to freeze the action but a little bit slower would show a very interesting movement in the exposure
    • Ensure you are using burst mode on your camera

    Monday, August 25, 2008

    Tips on...<Shooting at a rodeo>

    • Start by attending small-town rodeos. This will let u in get close and personal, as close as the arena fence. Having good day light si critical for high shutter speeds and high ISO
    • Set your camera for continuous focus and ensure you use most or all of the focus point on your camera 11 on the E-3
    • Use a fast telephoto, something around at least 300mm, but not so big that you can hand hold it. It can cover most of the arenas (Regular rodeo arenas are 2/3's the size of a foot ball field)
    • You might have to increase the ISO to ensure you can keep camera shake so 400 in full sun you can shoot at f/8 at 1/1000 of a sec. If your camera can cover 1600 then you can go to f/111 at 1/2000, this way you can ensure that you will still get a sharp shot in the case your camera's autofocus was focusing on the bull's nose and not on the rider's/
    • Sometimes the noise grainess on the shot if processed correctly can look very good for rodeo shots
    del.icio.us Tags: ,,,,

    Tips on...<Cricket>

    • Bring a tripod and teleconverters if available
    • Start by setting the lense first, then the converter, then the camera
    • A tripod makes sense as cricket has a lot of stops on the game, and gives you the ability to move around
    • Positioning parallel to the wicket will allow you to get some cool blur shots of the crowd
    • If playing Twenty20 then you get the advantage of having color uniforms and colored wickets which make it easier to stand out
    • Depending on where you are positioned, spend some time with each type of player hoping they make a play, spend some time on the bowler, the batsman or hoping a fielder makes a catch
    • Some great and classic shots are of those at focusing at the wicket, the batter gets bowled and wait for the bails to fly out up in the air.
    • Arrive early on the game, a tripod or monopod should be required.
    • Pay attention to the background as there will be lots of crowds and make sure the color doesnt interfere or makes the focal point gets lost
    • Be ready for every ball. there is nothing worse than missing a ball and realizing it would hae the best shot of the day.
    • Concentrate and try to anticipate what is going to happen. If the batsmen are runing quickly between the wickets then try focusing on the wicketkeeper in case there is a run out. If the ball is hit high in the air try to get a photograph of the ball being caught or dropped by the fielder
    • You will need a long lens for cricket. A 400mm is probably the shortest lens that u can get away with. The action will always be 60 to 80 yards away/ Converters are a cheaper way to get this done
    • Look around you, there might be a good picture away from the field. Children watching, old men sleeping, people in the scoreboard.

    Places I've shot in