Showing posts with label photo. Show all posts

Sunday, April 26, 2009

Photoshoot near Quirianopolis, Goias, Brasil

I managed to take a week off while in Sao Paulo to go visit the Fazenda Engenho São Francisco near Quirianopolis. Here are my tips and mistakes made while shooting pictures in a farm.

Here is the equipment taken

Here was my journey:

image Ireland to Brasil
Map picture
then to Goiania and Quirinopolis in Goias State
 image


Fazenda Engenho São Francisco  (click on the link and zoom in you can actually see the cattle)

BTW for Olympus RAW file usage with GPS I recently discovered GeoSetter, great tool that can work with the .ORF files, write the .xmp card or directly into the file to accommodate GPS data. Highly recommended.


Most Important tip…

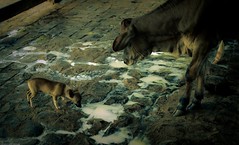
Always talk to the person that runs the place day in and day out. They will give you good tips around the behavior of some of animals, which ones are approachable, and which ones to be careful (I managed to piss off a cow with her calf and it wasn't pretty)

Bola and cattle

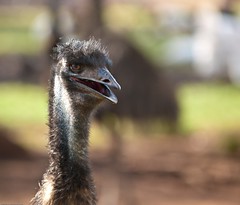
Learn beforehand what kind of animals will you get to see (in my case was mostly cattle but managed a nice surprise to see exotic animals.

Emu look

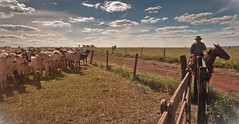
For cattle, learn what type of cattle it is you will be seeing, behavior will change depending on the breed and how is managed by the ranch.

The gang

If you want cattle to get close to you, as I wanted a very low close-up shot of some grown cows or bulls you need to get into the containment area, get down or sit down on the floor and wait. Cattle can be very curious and only takes one to come closer, for the other ones to follow. Be very careful once they are close, sudden moves can make them jump (very high) and you don't want to get stomped or worse your equipment be crushed

Courious calf

Clothes: depending on where you are going, will vary your clothing, but regardless of weather bring very old dirty jeans. If you can manage some cheap boots do as well, as you have to be ready to step, kneel and sit on cow dong, piss and milk and dirt. Same goes for your camera bag, be ready for it to get dirty and gnawed by curious calves

Spilled milk

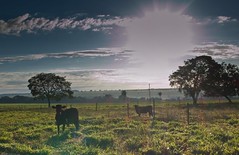
Bring your equipment for landscape photography, either on hills or flat land ranches tend to be in open spaces and you can capture great sunsets, sunrises and cloud formations.

Storm in Sta Cecilia

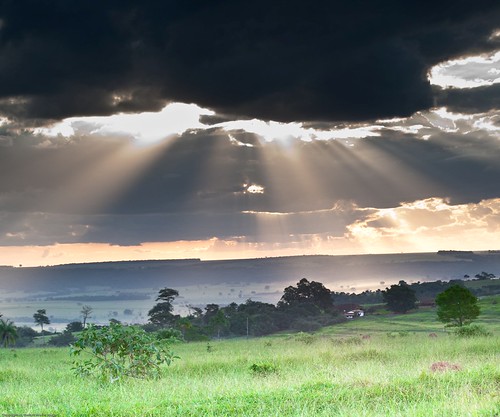
Get up early, not only because of the great light during that time, farm work starts at 5am the animals are quite awake and is the time before a lot of the cattle is being driven to eat at the grass lands. Also in the case of Brasil is when you can manage best to carry all your equipment with the sun.

Sunrise

If you get to ride a horse: Taking pictures on top of a horse is not so hard if you: a) Have IS on your lense or the camera 2) Shoot either using manual or at least shutter priority mode. The faster the horse, the faster the shutter speed if you want sharp images.

Find out what other ranches around the area you are visiting. We managed to visit a neighboring ranch that sells and raises exotic animals and manage to get great shots. They were very nice and let us walk inside the containment area and take our time on getting to know the animals and wait for the best shots.(So here is a free commercial  :) )

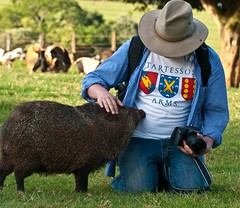
Also depending on where you are you might manage to view animals not very common to your area, I was very intrigued by Pipoca a cateto pork which tend to be very mean, except him.

Amigo Pipoca

Missed opportunities:

Some of the shots or things missed:

Not all the cattle behaves the same, while buying and marking some recently purchased cattle, a bull wouldn't come into the containment area, 4 workers chase after him but he managed to jump a fence of at least 1.5 meters, it would have been a great shot.

I should have brought my Manfrotto tripod I missed some good sunset and late opportunities because of not bring it. I have the 190X which is not too heavy but maybe I should invest on a gorillapod or at the very least a smaller tripod I can travel easier

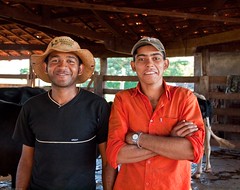
I was so concentrated on the cattle, that I missed some good opportunities for portraits with the workers at the ranches. Brasilians tend to be very open on getting their picture taken and the clothes they wear are very distinct and interesting and could make great portrait subjects.

Fazenda hands

Same as above, make sure to take pictures for remembering the trip, take pictures with family and friends, not everything is about getting the best shot.

See the rest of the shots here

Sunday, September 7, 2008

Macro (Flowers)

Shooting flowers (Macro)

Don’t start snapping the first flower you come across. Even if you re standing on a field full of them, take the time to seek out the specimen that offers the best photographic potential, wether that is due to the quality of the bloom or its location

Once you have found the flower in its prime, explore the subject from all angles to find the shooting position that delivers the best composition

While your flower will be the central subject if your image, the background will play an enormous  role in the final success of the photograph. In any floral image, the background or surroundings will fill a large proportion of the frame. This isn't just empty space to e ignored, its an integral part of the picture. Your key decision will be wether you want to capture the flower in content and therefore present a clear view of the surroundings trees, plants and foliage or wether you want to focus on the flower in isolation.

As a general rule of thumb a close up fo individual flower using a macro lens will demand an unclutered background so that nothing distracts from the shape and texture of the flower itself.

Direction

If you are shooting flowers have been shot with the sun falling on them from the front. The results gives highly saturated colors but an element of flatness in the picture, and texture will be sacrificed. Alternatively standing so that the sunlight hits your subject from the right hand side will mean you get more textural detail as the beams skim over the petals from an angle. You will get a more interesting though uneven shot. For an even more dramatic effect, opt for backlighting. With your subject positioned between you and the sun, the delicate nature, the spines, hairs and translucency of your flower will be emphasized because of the light shining trough the petals from behind. Ultimately this works best on subjects with a translucent quality, such as buttercups and poppies, giving an etheral effect. Keep the background darkest than your subject and take the meter reading from the shaded side of your subject for a more even exposure

Reflect and Diffuse

The type of reflector you use in your outdoor photograph will have different effect on the end result. Careful arrangement of home-make white card reflectors or professional reflector sheets will bounce crucial light back into areas of shadow to get a more creative and controlled end result

Using gold reflectors on the other hand will imbue a warm cast over the frame for a summery effect. For a particularly dreamy image, and to take the edge off bright sunspots so as not to burn out plate flowers, position a diffuser in between your subject and the subject to soften the lighting. Tracking paper acts as an efficient diffuser material, the closer your position to your subject, the brighter the appearance and the higher the contrast.

Use your knowledge

Your skills as a photographer will grow if you use your macro work win conjunction with another area, anywhere you have inside knowledge that gives you an insight into what would make a good image and the spur to work at it

Learn patience

Macro iis not the immediate gratification type of photography. There will be successes and failures but you lean from both

Equipment

Dont make equipment or lack of it an excuse. After all, you wll only need good lighting and Aperture Priority Mode.

Have respect

The welfare of living things is of paramount importance. Lean all you can about the things you photograph


del.icio.us Tags: ,,,

Friday, September 5, 2008

First "Photowalk" with my Zuiko 8mm

At last I was able to put my new purchase for lenses with my new backpack the Think Tank 360. You can read that review here.

As far as the lense goes, I really like it and I would defintely recommend the purchase of a fish eye as part of your kit.  Usually when I am having a photo only trip, I take 2 camera bodies with me. My Oly 410 and the Oly E-3. Most of the time I kept the fish eye lens in the 410 since I take advantage of the IS in the E3 for telephoto shots.

The most impressive thing about the lens is its sharpness and ability to capture lots of colors and dynamic range. I know this is also in due part of the body itself, but I haven't seen this tone range in any other of the Zuiko lenses. I guess it helps  that its a prime lens as well. Here is an example...

This picture only has a little bit of retouching in Lightroom 2. One thing to note is taking pictures takes a little to get used to. You have to mind ALL of the space around the frame, being careful on not to include your own feet, a friend standing next to you, etc. Its almost as you can take a picture of the back of your head with this lens.

One of the objectives for this trip was to "overuse" my 8mm just to get the most out of it. From now on, I will always carry this lense with me but it will be reserved for special effects, panoramas, and force myself to first work with my other lens and then close a spot with this specific effect.  I will try in the future to use this for panoramas to take advantage of the distortion or to fix it on Post Processing with the help of photoshop or PTLens . This lense if denitely not designed to replace your regular wide angle lense, but to bring out special effects and perspectives.

You can create different and eye-pleasing perspective with this lense, but one of the things I have learned is that with this type of distortion you really have to mind your surroundings and how you are standing in front of them, as all of this will get accentuated on the final exposure. Look at this example..

I should have stood right in front of the center of the middle lane, right now the picture shows an unbalance and an awkward distortion in the center lane, the parallel lanes and the pandas on the sides do not have the same level of distortion. Regardless of this, I think the colors were excellent

Here are some of the examples of the pics I liked and the effects you can manage..


One of the things that really caught my eye was when shooting up to a structure, is amazing the amount of sky you can capture, this should lend itself really well for using HDR. (I will try this next time I am carrying my tripod). I then switched from my 420 to my E3 using the fisheye, IS helped me capture the carrousel movement by hand...

Overall I really recommend using this lense, I would love to try this on panorama shots with a single shot covering a large amount of space, then removing the distortion with PTLens and see what happens..

The entire set of this pictures is here...

Wednesday, August 27, 2008

Tips on...<Panning>

Select a location

You want a location that offers a relatively homogeneous background but not a solid color. A bald white sky wont show paning streaks.

The background can be a hue of colors with a dominant one or a mix of colors, but look for a palette that contrasts with the subject

Avoid isolated vertical objects such as telephone poles, with vertical energy that will break the flow of the panning

Select a position that allows the subjects line of travel to be roughly parallel to your cameras imaging plane

Use your whole body

Start by aiming your feet where you think the pan will end. Next from your hip, twist to point toward the oncoming suvbject. AS your subject passes by simply unwind around your body's center of gravity. Panning happens in the torso, your arms, wrists and hands are stationary.

Hold the camera level and as tight in as possible, dont move your feet.

Practice untwisting in advance, and as your suvbject approaches try to pick it up before opening the shutter

Set the shutter speed

Its critical to use shutter priority or manual,. Shutter speeds can range from 1/125 down to 1/8 secs depending on the spoeed of the subject. The slower the shutter speed the more dramatic the shot but also the fewer successes you will ge.

For cycling 1/15 or 1/30 should be good.

Set an ISO that provides good exposure at one of those speeds.

Turn autofocus off

Pre focus manually on the subject's mark

Shoot in continuous mode

Fire off as many shots as possible during a single pass of the subject

One reason to use manual instead of shutter priority exposure is to ensure that the exposures in these sequences will match

If subjects are still not sharp here are some other tricks

Set a higher shutter speed

Hold the camera tight bracing your elbows against your body

If you use a wide angle lense and get in close to the action you will increase your chance of success. Also both to sharpen and to open uo your subject, pop a flash

del.icio.us Tags: ,,,

Monday, August 25, 2008

Tips on <Shoot UK Locations>

del.icio.us Tags: ,,,,

Ireland/UK ideas

A good place to look for ideas and good location in these areas are:

www.nationaltrust.org.uk

www.bbc.co.uk (Go to Science and Nature pages)

Lincolnshire coast between October and January. Seal pups can be seen in November

Best UK Locations (scenery)

Scotland

  • Glen Lui, Cairngorms
  • Bay of Laig, Isle of Eigg
  • Silver Sands of Morar, North West Highlands
  • Loch Achtriochtan, Western Highlands
  • Loch Ness, Western Highlands
  • Eilean Donan Castle, Dornie
  • Talmine, Northern HIghlands

England

  • Burnham-on-Sea, Somerset England
  • Durnstanburgh Castle, Northumberland
  • Bamburgh Castle, Northumberland
  • Castlerigg Stone Circle, Cumbria
  • Howden Dam, Derbyshire
  • Stow-on-the-wold, Gloucestershire

Northern Ireland

  • St John's Point Lighthouse
  • Mourne Wall, Mourne MOntains

South England

  • Portland Bill, Dorset
  • Corfe Castle, Dorset

East and South East

  • Turf Fen windmill, Norfolk
  • Brograve Drainage Mill, Norfolk

Wales

  • Nash Point, Glamorgan
  • Pen Y fan, Brecon Beacons
  • Pentre Ifan burial chamber, Pembrokeshire

Places I've shot in