Showing posts with label tips. Show all posts

Wednesday, November 12, 2008

Tips on <Wildlife in B&W>

Is not so hard to choose when a scene might be better suited for B&W or a color composition. Scenes where animals have colorful characteristics, or the entire scene has very saturated colors are better snapped in color, on the other hand, moody skies, harsh sunlight or interesting textures might be better suited for B&W

Its easy to select when to leave color

Textures and abstracts can make interesting B&W shots

When the weather takes a turn for the “worse”, low light, moody cloudy skies are usually the best opportunities to go for B&W. Remember you are trying to convey a mood, not any specific details of the animal or subject you are shooting.

Because of their color and textures, elephants, rhinos, gorillas and chimpanzees make for great portraits in B&W

Another trip to remember is that the more contrast the better so don't be afraid to shoot on harsh conditions which will accentuate this contrast.

Visit my pictures at http://www.flickr.com/a207001392

Wednesday, October 29, 2008

Tips on <Using Reflections>

Using reflections can add a new dimension of creativity to your photography. From Mirror, glass buildings, puddles, there is always a possibility to leverage them both in and outdoors. They can be used on any type of photography from landscapes (reflections on lakes), urban (glass windows, puddles)

Puddles

In urban settings, after a storm puddles will be created on the pavement, that can be leveraged to create great pictures of reflections. Dont worry about how clean the water is, sometimes all you need is an outline,

Unusual forms

Certain objects with interesting and complicated shapes will create a great shot if standing next to the reflective surface, as if they were join together. Framing is important in this kind of shot

Refractions

Using water droplets, make sure you get glycerin and either use it instead of water or mix it up half and half. This will allow the droplets to keep their shape for much longer, use a pipette if you want to make sure you get even shape droplets.

For this type of shot a close up macro lens is essential, you will also need a study tripod. Focusing is the most tricky part of this type of shot, focus in a single droplet, and focus on the image reflected not on the water itself. Around f/11 is recommended, this will you a sharp refraction.

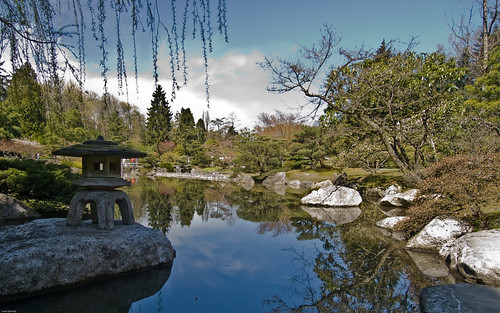
Use tranquil waters to reflect the scene
Glass buildings and puddles are great for creating a composition with reflections


visit my pics at http://www.flickr.com/a207001392 
Using glycerin and an interesting background can make for a very interesting composition.

Wednesday, October 8, 2008

Soccer Matches

Shooting soccer matches at the professional level, will prove difficult due to the permits required, so is better to start with your kids little league

  • You will need a good DSLR with a good AF system, and at least a good camera with 4 frames per second. A good lense such as a 70-300 mm should be enough.
  • In some countries there are some local adult teams, is best to request their permissions, most of the time a phone all is all that's needed.
  • Is basic you need to understand the rules of the game, need to know when certain positions will be moving up or down the field
  • In most games, the action happens in midfield, so find yourself a good spot on the center of the field.
  • Your speed should be around 1/640 secs if you want to freeze the action. Ensure you are using AF and use continuous shooting mode.
  • If you have a lens shorter than 250mm then think of staying midfield, if you have longer than 300mm then it might be worth spending some time behind one of the goals, this will allow you to capture action midfield, and great opportunities for goals.
  • Ensure you are filling the entire frame, if you are going for an entire body shoot then ensure you are not cutting arms or legs, and make sure you are capturing the ball on the shot.
  • Try to predict the action, for example start shooting when the players jump for the ball, so you will capture right at the moment they hit it. Pictures that denote contact are the most dramatic ones.
  • Don't forget to keep an eye on the coach or the crowd to capture reactions to any referee calls.
  • Once you have the shots, it might be a good idea to contact the local club to share some of them, for promotional material, display on the local bar this is a good way to say thanks to the club.
  • Another place to promote your shots is contacting the local newspaper.
del.icio.us Tags: ,,,,

Tuesday, October 7, 2008

Shoot great buildings

Focus on your composition

  • Use the basic rules, but when shooting a building from afar, pay special attention to your foreground, middle ground and background.
  • Leverage roads, pathways that lead to your building.
  • Use elements to frame up your buildings, Branches, other buildings can help you frame the subject. Lay low to exaggerate shots and converging lines
  • Fitting a whole building could be difficult to fit on the frame. Make sure you set your camera upwards to accomplish this. Trying to fit the entire building could drive the verticals to lean in. Some people don't like this, but it could be fixed later on post processing, also some specific lenses can help you fix this on the camera.
  • As for the times, be careful on the lighting. As many times dawn and dusk will allow for the best shots, during midday harsh shadows could ruin your shots making them look flat. This could be a good time to focus on specific architectural details you might be interested, or focus your shooting indoors.
  • The use of a warm up filter could help, but this could be done on post processing. Make sure you shoot RAW to get freedom on setting up the right WB
  • If you are shooting near a body of water, try and get the reflection of the building on the water. This works best on tranquil waters as any movement from animals or wind could cause the reflection to be ruined. Use a polarizer to bring out the colors, but use it wisely to ensure you dont eliminate the reflection. If its windy a good idea is to go for an abstract shot on the reflection only and get the reflection trough the water ripples
  • If your building has some stained glass, this is better shot under a overcast day. If you are taking the entire window, then meter carefully from the bright spot set your exposure to manual and recompose.
  • A good idea is to focus on the details. Dont only look for the detail, but looks for patterns from stone work, pathways, etc. Usually a tripod here is a good idea
  • If you are shooting at night, ensure to meter for the highlights and watch out for your white balance.
  • Indoor buildings are a good target to try HDR due to their uneven lighting.
Look for interesting shapes Focus on architectural details
 
When lighting is not good, indoor shooting can generate lots of opportunities 
Try out HDR indoors and play with different lighting opportunities

Friday, October 3, 2008

Silhouettes

The best time of the year to take this shots is during the fall, since the position of the sun is lower, and it will allow you to keep the sun on that position for longer.

All you need to do is to place your subject in front of a very bright light source so they are in the shadow. Meter and lock the sky’s exposure in Aperture Priority Mode with the subject out of the frame, then recompose and take the shot.  If you are shooting manual you can get even more creative, underexposing for 1 or 2 stops can deepen shadows and create very dramatic images.

Be aware of merging shapes: you want to make sure that your silhouettes are not merging with other ones. For example a person walking and his shape getting mixed with a street pole.In some cases this merging can work to your advantage, for example a couple’s silhouettes showing their individual shapes but merging in some areas can convey the message of togetherness.

As for composition make sure you locate yourself where the sun or your light source are strong. Is better if you spot meter as its more accurate, meter off the brightest cloud or lightest point in the sky. Check your histogram and ensure you are skewing to the left reflecting more and deeper shadows.

You have to be careful and be creative on your skies, sometimes with these technique they can be flat and lose their punch, is recommended the use of some sort of color filter on the camera, or work around this on the digital darkroom.

Some creative ideas for silhouettes

Shoot indoors: places like churches can create great images, source your light from a colorful stained glass window.

Fill the frame with a full silhouette shape, as the sky can get flat a more complex shape will make the image more interesting

Keep the silhouettes simple, people need to recognize them right away, otherwise people will lose interest

Here is an example: (this was meter off from the outer light from the sun)

Wednesday, August 27, 2008

Tips on...<Panning>

Select a location

You want a location that offers a relatively homogeneous background but not a solid color. A bald white sky wont show paning streaks.

The background can be a hue of colors with a dominant one or a mix of colors, but look for a palette that contrasts with the subject

Avoid isolated vertical objects such as telephone poles, with vertical energy that will break the flow of the panning

Select a position that allows the subjects line of travel to be roughly parallel to your cameras imaging plane

Use your whole body

Start by aiming your feet where you think the pan will end. Next from your hip, twist to point toward the oncoming suvbject. AS your subject passes by simply unwind around your body's center of gravity. Panning happens in the torso, your arms, wrists and hands are stationary.

Hold the camera level and as tight in as possible, dont move your feet.

Practice untwisting in advance, and as your suvbject approaches try to pick it up before opening the shutter

Set the shutter speed

Its critical to use shutter priority or manual,. Shutter speeds can range from 1/125 down to 1/8 secs depending on the spoeed of the subject. The slower the shutter speed the more dramatic the shot but also the fewer successes you will ge.

For cycling 1/15 or 1/30 should be good.

Set an ISO that provides good exposure at one of those speeds.

Turn autofocus off

Pre focus manually on the subject's mark

Shoot in continuous mode

Fire off as many shots as possible during a single pass of the subject

One reason to use manual instead of shutter priority exposure is to ensure that the exposures in these sequences will match

If subjects are still not sharp here are some other tricks

Set a higher shutter speed

Hold the camera tight bracing your elbows against your body

If you use a wide angle lense and get in close to the action you will increase your chance of success. Also both to sharpen and to open uo your subject, pop a flash

del.icio.us Tags: ,,,

Tips on...<Travel>

Travel Photography tips

Is good to go to a location and have a them around the photoshoot. Get an assignment

  • Working hands
  • Colorful
  • Street names
  • Vivid Colors
  • Close up Local architecture
  • Children
  • Keep it friendly when approaching people
  • Know when to back down. dont be upset by a refusal, just try somebody else
  • Learn the lingo:: learn a few basic words from the language of the country you are visiting, at least please and thanks
  • Understand the culture: research into local customs
  • Fill the frame: get in as close as possible to the subject
  • Research your destination thoroughly, if you get some research done it will tell you what kit to bring
  • Make the light work for you. Bring a reflector/diffuser kit and a flash with a diffuser. Controlling the light is key for a good portrait
  • Know the best time to shoot: Avoid harsh sunlight if possible move the subject to the shade
  • When shooting wildlife, preparation is key: Bring the longest lens you have
  • Consider composition carefully. Dead Center is deadly. Position the subject off-centerfor a more interesting composition
  • Experiment with filters: Use a polarizing filter, to reduce glare on water and foliage
  • Ask permission to take pictures of people:
  • Change your perspective, tell more of the story by using wider lenses.
  • For more marketable pictures, try writing, it helps selling a set for a certain location
  • Create a diary of your travels, this will help tell a story of your set

Checklist before you go...

  • Do your research: read upon the area for things to shoot where to go and where not to
  • Check your documents
  • Equipment list
  • Clean Equipment
  • Check equipment (take a few test shots)
  • Charge batteries
  • Power (dont forget a travel adapter)
  • Check airline restrictions for carry-on on passport and electronics
  • Storage; enough memory cards and back up units in case those cards fill up

Think Kit

Make sure you pack the right equipment. Think about these filters, lenses and cameras to suit all the photographic situations you might encounter. A circular polarizer is a most

Outside the box

Capture not only buildings and locations but the locals while on your travels and you will have some outstanding shots

Add context

Although some shots look like they could have been taken anywhere in the world, make sure your shots dont. Add subtle touches like a local language sign pr native animal to your shot to give a little context

Zoom In

Great travel shots arent just sweeping vistas and huge buildings. Get up close and shoot individual hieroglyphs, single crucifixes or sained glass windows

Colour composition

Take advantage of local dress, landmarks and culture to take striking photos.. The rules of composition still apply, but you could try to vary your viewpoint to get more exciting frames

After dark

Wait until the lights go down brefore you get your camera outm Dusk and sunset hours are beautiful by the water. Look out for reflections, slow your shutter speed.

Local people

Landscapes may be the most common travel shots, but the ones if local people are often the shots that speak the loudest. Make sure you ask permission to take their photo

In the wild

Invest in a good telephoto lens as well as abean bag. Its essential for a safari

Do your research

Find out everything you can before travel. What events are going while yuou are there. Are there any high vantage points to shoot from?.

Research what your destination has to offer and what makes it unique. Research travel brochures it can give you a good indication of whats been shot, so you dont repeat it, but it also is a good start

Find out of any festivals as well as where the local markets are, this creates a huge opportunity. If you want to add some portraits to the mix, learning some of the local language helps

Ideally you should carry 2 DSLR bodies and with them a collection of overlapping lenses a telephoto, tele-zoom and two wide-angle. Keeping lenses to a minimum will mean less switching and less risk to your sensor getting dirty or damaged.

For shooting on the move a good back up unit is essential, there are several at different prices, I personally own this one. Some extras to pack on your bag are a tripod (carbon fiber would be ideal), cable release, USB cables and spare memory cards. Graduated filers could be consider a luxury if you want to travel light as some of this effect can be recreated in Photoshop

Tuesday, August 26, 2008

Tips on...<Panning>

Select a location

You want a location that offers a relatively homogeneous background bnut not a solid color. A bald white sky wont show paning streaks.

The background can be a hue of colors with a dominant one or a mix of colors, but look for a palette that contrasts with the subject

Avoid isolated vertical objects such as telephone poles, with vertical energy that will break the flow of the panning

Select a position that allows the subjects line of travel to be roughly parallel to your cameras imaging plane

Use your whole body

Start by aiming your feet where you think the pan will end. Next from your hip, twist to point toward the oncoming suvbject. AS your subject passes by simply unwind around your body's center of gravity. Panning happens in the torso, your arms, wrists and hands are stationary.

Hold the camera level and as tight in as possible, don’t move your feet.

Practice untwisting in advance, and as your subject approaches try to pick it up before opening the shutter

Set the shutter speed

Its critical to use shutter priority or manual,. Shutter speeds can range from 1/125 down to 1/8 secs depending on the speed of the subject. The slower the shutter speed the more dramatic the shot but also the fewer successes you will get.

For cycling 1/15 or 1/30 should be good.

Set an ISO that provides good exposure at one of those speeds.

Turn autofocus off

Prefocus manually on the subject's mark

Shoot in continuos mode

Fire off as many shots as possible during a single pass of the subject

One reason to use manual instead of shutter priority exposure is to ensure that the exposures in these sequences will match

If subjects are still not sharp here are some other tricks

Set a higher shutter speed

Hold the camera tight bracing your elbows against your body

If you use a wide angle lense and get in close to the action you will increase your chance of success. Also both to sharpen and to open uo your subject, pop a flash

Tips on <Food Photos>

Have a theme

Food photography is just as seasonal as food itself. Its important to map out a story of the presentation of the food that includes season specific colors, textures, ingredients and utensils

Bring options

Bring extra accessories to see what works best with the theme of the sroy. Play a lot on the set such as a white napkin, soup cups, etc

Keep it simple

The more complicated youtr set the more things can go wrong.

Backlighting glass

Clean white backgrounds help to illuminate glass without direct lighting. If you don’t have any studio lights shoot in a bright white room during the time of day that gives you the most light

Set the white balance later

Is easier if you shoot RAW and then play with the balance settings during your workflow.

Food is staple ingredient in every home, and has the potential to quell even the most ambitious home photographers hunger for truly sumptuous shots. From fruit or veg, meat to sweets, glass to earthen ware that range of texture, form and color is without a doubt infinite

  • Careful panning is the most important factor in any successful food study. The subject matter must be fresh and thoughtfully placed with attention focused equally on background space and lighting techniques. In many cases, window light will provide the most natural effect for delectable subjects, and is common choice for food photography professionals as they provide shifts with even soft light
  • Using a simple home studio setup will provide you with enhanced control over your shoot. Flash is more predictable than natural light and can be used any time of day.
  • Whichever method you can choose start off by using just one type of lighting in order to keep the final shot clean. Backlighting a still life subject is one method that the pros swear by, but be sure to use reflectors to balance the distribution of light
  • With your lighting in place, it is important to setup a tripod in front of your subject, Aside from reducing camera shake a tripod will prove invaluable as static point that can be referred to when you are making adjustments.
  • Finally watch your timing, Edibles will wilt under hot lights and freshly cooed food will only appear wholesome for a limited time.


Places I've shot in