Showing posts with label outdoors. Show all posts

Saturday, July 11, 2009

AIB Street Performance World Championship

During the month of June (18th to 21st) there is an event in Dublin at Merrion Square sponsored by AIB that brings together street performance from all over the world. You can visit their website here, and follow them on facebook as well.

I didn't manage to get many shots but was able to get a couple of good pictures, here are some tips on the event if you want to try it next year .

First of all bring a telephoto lens, unless you are looking for a specific shot a wide angle lense might not do you much help as the crowds, sun might make it hard to get a good photo.

Plan in advance what you want to see, as for location, here is a good tip: get there early, is very crowded and not much space to move. Here is a piece of good advice, locate yourself in the corner of the park marked below, it has a grassy hill that people use as a seating area, if you get there early you will be able to get clear shots of the show. The green arrow shows the corner of Marrion square where you should be position yourself. Download the schedule and wait for the show you are interested to arrive there, across the 4 days all shows would have hit that single stage.

image

I was able to get clear shots of a couple of acts such as these:


As always in Dublin, be prepare for the rain, the organizers will provide ponchos for the crowds to use as seat covers for the wet grass, but bring something for the camera.

Once the shows starts, crowds start to gather, pay attention not only to the performer but people’s reactions make for great candid shots.

If you are interested on the whole photo set visit my site at flickr

Sunday, April 26, 2009

Photoshoot near Quirianopolis, Goias, Brasil

I managed to take a week off while in Sao Paulo to go visit the Fazenda Engenho São Francisco near Quirianopolis. Here are my tips and mistakes made while shooting pictures in a farm.

Here is the equipment taken

Here was my journey:
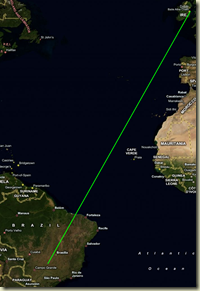
image Ireland to Brasil
Map picture
then to Goiania and Quirinopolis in Goias State
 image


Fazenda Engenho São Francisco  (click on the link and zoom in you can actually see the cattle)

BTW for Olympus RAW file usage with GPS I recently discovered GeoSetter, great tool that can work with the .ORF files, write the .xmp card or directly into the file to accommodate GPS data. Highly recommended.


Most Important tip…

Always talk to the person that runs the place day in and day out. They will give you good tips around the behavior of some of animals, which ones are approachable, and which ones to be careful (I managed to piss off a cow with her calf and it wasn't pretty)

Bola and cattle

Learn beforehand what kind of animals will you get to see (in my case was mostly cattle but managed a nice surprise to see exotic animals.

Emu look

For cattle, learn what type of cattle it is you will be seeing, behavior will change depending on the breed and how is managed by the ranch.

The gang

If you want cattle to get close to you, as I wanted a very low close-up shot of some grown cows or bulls you need to get into the containment area, get down or sit down on the floor and wait. Cattle can be very curious and only takes one to come closer, for the other ones to follow. Be very careful once they are close, sudden moves can make them jump (very high) and you don't want to get stomped or worse your equipment be crushed

Courious calf

Clothes: depending on where you are going, will vary your clothing, but regardless of weather bring very old dirty jeans. If you can manage some cheap boots do as well, as you have to be ready to step, kneel and sit on cow dong, piss and milk and dirt. Same goes for your camera bag, be ready for it to get dirty and gnawed by curious calves

Spilled milk

Bring your equipment for landscape photography, either on hills or flat land ranches tend to be in open spaces and you can capture great sunsets, sunrises and cloud formations.

Storm in Sta Cecilia

Get up early, not only because of the great light during that time, farm work starts at 5am the animals are quite awake and is the time before a lot of the cattle is being driven to eat at the grass lands. Also in the case of Brasil is when you can manage best to carry all your equipment with the sun.

Sunrise

If you get to ride a horse: Taking pictures on top of a horse is not so hard if you: a) Have IS on your lense or the camera 2) Shoot either using manual or at least shutter priority mode. The faster the horse, the faster the shutter speed if you want sharp images.

Find out what other ranches around the area you are visiting. We managed to visit a neighboring ranch that sells and raises exotic animals and manage to get great shots. They were very nice and let us walk inside the containment area and take our time on getting to know the animals and wait for the best shots.(So here is a free commercial  :) )

Also depending on where you are you might manage to view animals not very common to your area, I was very intrigued by Pipoca a cateto pork which tend to be very mean, except him.

Amigo Pipoca

Missed opportunities:

Some of the shots or things missed:

Not all the cattle behaves the same, while buying and marking some recently purchased cattle, a bull wouldn't come into the containment area, 4 workers chase after him but he managed to jump a fence of at least 1.5 meters, it would have been a great shot.

I should have brought my Manfrotto tripod I missed some good sunset and late opportunities because of not bring it. I have the 190X which is not too heavy but maybe I should invest on a gorillapod or at the very least a smaller tripod I can travel easier

I was so concentrated on the cattle, that I missed some good opportunities for portraits with the workers at the ranches. Brasilians tend to be very open on getting their picture taken and the clothes they wear are very distinct and interesting and could make great portrait subjects.

Fazenda hands

Same as above, make sure to take pictures for remembering the trip, take pictures with family and friends, not everything is about getting the best shot.

See the rest of the shots here

Friday, August 29, 2008

Tip on... Hostile climates

Here are some tips when going to extremes in relation to climate

For cold temperatures

Batteries dont like cold weather. If you look at your camera manual you will usually see 2 different sets of values for battery life, one for normal conditions and another one for freezing point. Usually battery life is reduce by half on near freezing temperatures. For example the Canon EOS 400D battery can take 500 shots at 23degrees centigrade but only 370 at 0 degrees.

One good tip is to keep your battery inside your coat, this way it can use your body's temperature.

Another concern in some cameras are leaf shutters on traditional large format cameras where the lubricants have become viscous in low temperatures. Some plastics can become brittle, and while not a problem for camera, it could be for accessories

When taking pictures in the snow and things like skiing or snowboarding there shouldn't be a problem with the snow if it remains frozen, problem is when you move indoors. This water could sip into the lens joints and other areas. So be careful of wiping your camera before you go indoors or putting it inside your coat.

Condensation can also be a big problem. At best it is a nuisance. the lens becomes misted up and the camera body become damp. At worth though the condensation may penetrate the camera and damage the electronic if the camera is stored damp, cause mould and fungus to appear

What you need to do is put the camera away in a bag or case before you bring it indoors, and then let it warm up naturally for an hour or so before opening up the bag, it doesn't have to be airtight because there is no pressure difference, you are simply preventing the warm air from circulating around cold equipment

For hot weather

When it comes to the sun, cameras are pretty hardy the only big nuisance is that the black plastic on which cameras are built, attract the hear, which could cause your camera to become so hot that it cannot be operated for a few minutes.

For hot weather your worst enemies are moisture and dust

Sand is a real killer when it comes to lenese, any grit can lock up a precise and delicate mechanism of the camera and or lens

This is critical when trying to exchange lens in the middle of a dusty environment. If you have to, you should turn away from the wind, and face the camera downwards to minimize the risk of particles getting into the camera body.

In some environments, fine dust particles are suspended in the air and will enter the camera body even if perfectly still conditions.

Never put your camera away damp.

Wednesday, August 27, 2008

Exotic Landscapes

Tricks of the light

  • If you are traveling anywhere near the coast or desert, the exotic idyll of white sands and turquoise skies although photogenic will present the photographer with a multitude of hazards. They key is to be aware of the suns position.
  • In locations where cloud cover is sparse, intense sunlight will be detrimental to the level of detail in your image.
  • Adjust EV compensation up by one or two stops, or use exposure bracketing to cover yourself against inaccurate metering in tricky lighting scenarios
  • Early morning light is perfect for highlighting contours and textural formations of a deser landscape, emphasized even more by a low shooting position and wide angle lens
  • The low position of the sun and quality of natural light later in the day will give shots an atmospheric appearance, casting long shadows and adding depth to scenes such as rock formations and layered landscapes. Landscapes will also take on a warmer color tone at the beginning and end of the day, compared with the cool blue cast of midday

Wide Open

  • A standard wide angle lens at 35mm equivalent focal lent of 43-60mm or a super wide angle lens of 24-42mm will work to capture every last detail while making the most of the sjy and foreground
  • Place the horizon in your frame according to the interest that the sky and foreground each hold - they must wor kwell together or not at all-

For coastal areas

  • Using fast shutter speeds higher than 1/250 secs will freezse the motion of waves and sea spray. In contrast, slow shutter speeds of less than half a second will blur the water and soften the scene. If this is where your traveling interest lues then the addition of a polarizing filter to your kit bag will help you improving the color and contrast of your images, and will reduce the glare caused by reflection. A tripod is a most on all of this situations
  • The inclusion of a human element into a typical landscape photograph can give a striking sense of scale to a place. Focus your lens on the person in the frame, but employ a wide aperture to ensure sharpness from front to back.

del.icio.us Tags: ,,,

Tips on...<Travel>

Travel Photography tips

Is good to go to a location and have a them around the photoshoot. Get an assignment

  • Working hands
  • Colorful
  • Street names
  • Vivid Colors
  • Close up Local architecture
  • Children
  • Keep it friendly when approaching people
  • Know when to back down. dont be upset by a refusal, just try somebody else
  • Learn the lingo:: learn a few basic words from the language of the country you are visiting, at least please and thanks
  • Understand the culture: research into local customs
  • Fill the frame: get in as close as possible to the subject
  • Research your destination thoroughly, if you get some research done it will tell you what kit to bring
  • Make the light work for you. Bring a reflector/diffuser kit and a flash with a diffuser. Controlling the light is key for a good portrait
  • Know the best time to shoot: Avoid harsh sunlight if possible move the subject to the shade
  • When shooting wildlife, preparation is key: Bring the longest lens you have
  • Consider composition carefully. Dead Center is deadly. Position the subject off-centerfor a more interesting composition
  • Experiment with filters: Use a polarizing filter, to reduce glare on water and foliage
  • Ask permission to take pictures of people:
  • Change your perspective, tell more of the story by using wider lenses.
  • For more marketable pictures, try writing, it helps selling a set for a certain location
  • Create a diary of your travels, this will help tell a story of your set

Checklist before you go...

  • Do your research: read upon the area for things to shoot where to go and where not to
  • Check your documents
  • Equipment list
  • Clean Equipment
  • Check equipment (take a few test shots)
  • Charge batteries
  • Power (dont forget a travel adapter)
  • Check airline restrictions for carry-on on passport and electronics
  • Storage; enough memory cards and back up units in case those cards fill up

Think Kit

Make sure you pack the right equipment. Think about these filters, lenses and cameras to suit all the photographic situations you might encounter. A circular polarizer is a most

Outside the box

Capture not only buildings and locations but the locals while on your travels and you will have some outstanding shots

Add context

Although some shots look like they could have been taken anywhere in the world, make sure your shots dont. Add subtle touches like a local language sign pr native animal to your shot to give a little context

Zoom In

Great travel shots arent just sweeping vistas and huge buildings. Get up close and shoot individual hieroglyphs, single crucifixes or sained glass windows

Colour composition

Take advantage of local dress, landmarks and culture to take striking photos.. The rules of composition still apply, but you could try to vary your viewpoint to get more exciting frames

After dark

Wait until the lights go down brefore you get your camera outm Dusk and sunset hours are beautiful by the water. Look out for reflections, slow your shutter speed.

Local people

Landscapes may be the most common travel shots, but the ones if local people are often the shots that speak the loudest. Make sure you ask permission to take their photo

In the wild

Invest in a good telephoto lens as well as abean bag. Its essential for a safari

Do your research

Find out everything you can before travel. What events are going while yuou are there. Are there any high vantage points to shoot from?.

Research what your destination has to offer and what makes it unique. Research travel brochures it can give you a good indication of whats been shot, so you dont repeat it, but it also is a good start

Find out of any festivals as well as where the local markets are, this creates a huge opportunity. If you want to add some portraits to the mix, learning some of the local language helps

Ideally you should carry 2 DSLR bodies and with them a collection of overlapping lenses a telephoto, tele-zoom and two wide-angle. Keeping lenses to a minimum will mean less switching and less risk to your sensor getting dirty or damaged.

For shooting on the move a good back up unit is essential, there are several at different prices, I personally own this one. Some extras to pack on your bag are a tripod (carbon fiber would be ideal), cable release, USB cables and spare memory cards. Graduated filers could be consider a luxury if you want to travel light as some of this effect can be recreated in Photoshop

Tuesday, August 26, 2008

Tips on..<Animals in Action>

Have patience

Eye contact

  • Good eye contact helps the viewer to make a connection with the subject, adding impact
  • Whenever possible try to get at same eye level of your subject
  • Make slow deliverate movements to ensure you are not perceived as a threat and wait until you see catchlights in the eyes

Panning

  • Convey the feeling of speed as your subject runs or flies by your sreen
  • It will take practive, start by a shutter speed of 1/30, 1/125 seconds)
  • Prefocus on the sport where the creature will pass in front of you and fire the shutter.
  • Your settings will need tweaking according to the lighting conditions speed of the animal.

Relieve stress

  • Make sure you give the animal time to relax, such as dogs. In case of dogs, let them be dogs before you start shooting them, play around with them
  • Once you begin if it begins yawning lor laying down he is showing signs pf stress and just needs to be a dog again.

The right lens

  • Go for the fastest lense you can aford
  • Image Stabilization either on lense or camera can make a big difference
  • In some situations a monopod can help achieve sharp shoots
  • If you can justify the cost, a prime lense offers unrivalledmimage quality and sharpness

Be invisible

  • For cerain species that are hard to capture, weate quite clothes in natural subdued colors, steer clear of perfurmed soaps and lay off afteshave the day of the shot
  • Use bushes and trees for cover or invest in scrim netting to drape over you and your camera, disguising your outline

Add water

  • Any body of water can make great aditions to your photographers acting as a foreground interest or prodiving a reflective surface to add another dimension to your subject
  • Calm water often works best for reflections of wildlife.

Aperture

  • A fast aperture may be necessary in dim conditions in order to maintain image sharpness, but shooting with your lense wide open generates a shallow DOF, recommended is at an f/8 to allow plenty of light to nter the lense as well as to create enough separation Boost your ISO slightly so u can still shoot with a fast shutter speed.

The right light

  • The midday sun flattens fitures and reduces contrast so is better to stay until the sun hangs lower.
  • If you position yourself correctly, you should find that this creates dramatic, high contrast lighting, with deep shadows cast across the landscape.
  • Capture your subject in full sun against a shadowy background and you have a recipe for a moody spectacular show

Freeze the Action

  • Some actions can look great when frozen completely but be aware that this mean you lose some of the drama. This is a good approach when trying to capture a decisive moment. Such as the apex of a horse jump, a cat jumpng filling the frame, try 1/1000 sec shutter speed

Flash

  • Sometimes a burst of fill-flash can make a real difference to your shot, lifting your subject out of the shadows or simply adding a glint to their eyes.
  • You are not using the flash to illuminate your subject entirely, merely to fill in some of the harsher shadows and inject some life into your photo, so dont over do it. Always be aware of your subjects disposition; if they are nervous its not worth the risk of causing them stress - find another subject.

Filters

  • A soft focus filter can work really well for some subjects, particularly when ytou want to add a warm glow or soft nostalgic feel to the image. This filter doesnt cut the amount of light entering the lens, so you can use it without affecting your exposure settings. It also works really well with light subjhectsm bathed in sunlight.
  • An ND grad is essential for balancing compositions with dark subjects agaunst bright backgrounds and a ND filter helps to cut the amount of light entering your lens allowing you to extend your exposure time without overexposing the image

Blur the action

  • Sometiomes a more abstract approach to photographing your moving subject can yield a very pleasing shot. Mount your camera up on a tripod set the shutter speed of 1/8, 1/2 secs, predocus on a point that your subject will pass and fire the sutter just as they sweep past your lense withou trying to track them, the result should be a colorful blur of movement across the frame, capturing the speed and drama of the animals movement. You can vary this technique by panning the camera slightly to achieve an overall blurred effect, but still retain some of the subject's distinguishin feature.

Autofocusing

  • For some subjects select a single central focusing point, but this doesnt always work. The solution is to select several focus points around the center so even if part of a wing crosses that rectangle of points the AF mechanism can lock onto it. This can be a very useful way to accurately tracking the fast moving birds by using continuos auto focus.

Birds in flight

  • Its best to set to either Aperture, or Shutter Speed, set your ISO according to the light conditions.
  • Use a shutter of around 1/500 seconds to freeze the action but a little bit slower would show a very interesting movement in the exposure
  • Ensure you are using burst mode on your camera

Places I've shot in