Showing posts with label composition. Show all posts

Sunday, July 19, 2009

Bull Island Seals Dublin Photo shoot

Bull Island is located just south of Howth, around a 10 min drive from Howth harbor. It is a nature reserve, so make sure to follow the rules listed there. In order to find the seals you need to park on the northern part of the Island (Second bridge if you are coming from Dublin)

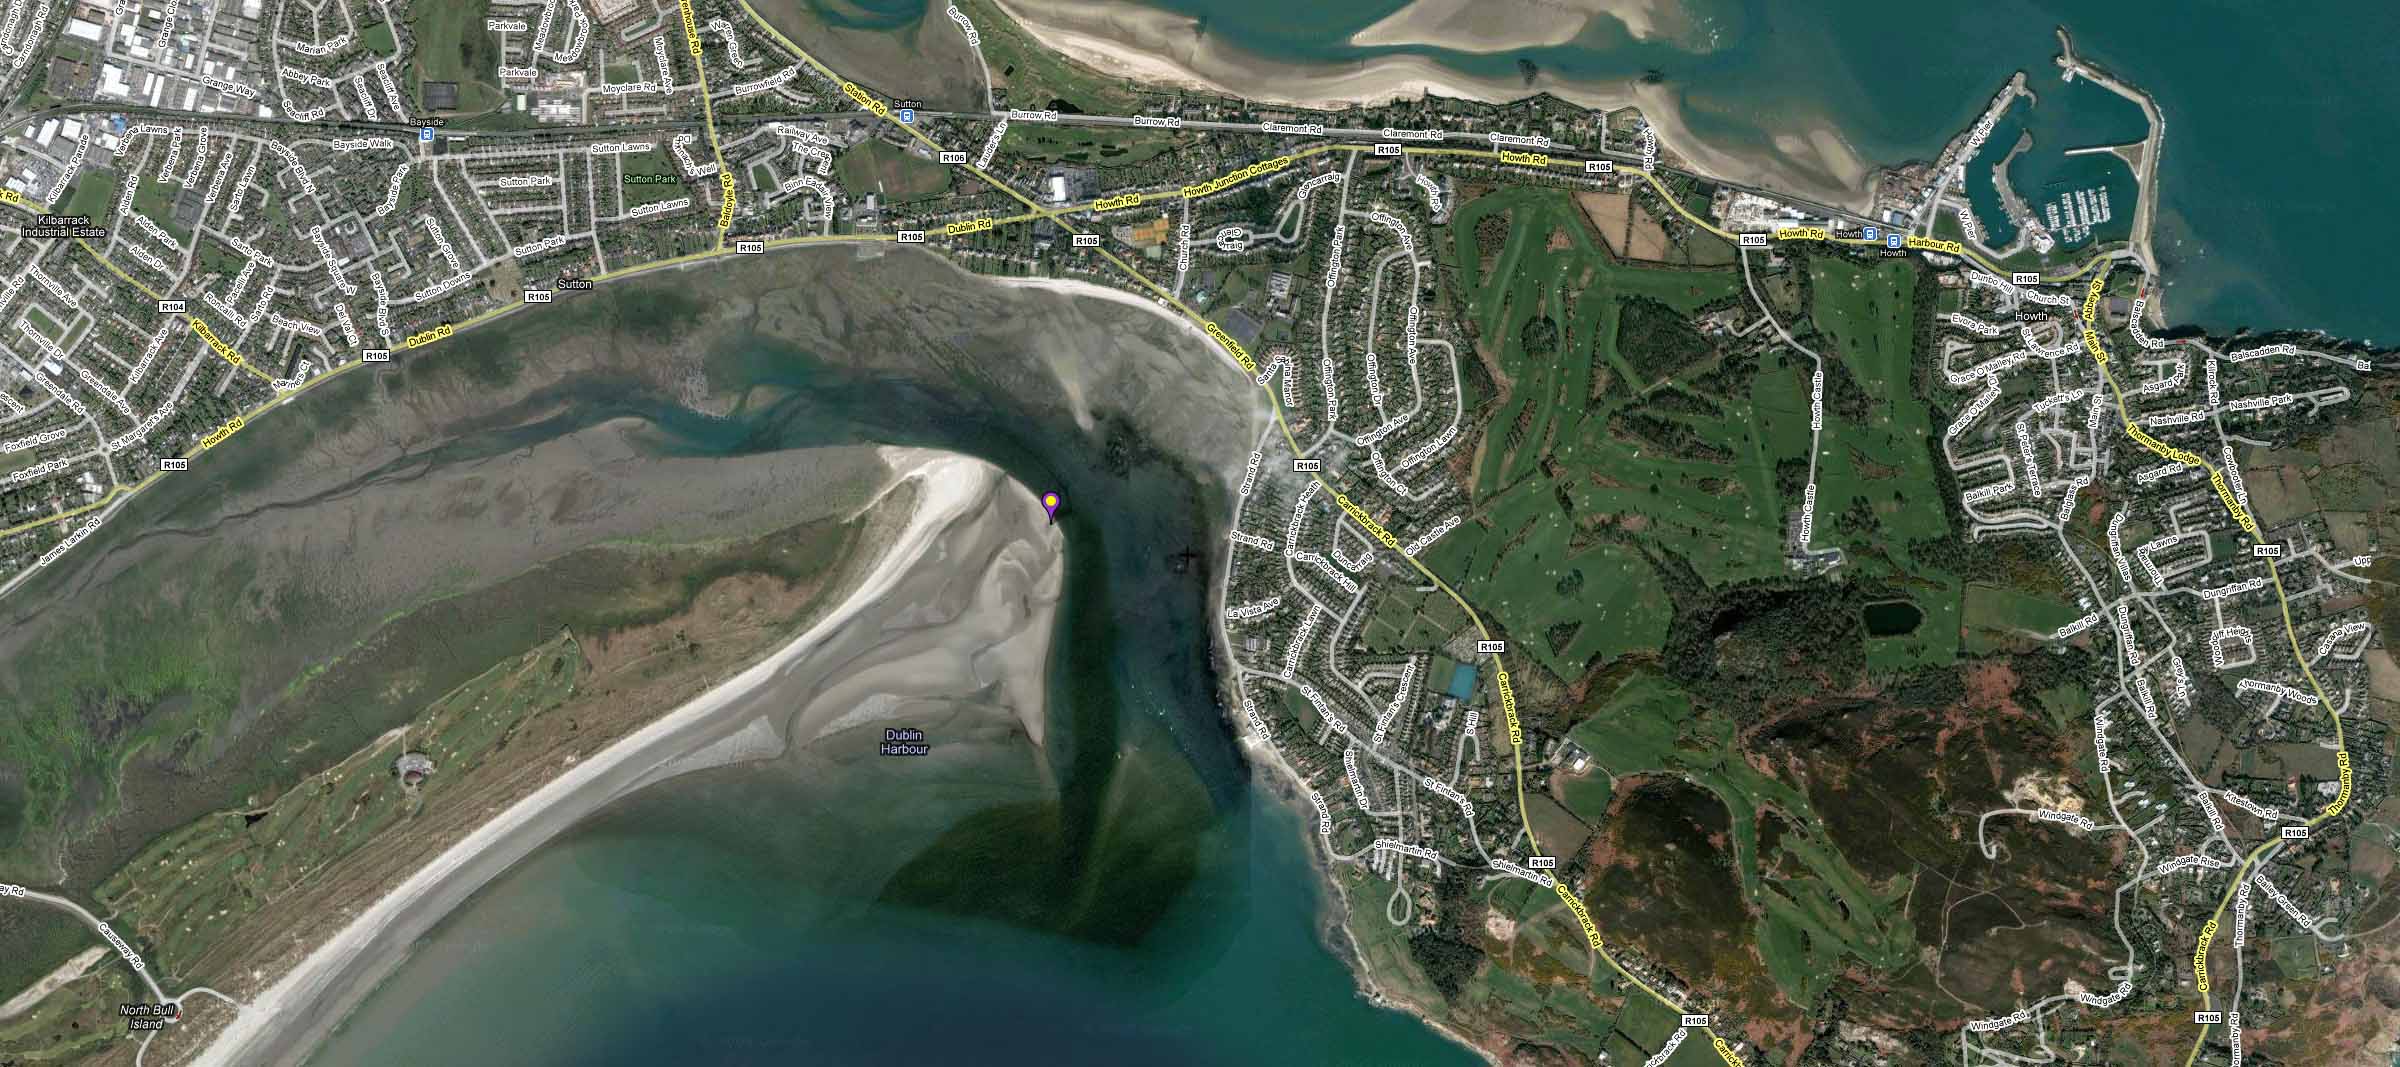
Park your car in the sand parking lot, and get ready for a 20-30 min walk. Here is a quick map on where you will find the seals my location is marked with the purple marker.
For Olympus RAW file usage with GPS I recently discovered GeoSetter, great tool that can work with the .ORF files, write the .xmp card or directly into the file to accommodate GPS data. Highly recommended.

Funny enough this map shows the exact GPS location where I was located, but bear in mind that the tide changes, so that area could be covered with water any other day, but I have been there 3 times and the seals are always located on the northernmost corner of the island, but not all the time laying on the sand, which was the shot I was looking for. After a couple of tries, here is what I managed to get prior to this day..just a few head shots.

I believe that in order to get shots from the seals outside of the water there must be a reasonable amount of sun and a low tide, this last time I went was around 9AM, so I dont think the hour in the day matters that much.

My Gear:

  • Olympus E3
  • Olympus E30
  • Zuiko 50-200mm 2.8
  • Zuiko Teleconverter 2X EC-20
  • Hoya Polarizer Filters
  • Lowepro FastPack 250
  • Wind resistant pants and jacket
  • Wellies

    After a good 30 minute walk,  and depending on the tide you will find the seals at the northeast corner, approach very slowly and be very careful of the sand. I misjudged some weed and sand banks and went right in all the way to my knees covered with weed,sand and I am sure smell liked shit.  Once you are 50-75 meters away from the seals lay down on the sand, take your gear out and start approaching them by dragging yourself trough the sand, if the seals see something taller or something similar to a human shape they will dive right into the water.

    Take a few shots and get closer, make the seals comfortable, and then get closer again, if some of them get scared and dive into the water stop immediately, stay still for a few minutes and move again. I saw a group of 15-20 seals but as I got closer and the tide rose few and few seals remained.

    Use your bag as a bean bag and start shooting, I used Shutter and Aperture Priority Mode, low ISO (100) and a polarizer filter. I tried some shots with the tele-converter but I thought I was sacrificing too much sharpness, so decided to get closer and also crop some of the images to close-in the seals.

    Being gray seals, the metering system will struggle with the light measuring of both the harsh light reflecting on the sea and the dark features on the seals faces, so compensated with EV+1 to bring some details on the face, or try and fix on post processing.

    Puppies are very curious so they are the ones that will be the most active and will get closer to you, but be careful in never getting between the puppy and the mom, as they will feel threatened. Also as some seals go in the water be aware always of where they are, they can come out behind you and you dont want to be too close, a seal bite can be very nasty and have lots of bacteria in their mouths that can cause a big infection.

    I lost a very good shot of a fight between 2 adult seals. If you see a seal approaching another one, and their heads are close to each other,  one of them will open its mouth that’s the beggining, put your camera on burst mode and do some manual focusing as you will see a fight that will only last for a few seconds.

    Always be mindful of the tide, if you think that the waves are getting closer and closer you are right. Usually the seals are on a spot higher than the tide, that means that if you are not careful you will end up on a little sand island surrounded by water that is rising, believe me I was stuck once and had to walk with water up to my knees hauling my gear, hence the wellies. Once you get home, clean your equipment right away, there will be sand between the extension part of your lenses and all around the buttons, even though the E-3 is weather sealed, clean this with an air brush as you dont want corrosion. For your bag, wait for the sand to dry and then shake all the sand off, there will be a lot of sand accumulated on the back area of the backpack that you wont see but once it dries it will come off rather easily. If you want to see the whole set of pictures visit my site at flickr here..

  • Wednesday, May 13, 2009

    Vienna photowalk

    A couple of weeks ago had the opportunity to spend a couple of days in Vienna and brought my equipment with me. Here is a list of my equipment for this occasion:

  • Olympus E3
  • Olympus E30
  • Olympus Flash FL-50R (Very useful while inside a Barn)
  • Sigma 30mm 1.4
  • Zuiko 8mm 3.5 (great for cow and calf close-ups)
  • Zuiko 50-200mm 2.8
  • Zuiko Teleconverter 2X EC-20
  • Zuiko 11-22mm 2.8
  • ND Filters
  • Small Table top tripod
  • Hoya Polarizer Filters

    Most of the sites worth visiting in Vienna are contained within the city center and easy to get around either by walking or tram.

    Here is an overview of the walk by using my AMOD GPS tracker as well as GeoSetter for attaching  GPS coordinates for my Olympus Raw Files. One thing I have found out while traveling on old cities with narrow streets is that it will be common for the GPS to lose connection with the satellites, so make sure you adjust your settings to your Software accordingly to ensure that you tag the picture to the closest available tracking point.

  • Vienna Photowalk

    A good way to track the main sites to photograph is by using the Rick Steves guides for Europe, I always travel with one as the contain easy to follow maps as well as tips for avoiding crowds, using public transportation, etc.

    Some of the highlights of the city are:

    NaschtMarket:

    Located between the left and right Wienzeile, the Naschmarkt extends from the Kettenbrückengasse to the Getreidemark, on an elevation to the Secession.

    Differently to as the name implies, there aren’t only sweets to buy at the Naschmarkt: Fresh fruit and vegetables from around the world, exotic spices, meat, fish and ecological foods are offered for sale on the colorful market stands. Early in the morning cooks and chefs already crowd around the market looking for fresh specialties. Later, after a Viennese breakfast in one of the numerous cafes, bars or delis located around the Naschmarkt, the "laymen" start their search for culinary treats. Delicacies from the Naschmarkt make a favorite gift with Vienna holiday-makers.

    Spices Sale on....????  

    On Saturdays you'll not only find delicious treats at the food market but also curiosities, old and beautiful things on the street market stalls adjacent to the Naschmarkt. The wares offered are completely mixed, for beautiful souvenirs it helps to be a skillful bargainer.

    There are great opportunities for those that also want to take candid pictures of people haggling (specially on the antiquities area at the end of the market), friends having breakfast and the intellectual crowd.

    A tiger in the Naschmarkt The dude and the DJ Lady @ the market

    Opera House and Concert Hall

    Try to attend a music concert either on the Opera or the Music Concert Hall. Its allowed to bring your camera but not a tripod. You can see people dressed as in the times of Mozart. As well a both buildings have great architectural detail. Make sure to boost the ISO and bring a sharp lens

    CandelabrosOpera and Tram

    City Center

    Within the Opernring there are lots of opportunities to take advantage of the city architecture. Some examples are St Stephens Cathedral, Rathaus, State Opera, among others. It gets very crowded, what I ended up doing was getup at sunrise to take full advantage of the buildings without any crowds. You can check the sunrise and sunset times throughout the year for most cities in the world here.


    Pointy little hats A prayer
    P5019241 Golden Mozart
    Entrance to Vienna Austria

    Sunday, April 26, 2009

    Photoshoot near Quirianopolis, Goias, Brasil

    I managed to take a week off while in Sao Paulo to go visit the Fazenda Engenho São Francisco near Quirianopolis. Here are my tips and mistakes made while shooting pictures in a farm.

    Here is the equipment taken

    Here was my journey:

    image Ireland to Brasil
    Map picture
    then to Goiania and Quirinopolis in Goias State
     image


    Fazenda Engenho São Francisco  (click on the link and zoom in you can actually see the cattle)

    BTW for Olympus RAW file usage with GPS I recently discovered GeoSetter, great tool that can work with the .ORF files, write the .xmp card or directly into the file to accommodate GPS data. Highly recommended.


    Most Important tip…

    Always talk to the person that runs the place day in and day out. They will give you good tips around the behavior of some of animals, which ones are approachable, and which ones to be careful (I managed to piss off a cow with her calf and it wasn't pretty)

    Bola and cattle

    Learn beforehand what kind of animals will you get to see (in my case was mostly cattle but managed a nice surprise to see exotic animals.

    Emu look

    For cattle, learn what type of cattle it is you will be seeing, behavior will change depending on the breed and how is managed by the ranch.

    The gang

    If you want cattle to get close to you, as I wanted a very low close-up shot of some grown cows or bulls you need to get into the containment area, get down or sit down on the floor and wait. Cattle can be very curious and only takes one to come closer, for the other ones to follow. Be very careful once they are close, sudden moves can make them jump (very high) and you don't want to get stomped or worse your equipment be crushed

    Courious calf

    Clothes: depending on where you are going, will vary your clothing, but regardless of weather bring very old dirty jeans. If you can manage some cheap boots do as well, as you have to be ready to step, kneel and sit on cow dong, piss and milk and dirt. Same goes for your camera bag, be ready for it to get dirty and gnawed by curious calves

    Spilled milk

    Bring your equipment for landscape photography, either on hills or flat land ranches tend to be in open spaces and you can capture great sunsets, sunrises and cloud formations.

    Storm in Sta Cecilia

    Get up early, not only because of the great light during that time, farm work starts at 5am the animals are quite awake and is the time before a lot of the cattle is being driven to eat at the grass lands. Also in the case of Brasil is when you can manage best to carry all your equipment with the sun.

    Sunrise

    If you get to ride a horse: Taking pictures on top of a horse is not so hard if you: a) Have IS on your lense or the camera 2) Shoot either using manual or at least shutter priority mode. The faster the horse, the faster the shutter speed if you want sharp images.

    Find out what other ranches around the area you are visiting. We managed to visit a neighboring ranch that sells and raises exotic animals and manage to get great shots. They were very nice and let us walk inside the containment area and take our time on getting to know the animals and wait for the best shots.(So here is a free commercial  :) )

    Also depending on where you are you might manage to view animals not very common to your area, I was very intrigued by Pipoca a cateto pork which tend to be very mean, except him.

    Amigo Pipoca

    Missed opportunities:

    Some of the shots or things missed:

    Not all the cattle behaves the same, while buying and marking some recently purchased cattle, a bull wouldn't come into the containment area, 4 workers chase after him but he managed to jump a fence of at least 1.5 meters, it would have been a great shot.

    I should have brought my Manfrotto tripod I missed some good sunset and late opportunities because of not bring it. I have the 190X which is not too heavy but maybe I should invest on a gorillapod or at the very least a smaller tripod I can travel easier

    I was so concentrated on the cattle, that I missed some good opportunities for portraits with the workers at the ranches. Brasilians tend to be very open on getting their picture taken and the clothes they wear are very distinct and interesting and could make great portrait subjects.

    Fazenda hands

    Same as above, make sure to take pictures for remembering the trip, take pictures with family and friends, not everything is about getting the best shot.

    See the rest of the shots here

    Sunday, September 7, 2008

    Macro (Flowers)

    Shooting flowers (Macro)

    Don’t start snapping the first flower you come across. Even if you re standing on a field full of them, take the time to seek out the specimen that offers the best photographic potential, wether that is due to the quality of the bloom or its location

    Once you have found the flower in its prime, explore the subject from all angles to find the shooting position that delivers the best composition

    While your flower will be the central subject if your image, the background will play an enormous  role in the final success of the photograph. In any floral image, the background or surroundings will fill a large proportion of the frame. This isn't just empty space to e ignored, its an integral part of the picture. Your key decision will be wether you want to capture the flower in content and therefore present a clear view of the surroundings trees, plants and foliage or wether you want to focus on the flower in isolation.

    As a general rule of thumb a close up fo individual flower using a macro lens will demand an unclutered background so that nothing distracts from the shape and texture of the flower itself.

    Direction

    If you are shooting flowers have been shot with the sun falling on them from the front. The results gives highly saturated colors but an element of flatness in the picture, and texture will be sacrificed. Alternatively standing so that the sunlight hits your subject from the right hand side will mean you get more textural detail as the beams skim over the petals from an angle. You will get a more interesting though uneven shot. For an even more dramatic effect, opt for backlighting. With your subject positioned between you and the sun, the delicate nature, the spines, hairs and translucency of your flower will be emphasized because of the light shining trough the petals from behind. Ultimately this works best on subjects with a translucent quality, such as buttercups and poppies, giving an etheral effect. Keep the background darkest than your subject and take the meter reading from the shaded side of your subject for a more even exposure

    Reflect and Diffuse

    The type of reflector you use in your outdoor photograph will have different effect on the end result. Careful arrangement of home-make white card reflectors or professional reflector sheets will bounce crucial light back into areas of shadow to get a more creative and controlled end result

    Using gold reflectors on the other hand will imbue a warm cast over the frame for a summery effect. For a particularly dreamy image, and to take the edge off bright sunspots so as not to burn out plate flowers, position a diffuser in between your subject and the subject to soften the lighting. Tracking paper acts as an efficient diffuser material, the closer your position to your subject, the brighter the appearance and the higher the contrast.

    Use your knowledge

    Your skills as a photographer will grow if you use your macro work win conjunction with another area, anywhere you have inside knowledge that gives you an insight into what would make a good image and the spur to work at it

    Learn patience

    Macro iis not the immediate gratification type of photography. There will be successes and failures but you lean from both

    Equipment

    Dont make equipment or lack of it an excuse. After all, you wll only need good lighting and Aperture Priority Mode.

    Have respect

    The welfare of living things is of paramount importance. Lean all you can about the things you photograph


    del.icio.us Tags: ,,,

    Closer to Home (Macro)

    Closer to Home (Macro)

    Everyday objects around the home offer plenty of potential for interesting close ups, the key is to keep your eyes open for the possibilities of colors, textures and shapes. Even if you run out of ideas for photographing objects in your home, it is possible to bring interesting objects from outdoors for still life shooting

    Consider investing on a mini tripod that will allow you to get closer to your objects, a larger tripod my interfere with the table

    Creating a table top studio

    • A sturdy table
    • A white sheet or selection of large colored cards
    • A minimum of two, but ideally three or four separate lamps
    • Small pieces of card
    • Tin foil
    • Two objects large enough to prop up the card or sheets
    • A tripod

    Setting up your studio

    • Lay a well ironed sheet or large piece of card over a table and prop the rear end up so it falls in a curve. Position the object you want photograph in the center of the table and change your lamps in such a position to eliminate any unruly shadows.
    • If you have more than 2 lamps this should be easier In a professional studio darker shadows are field with the use of reflectors.
    • You can use your cards wrapped with tin foils to create reflectors.

    Try using a water spray bottle to add fine droplets to the petals and leaves. By photographing at such a close proximity to the subject you may capture some nice reflections.

    The most everyday or mundane subjects can turn into  inspirational photos if you capture their details in abstract.

    By learning to view the world around you in terms of its various patterns, colours and textures rather than the nature of the subject matter itself, you will undoubtedly discover a whole new world of photographic opportunities lurking in even the most unexpected places


    del.icio.us Tags: ,,,

    Wednesday, August 27, 2008

    Exotic Landscapes

    Tricks of the light

    • If you are traveling anywhere near the coast or desert, the exotic idyll of white sands and turquoise skies although photogenic will present the photographer with a multitude of hazards. They key is to be aware of the suns position.
    • In locations where cloud cover is sparse, intense sunlight will be detrimental to the level of detail in your image.
    • Adjust EV compensation up by one or two stops, or use exposure bracketing to cover yourself against inaccurate metering in tricky lighting scenarios
    • Early morning light is perfect for highlighting contours and textural formations of a deser landscape, emphasized even more by a low shooting position and wide angle lens
    • The low position of the sun and quality of natural light later in the day will give shots an atmospheric appearance, casting long shadows and adding depth to scenes such as rock formations and layered landscapes. Landscapes will also take on a warmer color tone at the beginning and end of the day, compared with the cool blue cast of midday

    Wide Open

    • A standard wide angle lens at 35mm equivalent focal lent of 43-60mm or a super wide angle lens of 24-42mm will work to capture every last detail while making the most of the sjy and foreground
    • Place the horizon in your frame according to the interest that the sky and foreground each hold - they must wor kwell together or not at all-

    For coastal areas

    • Using fast shutter speeds higher than 1/250 secs will freezse the motion of waves and sea spray. In contrast, slow shutter speeds of less than half a second will blur the water and soften the scene. If this is where your traveling interest lues then the addition of a polarizing filter to your kit bag will help you improving the color and contrast of your images, and will reduce the glare caused by reflection. A tripod is a most on all of this situations
    • The inclusion of a human element into a typical landscape photograph can give a striking sense of scale to a place. Focus your lens on the person in the frame, but employ a wide aperture to ensure sharpness from front to back.

    del.icio.us Tags: ,,,

    Tips on...<Travel>

    Travel Photography tips

    Is good to go to a location and have a them around the photoshoot. Get an assignment

    • Working hands
    • Colorful
    • Street names
    • Vivid Colors
    • Close up Local architecture
    • Children
    • Keep it friendly when approaching people
    • Know when to back down. dont be upset by a refusal, just try somebody else
    • Learn the lingo:: learn a few basic words from the language of the country you are visiting, at least please and thanks
    • Understand the culture: research into local customs
    • Fill the frame: get in as close as possible to the subject
    • Research your destination thoroughly, if you get some research done it will tell you what kit to bring
    • Make the light work for you. Bring a reflector/diffuser kit and a flash with a diffuser. Controlling the light is key for a good portrait
    • Know the best time to shoot: Avoid harsh sunlight if possible move the subject to the shade
    • When shooting wildlife, preparation is key: Bring the longest lens you have
    • Consider composition carefully. Dead Center is deadly. Position the subject off-centerfor a more interesting composition
    • Experiment with filters: Use a polarizing filter, to reduce glare on water and foliage
    • Ask permission to take pictures of people:
    • Change your perspective, tell more of the story by using wider lenses.
    • For more marketable pictures, try writing, it helps selling a set for a certain location
    • Create a diary of your travels, this will help tell a story of your set

    Checklist before you go...

    • Do your research: read upon the area for things to shoot where to go and where not to
    • Check your documents
    • Equipment list
    • Clean Equipment
    • Check equipment (take a few test shots)
    • Charge batteries
    • Power (dont forget a travel adapter)
    • Check airline restrictions for carry-on on passport and electronics
    • Storage; enough memory cards and back up units in case those cards fill up

    Think Kit

    Make sure you pack the right equipment. Think about these filters, lenses and cameras to suit all the photographic situations you might encounter. A circular polarizer is a most

    Outside the box

    Capture not only buildings and locations but the locals while on your travels and you will have some outstanding shots

    Add context

    Although some shots look like they could have been taken anywhere in the world, make sure your shots dont. Add subtle touches like a local language sign pr native animal to your shot to give a little context

    Zoom In

    Great travel shots arent just sweeping vistas and huge buildings. Get up close and shoot individual hieroglyphs, single crucifixes or sained glass windows

    Colour composition

    Take advantage of local dress, landmarks and culture to take striking photos.. The rules of composition still apply, but you could try to vary your viewpoint to get more exciting frames

    After dark

    Wait until the lights go down brefore you get your camera outm Dusk and sunset hours are beautiful by the water. Look out for reflections, slow your shutter speed.

    Local people

    Landscapes may be the most common travel shots, but the ones if local people are often the shots that speak the loudest. Make sure you ask permission to take their photo

    In the wild

    Invest in a good telephoto lens as well as abean bag. Its essential for a safari

    Do your research

    Find out everything you can before travel. What events are going while yuou are there. Are there any high vantage points to shoot from?.

    Research what your destination has to offer and what makes it unique. Research travel brochures it can give you a good indication of whats been shot, so you dont repeat it, but it also is a good start

    Find out of any festivals as well as where the local markets are, this creates a huge opportunity. If you want to add some portraits to the mix, learning some of the local language helps

    Ideally you should carry 2 DSLR bodies and with them a collection of overlapping lenses a telephoto, tele-zoom and two wide-angle. Keeping lenses to a minimum will mean less switching and less risk to your sensor getting dirty or damaged.

    For shooting on the move a good back up unit is essential, there are several at different prices, I personally own this one. Some extras to pack on your bag are a tripod (carbon fiber would be ideal), cable release, USB cables and spare memory cards. Graduated filers could be consider a luxury if you want to travel light as some of this effect can be recreated in Photoshop

    Tuesday, August 26, 2008

    Tips on...<Guide to the Eye>

    This principles are based on eye studies that you can take advantage for more compelling pictures

    • The slowest film you can buy is ISO 25, with DSLR's going npw tp ISO 6400 your camera sees better in the dark than you do. So enjoy this functionality and go shoot in the dark. Dont be afraid of some noise
    • The eyes love lines, especially horizons. Use them to your advantage, keep lines straight include points of intersection, and put your subject close to corners
    • Avoid bright pupil contracting lights in the eyes when shooting portraits, or score some belladona
    • Place someone or something moving to the right in the foreground (perhaps a couple walking on the beach) and in the background above their heads place objects projecting to the left such as cliffs and headlands)
    • When shooting B&W make sure you have enough contrast to keep viewer's attention where you want it. And dont forget those all important lines and faces
    • Use split ND density filters in sunshine and high dynamic range photography at night to make your pictures look more like your actual experience of the scene.
    • With a focal length of about 22mm and a field of view of almost 180 degrees at its extreme our eyes are capable of f3.5 wide open. Then, only the 2 degrees in the center of the retina an area called the fove us sharp. This is maybe why shallow DOF is very appealing. So use it to draw attention straight to your subject. Extreme DOF can also introduce elements of surprise to your photo
    • When we view pictures our brains can identify and make associations with a range of blurry and indistinct elements, essentially filling the blanks due to the fact that with a 120 degree vuew field of view the eyes resolution is around 576 megapixels.
    • Studies show that 75% of the most appealing paintings across 3 centuries showed a light source above and left.

    Places I've shot in