Showing posts with label GPS. Show all posts

Sunday, July 19, 2009

Bull Island Seals Dublin Photo shoot

Bull Island is located just south of Howth, around a 10 min drive from Howth harbor. It is a nature reserve, so make sure to follow the rules listed there. In order to find the seals you need to park on the northern part of the Island (Second bridge if you are coming from Dublin)

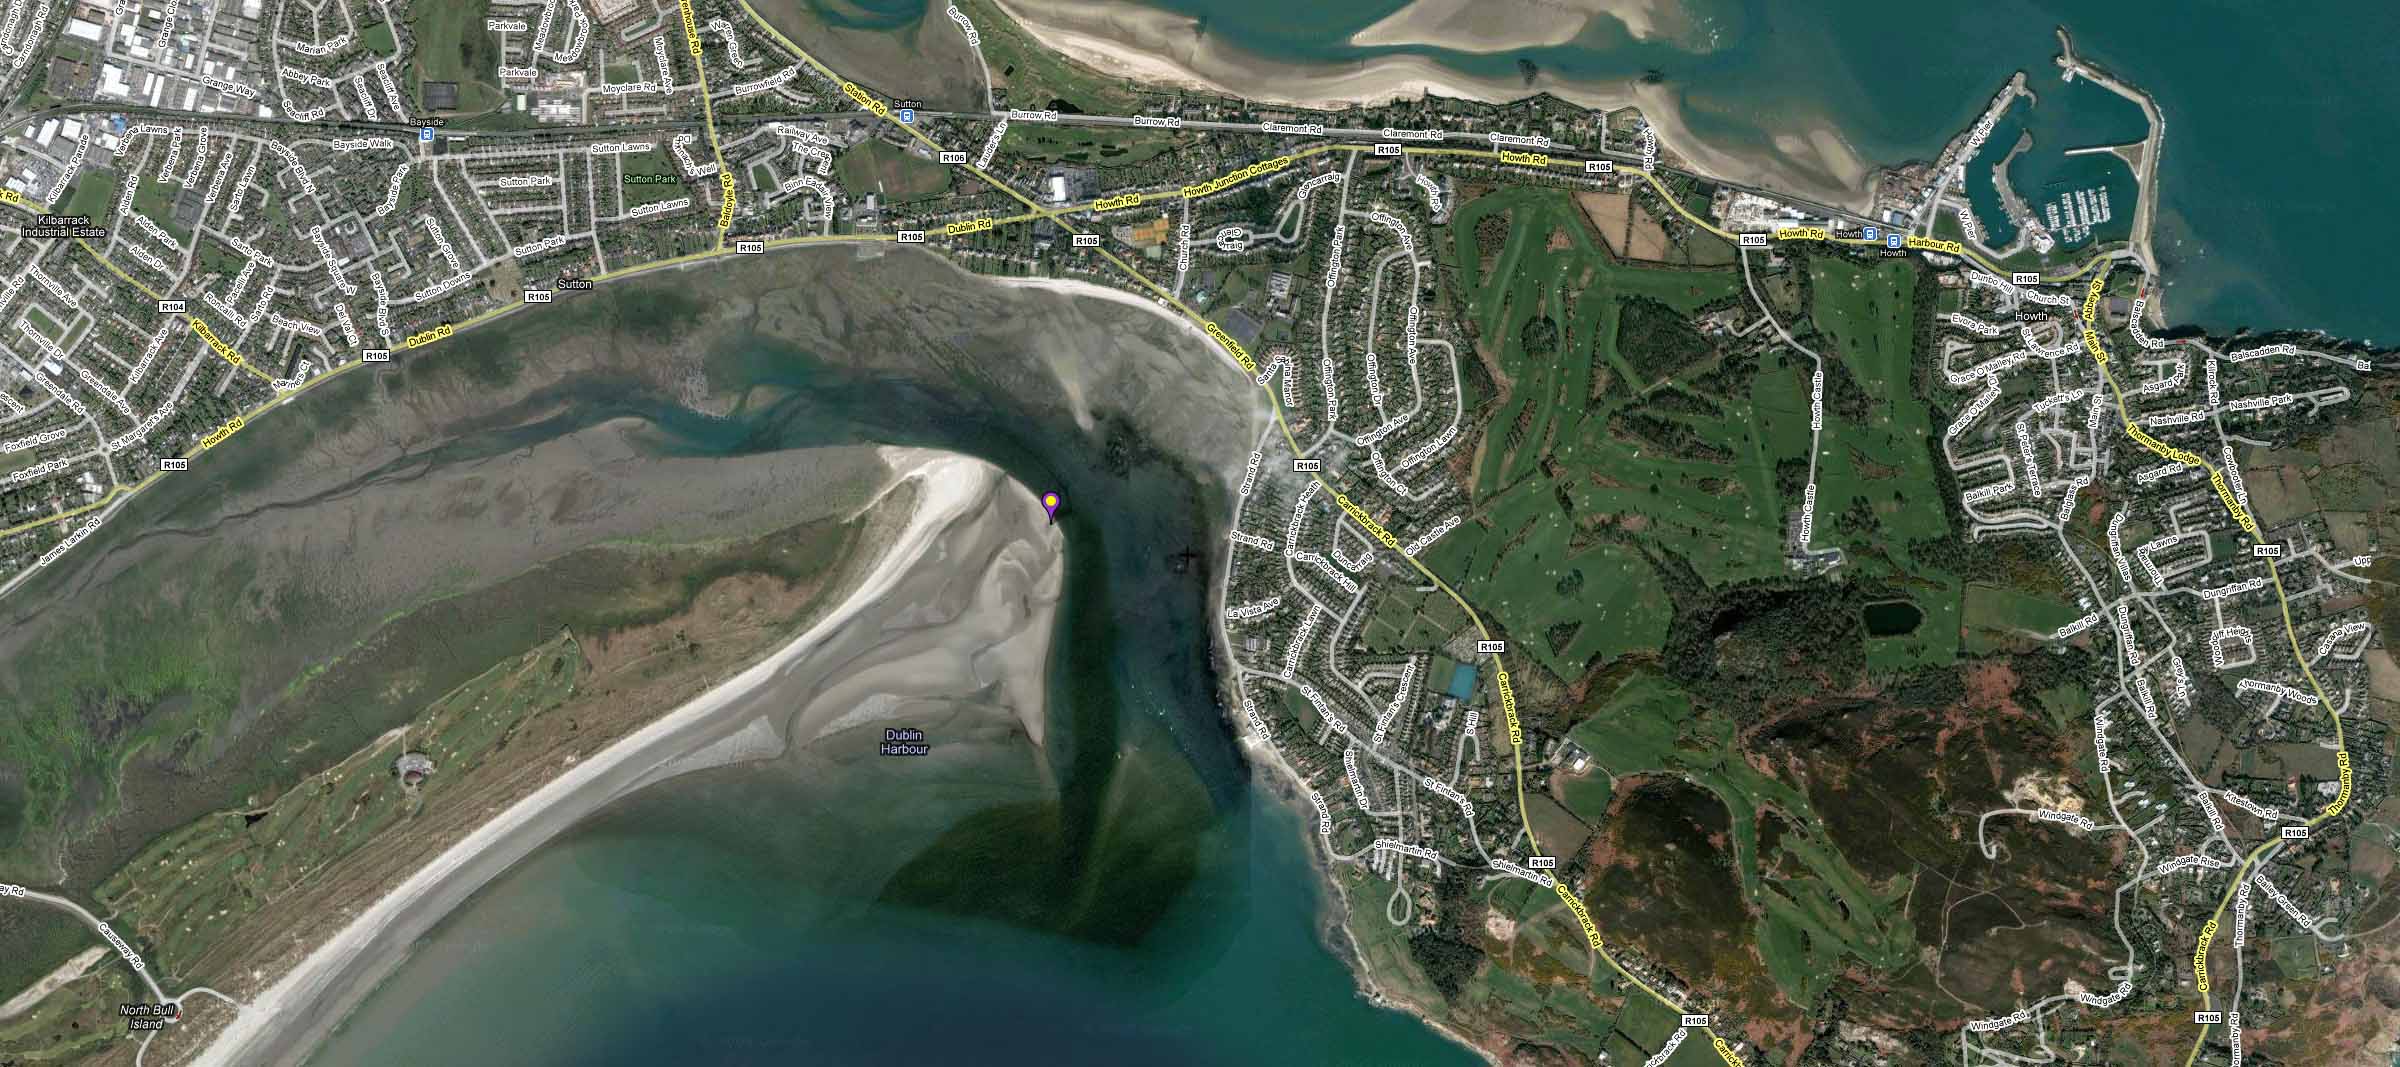
Park your car in the sand parking lot, and get ready for a 20-30 min walk. Here is a quick map on where you will find the seals my location is marked with the purple marker.
For Olympus RAW file usage with GPS I recently discovered GeoSetter, great tool that can work with the .ORF files, write the .xmp card or directly into the file to accommodate GPS data. Highly recommended.

Funny enough this map shows the exact GPS location where I was located, but bear in mind that the tide changes, so that area could be covered with water any other day, but I have been there 3 times and the seals are always located on the northernmost corner of the island, but not all the time laying on the sand, which was the shot I was looking for. After a couple of tries, here is what I managed to get prior to this day..just a few head shots.

I believe that in order to get shots from the seals outside of the water there must be a reasonable amount of sun and a low tide, this last time I went was around 9AM, so I dont think the hour in the day matters that much.

My Gear:

  • Olympus E3
  • Olympus E30
  • Zuiko 50-200mm 2.8
  • Zuiko Teleconverter 2X EC-20
  • Hoya Polarizer Filters
  • Lowepro FastPack 250
  • Wind resistant pants and jacket
  • Wellies

    After a good 30 minute walk,  and depending on the tide you will find the seals at the northeast corner, approach very slowly and be very careful of the sand. I misjudged some weed and sand banks and went right in all the way to my knees covered with weed,sand and I am sure smell liked shit.  Once you are 50-75 meters away from the seals lay down on the sand, take your gear out and start approaching them by dragging yourself trough the sand, if the seals see something taller or something similar to a human shape they will dive right into the water.

    Take a few shots and get closer, make the seals comfortable, and then get closer again, if some of them get scared and dive into the water stop immediately, stay still for a few minutes and move again. I saw a group of 15-20 seals but as I got closer and the tide rose few and few seals remained.

    Use your bag as a bean bag and start shooting, I used Shutter and Aperture Priority Mode, low ISO (100) and a polarizer filter. I tried some shots with the tele-converter but I thought I was sacrificing too much sharpness, so decided to get closer and also crop some of the images to close-in the seals.

    Being gray seals, the metering system will struggle with the light measuring of both the harsh light reflecting on the sea and the dark features on the seals faces, so compensated with EV+1 to bring some details on the face, or try and fix on post processing.

    Puppies are very curious so they are the ones that will be the most active and will get closer to you, but be careful in never getting between the puppy and the mom, as they will feel threatened. Also as some seals go in the water be aware always of where they are, they can come out behind you and you dont want to be too close, a seal bite can be very nasty and have lots of bacteria in their mouths that can cause a big infection.

    I lost a very good shot of a fight between 2 adult seals. If you see a seal approaching another one, and their heads are close to each other,  one of them will open its mouth that’s the beggining, put your camera on burst mode and do some manual focusing as you will see a fight that will only last for a few seconds.

    Always be mindful of the tide, if you think that the waves are getting closer and closer you are right. Usually the seals are on a spot higher than the tide, that means that if you are not careful you will end up on a little sand island surrounded by water that is rising, believe me I was stuck once and had to walk with water up to my knees hauling my gear, hence the wellies. Once you get home, clean your equipment right away, there will be sand between the extension part of your lenses and all around the buttons, even though the E-3 is weather sealed, clean this with an air brush as you dont want corrosion. For your bag, wait for the sand to dry and then shake all the sand off, there will be a lot of sand accumulated on the back area of the backpack that you wont see but once it dries it will come off rather easily. If you want to see the whole set of pictures visit my site at flickr here..

  • Sunday, August 17, 2008

    Tagging with GPS...

    Geo-tagging your pictures is the process of embedding GPS coordinates inside your photos metadata for later retrieval of different types of Software.

    Tagging your photos with GPS data, facilitates the sense of community and sharing of your pictures; I have found it very useful to explore places I will be visiting just by looking at other's people pictures based on the exact location I will be and what other people photographed there.

    There are lots of different ways of doing it, the easiest one and most expensive is using certain devices that can be attached to your camera (I have only seen it on Nikon, nothing on Olympus yet) and every time the shutter is pressed, GPS coordinates are written to the file inside the camera. On the other side of the spectrum, downloading the files, doing your digital workflow and then use software like Flickr to assign "close-enough" coordinates is by far the cheapest.

    Here is a review of a solution in the "middle of the road" that has proven cheap and easy to incorporate into the digital workflow.

    Choosing a GPS.

    There are lots of options out there, I spent 1 day researching and to me it came down to the following devices:

    At the end of the day it came down to 2 criteria;

    Need to load a driver on my computer and the power options. I went for the Amod AGL3080 because it connects via USB and its immediately map as a drive on my PC, and it uses regular batteries vs being charged via USB.

    Here is a quick review of the GPS and the whole process:

    Once I received the GPS, I wasnt very impressed with the packaging, it comes with the GPS, no batteries are IMGP1077included (it requires 3 AAA) it includes some mapping software that I haven't installed yet and the manuals are included inside the device on a pdf format.

    The GPS itself is small and its design to be IMGP1075used attached to a belt clip or to your camera bag. Once the batteries are in, it took no more than 1 minute to get a lock on the satellites and start recording the position.

    I used it "on the field" on a recent trip to Alki Light House here in Seattle. First things first: the GPS came with a protective plastic sticker, very similar to watches: DONT REMOVE IT. The unit itself will get scratched very easiy without it, and since it will be attached to your bag, it could get damaged, that happened to me when I put my bag down on the stone beach at the Lighthouse.

    This is very, very important, make sure that your IMGP1076camera's time and date are accurate. A good tip also is to take your first picture of your watch to have a record of the time you started shooting.I made the mistake of not 20080814-P8153103 setting this up correctly and while fixable latter its a pain the butt (My cameras were purchased in Singapore so they were 14 hours ahead). Once you have done this you are set. The GPS acquired signal and off we went. I turned on the GPS as soon as I left home, and didnt turn it off until we got back home some 9 hours later. If you have attached the GPS unit to your bag, just make sure not to leave it on the car!

    Once we got back home, I realized the mistake of the camera's date and time. So here is what I had to do to fix it:

    First we tried to fix it by copying the RAW files and 8-17-2008 10-33-53 AMusing lightroom' s b ulk time and ate change functionality. Only problem with this approach is that Lightroom did not modify the original RAW file, but rather created an extra file with the new EXIF data for each RAW file. Finally we decided to use the Olympus Master 2 Software which has the same bulk date change functionality but it actually modified the RAW file.

    With the RAW files fixed for the RAW files in both my cameras, we were ready for the geotagging process. Here are the steps:

    We attached the GPS receiver to the computer USB which attached as another drive and use the file generated which was 8MB in size. By using a SW called Downloader Pro we downloadpro manage the whole process of tagging the pictures. Under the Edit Menu on GPS Settings we set the different parameters such as location of GPS file, the offset or window to match the pictures (In this case is 5 minutes). By doing this the software matches each photo's time within a 5 minute window on the log file trying to do the match. If it cant match it, an error is generated for that specific file. An output folder also is specified to generate a goggle google track's file that can be used later to look at the entire journey. (For some reason it runs rather slow on my computer using I.E). The process takes very little time and it generates a set of RAW files with the GPS coordinates. (There is an option also to export to DNG directly from Downloader Pro but I did that using Lightroom).

    Once this is completed, then you can use your regular workflow to edit and process your images. The neat thing now is that all of your exports from Lightroom will now have the GPS coordiates and can be shared in applications like google, live or Flickr.

    Here is how the finish product looks like in lightroom. By lrpic clicking on the little arrow next to the coordinates it will open Googmaple Maps with the actual location of where those GPS coordinates represent. It is a very cool process and it doesnt take a lot of time or money to achieve. I spent $60 USD for the receiver and $30 for the Dowloader Pro License. I think to get this extra information and functionality out of your pictures is well worth it.

    Any questions drop me a line...

    Places I've shot in