Geo-tagging your pictures is the process of embedding GPS coordinates inside your photos metadata for later retrieval of different types of Software.
Tagging your photos with GPS data, facilitates the sense of community and sharing of your pictures; I have found it very useful to explore places I will be visiting just by looking at other's people pictures based on the exact location I will be and what other people photographed there.
There are lots of different ways of doing it, the easiest one and most expensive is using certain devices that can be attached to your camera (I have only seen it on Nikon, nothing on Olympus yet) and every time the shutter is pressed, GPS coordinates are written to the file inside the camera. On the other side of the spectrum, downloading the files, doing your digital workflow and then use software like Flickr to assign "close-enough" coordinates is by far the cheapest.
Here is a review of a solution in the "middle of the road" that has proven cheap and easy to incorporate into the digital workflow.
Choosing a GPS.
There are lots of options out there, I spent 1 day researching and to me it came down to the following devices:
At the end of the day it came down to 2 criteria;
Need to load a driver on my computer and the power options. I went for the Amod AGL3080 because it connects via USB and its immediately map as a drive on my PC, and it uses regular batteries vs being charged via USB.
Here is a quick review of the GPS and the whole process:
Once I received the GPS, I wasnt very impressed with the packaging, it comes with the GPS, no batteries are 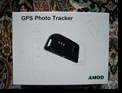 included (it requires 3 AAA) it includes some mapping software that I haven't installed yet and the manuals are included inside the device on a pdf format.
The GPS itself is small and its design to be  used attached to a belt clip or to your camera bag. Once the batteries are in, it took no more than 1 minute to get a lock on the satellites and start recording the position.
I used it "on the field" on a recent trip to Alki Light House here in Seattle. First things first: the GPS came with a protective plastic sticker, very similar to watches: DONT REMOVE IT. The unit itself will get scratched very easiy without it, and since it will be attached to your bag, it could get damaged, that happened to me when I put my bag down on the stone beach at the Lighthouse.
This is very, very important, make sure that your  camera's time and date are accurate. A good tip also is to take your first picture of your watch to have a record of the time you started shooting.I made the mistake of not
  setting this up correctly and while fixable latter its a pain the butt (My cameras were purchased in Singapore so they were 14 hours ahead). Once you have done this you are set. The GPS acquired signal and off we went. I turned on the GPS as soon as I left home, and didnt turn it off until we got back home some 9 hours later. If you have attached the GPS unit to your bag, just make sure not to leave it on the car!
Once we got back home, I realized the mistake of the camera's date and time. So here is what I had to do to fix it:
First we tried to fix it by copying the RAW files and 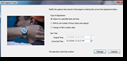 using lightroom' s b ulk time and ate change functionality. Only problem with this approach is that Lightroom did not modify the original RAW file, but rather created an extra file with the new EXIF data for each RAW file. Finally we decided to use the Olympus Master 2 Software which has the same bulk date change functionality but it actually modified the RAW file.
With the RAW files fixed for the RAW files in both my cameras, we were ready for the geotagging process. Here are the steps:
We attached the GPS receiver to the computer USB which attached as another drive and use the file generated which was 8MB in size. By using a SW called Downloader Pro we 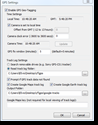 manage the whole process of tagging the pictures. Under the Edit Menu on GPS Settings we set the different parameters such as location of GPS file, the offset or window to match the pictures (In this case is 5 minutes). By doing this the software matches each photo's time within a 5 minute window on the log file trying to do the match. If it cant match it, an error is generated for that specific file. An output folder also is specified to generate a
 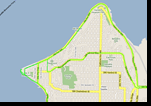 google track's file that can be used later to look at the entire journey. (For some reason it runs rather slow on my computer using I.E). The process takes very little time and it generates a set of RAW files with the GPS coordinates. (There is an option also to export to DNG directly from Downloader Pro but I did that using Lightroom).
Once this is completed, then you can use your regular workflow to edit and process your images. The neat thing now is that all of your exports from Lightroom will now have the GPS coordiates and can be shared in applications like google, live or Flickr.
Here is how the finish product looks like in lightroom. By  clicking on the little arrow next to the coordinates it will open Goog
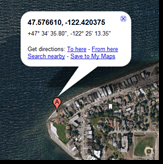 le Maps with the actual location of where those GPS coordinates represent. It is a very cool process and it doesnt take a lot of time or money to achieve. I spent $60 USD for the receiver and $30 for the Dowloader Pro License. I think to get this extra information and functionality out of your pictures is well worth it.
Any questions drop me a line...



 Posts
Posts


