Showing posts with label photography. Show all posts

Sunday, July 19, 2009

Bull Island Seals Dublin Photo shoot

Bull Island is located just south of Howth, around a 10 min drive from Howth harbor. It is a nature reserve, so make sure to follow the rules listed there. In order to find the seals you need to park on the northern part of the Island (Second bridge if you are coming from Dublin)

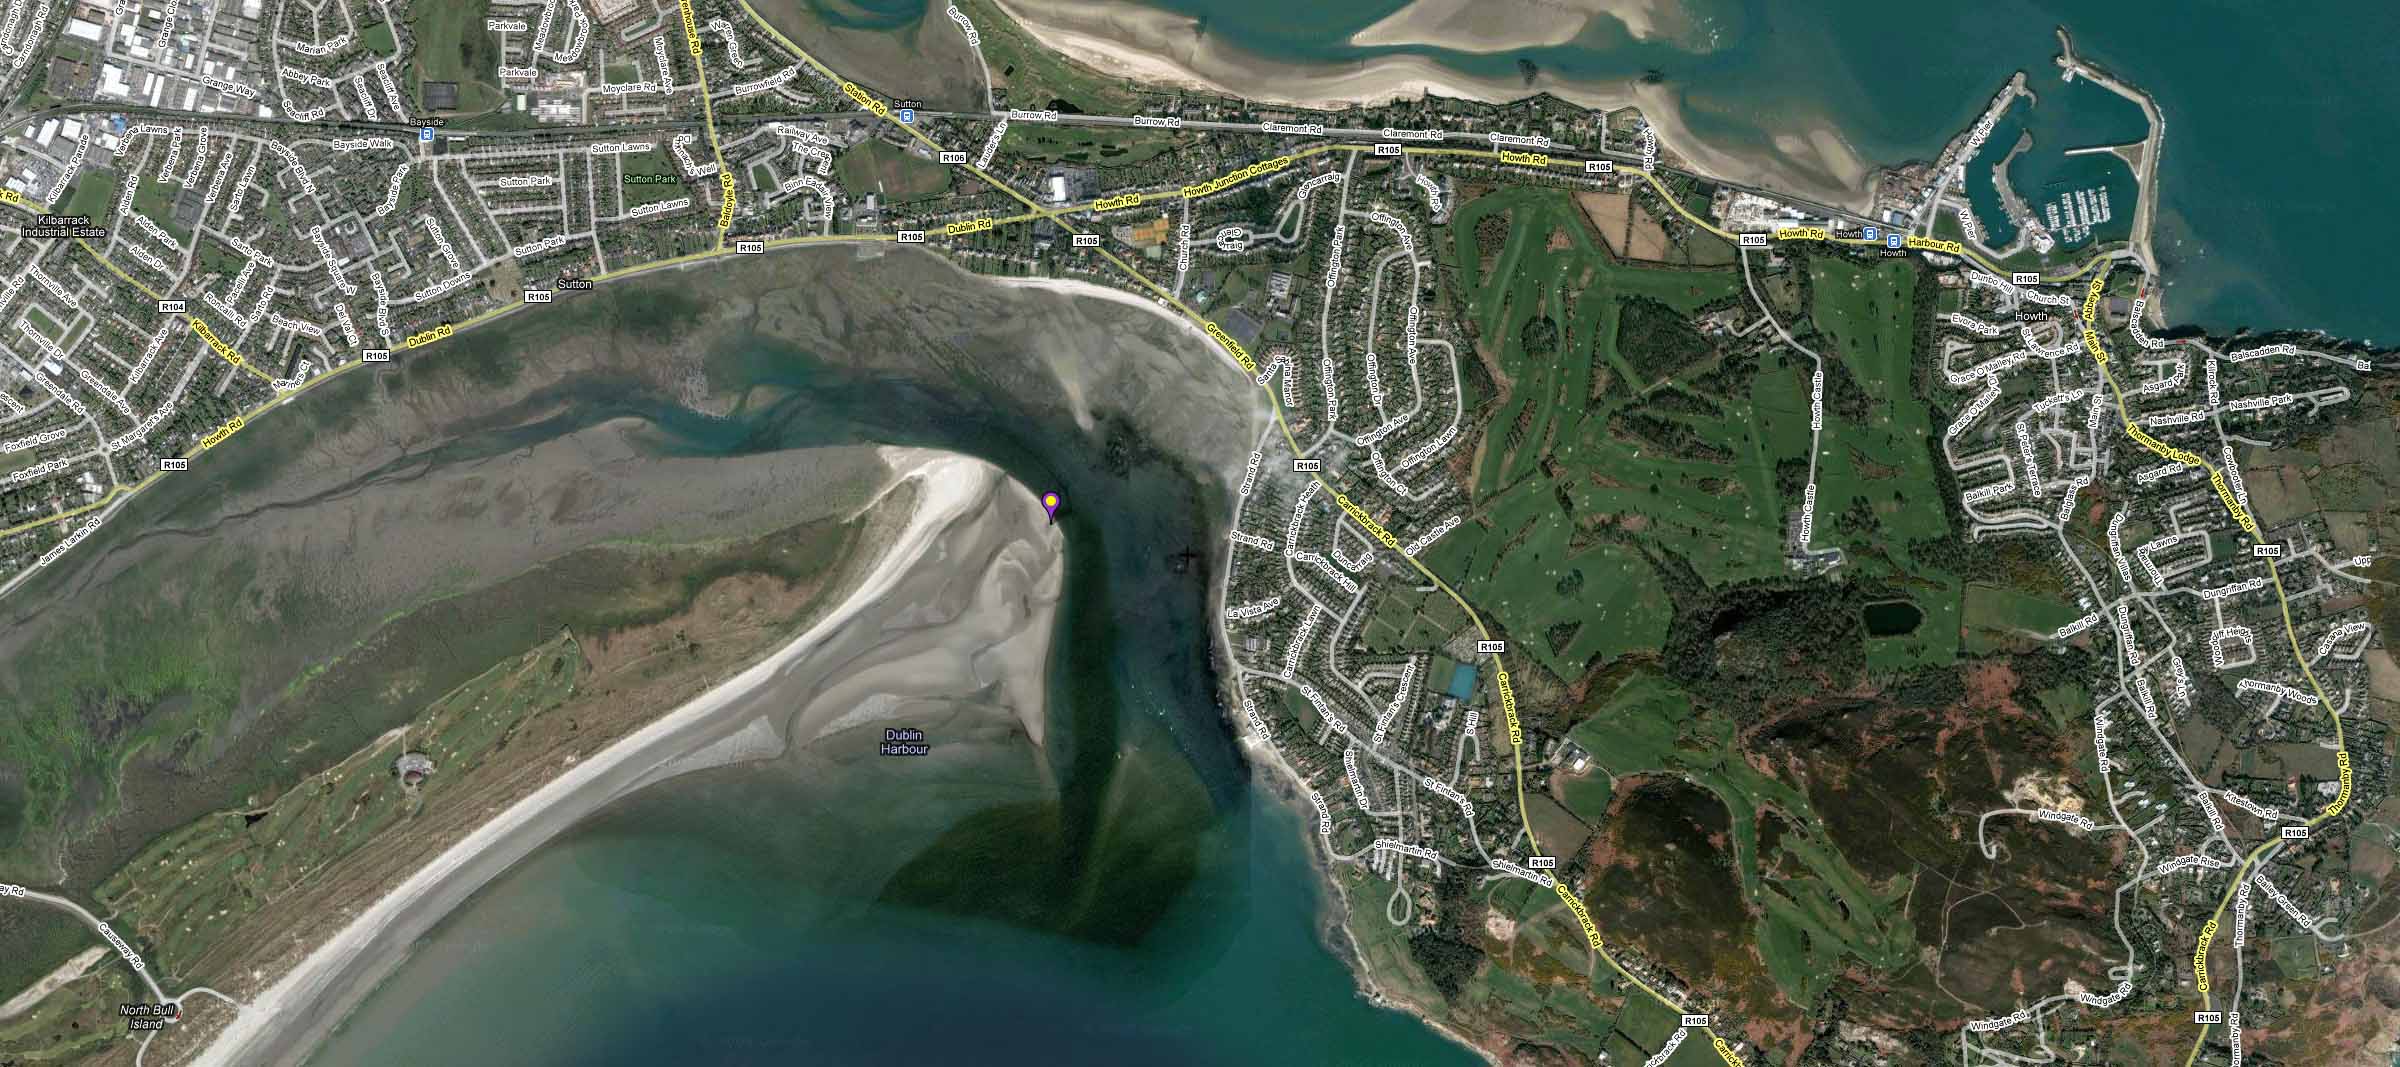
Park your car in the sand parking lot, and get ready for a 20-30 min walk. Here is a quick map on where you will find the seals my location is marked with the purple marker.
For Olympus RAW file usage with GPS I recently discovered GeoSetter, great tool that can work with the .ORF files, write the .xmp card or directly into the file to accommodate GPS data. Highly recommended.

Funny enough this map shows the exact GPS location where I was located, but bear in mind that the tide changes, so that area could be covered with water any other day, but I have been there 3 times and the seals are always located on the northernmost corner of the island, but not all the time laying on the sand, which was the shot I was looking for. After a couple of tries, here is what I managed to get prior to this day..just a few head shots.

I believe that in order to get shots from the seals outside of the water there must be a reasonable amount of sun and a low tide, this last time I went was around 9AM, so I dont think the hour in the day matters that much.

My Gear:

  • Olympus E3
  • Olympus E30
  • Zuiko 50-200mm 2.8
  • Zuiko Teleconverter 2X EC-20
  • Hoya Polarizer Filters
  • Lowepro FastPack 250
  • Wind resistant pants and jacket
  • Wellies

    After a good 30 minute walk,  and depending on the tide you will find the seals at the northeast corner, approach very slowly and be very careful of the sand. I misjudged some weed and sand banks and went right in all the way to my knees covered with weed,sand and I am sure smell liked shit.  Once you are 50-75 meters away from the seals lay down on the sand, take your gear out and start approaching them by dragging yourself trough the sand, if the seals see something taller or something similar to a human shape they will dive right into the water.

    Take a few shots and get closer, make the seals comfortable, and then get closer again, if some of them get scared and dive into the water stop immediately, stay still for a few minutes and move again. I saw a group of 15-20 seals but as I got closer and the tide rose few and few seals remained.

    Use your bag as a bean bag and start shooting, I used Shutter and Aperture Priority Mode, low ISO (100) and a polarizer filter. I tried some shots with the tele-converter but I thought I was sacrificing too much sharpness, so decided to get closer and also crop some of the images to close-in the seals.

    Being gray seals, the metering system will struggle with the light measuring of both the harsh light reflecting on the sea and the dark features on the seals faces, so compensated with EV+1 to bring some details on the face, or try and fix on post processing.

    Puppies are very curious so they are the ones that will be the most active and will get closer to you, but be careful in never getting between the puppy and the mom, as they will feel threatened. Also as some seals go in the water be aware always of where they are, they can come out behind you and you dont want to be too close, a seal bite can be very nasty and have lots of bacteria in their mouths that can cause a big infection.

    I lost a very good shot of a fight between 2 adult seals. If you see a seal approaching another one, and their heads are close to each other,  one of them will open its mouth that’s the beggining, put your camera on burst mode and do some manual focusing as you will see a fight that will only last for a few seconds.

    Always be mindful of the tide, if you think that the waves are getting closer and closer you are right. Usually the seals are on a spot higher than the tide, that means that if you are not careful you will end up on a little sand island surrounded by water that is rising, believe me I was stuck once and had to walk with water up to my knees hauling my gear, hence the wellies. Once you get home, clean your equipment right away, there will be sand between the extension part of your lenses and all around the buttons, even though the E-3 is weather sealed, clean this with an air brush as you dont want corrosion. For your bag, wait for the sand to dry and then shake all the sand off, there will be a lot of sand accumulated on the back area of the backpack that you wont see but once it dries it will come off rather easily. If you want to see the whole set of pictures visit my site at flickr here..

  • Saturday, July 11, 2009

    AIB Street Performance World Championship

    During the month of June (18th to 21st) there is an event in Dublin at Merrion Square sponsored by AIB that brings together street performance from all over the world. You can visit their website here, and follow them on facebook as well.

    I didn't manage to get many shots but was able to get a couple of good pictures, here are some tips on the event if you want to try it next year .

    First of all bring a telephoto lens, unless you are looking for a specific shot a wide angle lense might not do you much help as the crowds, sun might make it hard to get a good photo.

    Plan in advance what you want to see, as for location, here is a good tip: get there early, is very crowded and not much space to move. Here is a piece of good advice, locate yourself in the corner of the park marked below, it has a grassy hill that people use as a seating area, if you get there early you will be able to get clear shots of the show. The green arrow shows the corner of Marrion square where you should be position yourself. Download the schedule and wait for the show you are interested to arrive there, across the 4 days all shows would have hit that single stage.

    image

    I was able to get clear shots of a couple of acts such as these:


    As always in Dublin, be prepare for the rain, the organizers will provide ponchos for the crowds to use as seat covers for the wet grass, but bring something for the camera.

    Once the shows starts, crowds start to gather, pay attention not only to the performer but people’s reactions make for great candid shots.

    If you are interested on the whole photo set visit my site at flickr…

    Sunday, April 26, 2009

    Photoshoot near Quirianopolis, Goias, Brasil

    I managed to take a week off while in Sao Paulo to go visit the Fazenda Engenho São Francisco near Quirianopolis. Here are my tips and mistakes made while shooting pictures in a farm.

    Here is the equipment taken

    Here was my journey:

    image Ireland to Brasil
    Map picture
    then to Goiania and Quirinopolis in Goias State
     image


    Fazenda Engenho São Francisco  (click on the link and zoom in you can actually see the cattle)

    BTW for Olympus RAW file usage with GPS I recently discovered GeoSetter, great tool that can work with the .ORF files, write the .xmp card or directly into the file to accommodate GPS data. Highly recommended.


    Most Important tip…

    Always talk to the person that runs the place day in and day out. They will give you good tips around the behavior of some of animals, which ones are approachable, and which ones to be careful (I managed to piss off a cow with her calf and it wasn't pretty)

    Bola and cattle

    Learn beforehand what kind of animals will you get to see (in my case was mostly cattle but managed a nice surprise to see exotic animals.

    Emu look

    For cattle, learn what type of cattle it is you will be seeing, behavior will change depending on the breed and how is managed by the ranch.

    The gang

    If you want cattle to get close to you, as I wanted a very low close-up shot of some grown cows or bulls you need to get into the containment area, get down or sit down on the floor and wait. Cattle can be very curious and only takes one to come closer, for the other ones to follow. Be very careful once they are close, sudden moves can make them jump (very high) and you don't want to get stomped or worse your equipment be crushed

    Courious calf

    Clothes: depending on where you are going, will vary your clothing, but regardless of weather bring very old dirty jeans. If you can manage some cheap boots do as well, as you have to be ready to step, kneel and sit on cow dong, piss and milk and dirt. Same goes for your camera bag, be ready for it to get dirty and gnawed by curious calves

    Spilled milk

    Bring your equipment for landscape photography, either on hills or flat land ranches tend to be in open spaces and you can capture great sunsets, sunrises and cloud formations.

    Storm in Sta Cecilia

    Get up early, not only because of the great light during that time, farm work starts at 5am the animals are quite awake and is the time before a lot of the cattle is being driven to eat at the grass lands. Also in the case of Brasil is when you can manage best to carry all your equipment with the sun.

    Sunrise

    If you get to ride a horse: Taking pictures on top of a horse is not so hard if you: a) Have IS on your lense or the camera 2) Shoot either using manual or at least shutter priority mode. The faster the horse, the faster the shutter speed if you want sharp images.

    Find out what other ranches around the area you are visiting. We managed to visit a neighboring ranch that sells and raises exotic animals and manage to get great shots. They were very nice and let us walk inside the containment area and take our time on getting to know the animals and wait for the best shots.(So here is a free commercial  :) )

    Also depending on where you are you might manage to view animals not very common to your area, I was very intrigued by Pipoca a cateto pork which tend to be very mean, except him.

    Amigo Pipoca

    Missed opportunities:

    Some of the shots or things missed:

    Not all the cattle behaves the same, while buying and marking some recently purchased cattle, a bull wouldn't come into the containment area, 4 workers chase after him but he managed to jump a fence of at least 1.5 meters, it would have been a great shot.

    I should have brought my Manfrotto tripod I missed some good sunset and late opportunities because of not bring it. I have the 190X which is not too heavy but maybe I should invest on a gorillapod or at the very least a smaller tripod I can travel easier

    I was so concentrated on the cattle, that I missed some good opportunities for portraits with the workers at the ranches. Brasilians tend to be very open on getting their picture taken and the clothes they wear are very distinct and interesting and could make great portrait subjects.

    Fazenda hands

    Same as above, make sure to take pictures for remembering the trip, take pictures with family and friends, not everything is about getting the best shot.

    See the rest of the shots here

    Sunday, September 7, 2008

    Macro (Flowers)

    Shooting flowers (Macro)

    Don’t start snapping the first flower you come across. Even if you re standing on a field full of them, take the time to seek out the specimen that offers the best photographic potential, wether that is due to the quality of the bloom or its location

    Once you have found the flower in its prime, explore the subject from all angles to find the shooting position that delivers the best composition

    While your flower will be the central subject if your image, the background will play an enormous  role in the final success of the photograph. In any floral image, the background or surroundings will fill a large proportion of the frame. This isn't just empty space to e ignored, its an integral part of the picture. Your key decision will be wether you want to capture the flower in content and therefore present a clear view of the surroundings trees, plants and foliage or wether you want to focus on the flower in isolation.

    As a general rule of thumb a close up fo individual flower using a macro lens will demand an unclutered background so that nothing distracts from the shape and texture of the flower itself.

    Direction

    If you are shooting flowers have been shot with the sun falling on them from the front. The results gives highly saturated colors but an element of flatness in the picture, and texture will be sacrificed. Alternatively standing so that the sunlight hits your subject from the right hand side will mean you get more textural detail as the beams skim over the petals from an angle. You will get a more interesting though uneven shot. For an even more dramatic effect, opt for backlighting. With your subject positioned between you and the sun, the delicate nature, the spines, hairs and translucency of your flower will be emphasized because of the light shining trough the petals from behind. Ultimately this works best on subjects with a translucent quality, such as buttercups and poppies, giving an etheral effect. Keep the background darkest than your subject and take the meter reading from the shaded side of your subject for a more even exposure

    Reflect and Diffuse

    The type of reflector you use in your outdoor photograph will have different effect on the end result. Careful arrangement of home-make white card reflectors or professional reflector sheets will bounce crucial light back into areas of shadow to get a more creative and controlled end result

    Using gold reflectors on the other hand will imbue a warm cast over the frame for a summery effect. For a particularly dreamy image, and to take the edge off bright sunspots so as not to burn out plate flowers, position a diffuser in between your subject and the subject to soften the lighting. Tracking paper acts as an efficient diffuser material, the closer your position to your subject, the brighter the appearance and the higher the contrast.

    Use your knowledge

    Your skills as a photographer will grow if you use your macro work win conjunction with another area, anywhere you have inside knowledge that gives you an insight into what would make a good image and the spur to work at it

    Learn patience

    Macro iis not the immediate gratification type of photography. There will be successes and failures but you lean from both

    Equipment

    Dont make equipment or lack of it an excuse. After all, you wll only need good lighting and Aperture Priority Mode.

    Have respect

    The welfare of living things is of paramount importance. Lean all you can about the things you photograph


    del.icio.us Tags: ,,,

    Friday, August 29, 2008

    Tip on... Hostile climates

    Here are some tips when going to extremes in relation to climate

    For cold temperatures

    Batteries dont like cold weather. If you look at your camera manual you will usually see 2 different sets of values for battery life, one for normal conditions and another one for freezing point. Usually battery life is reduce by half on near freezing temperatures. For example the Canon EOS 400D battery can take 500 shots at 23degrees centigrade but only 370 at 0 degrees.

    One good tip is to keep your battery inside your coat, this way it can use your body's temperature.

    Another concern in some cameras are leaf shutters on traditional large format cameras where the lubricants have become viscous in low temperatures. Some plastics can become brittle, and while not a problem for camera, it could be for accessories

    When taking pictures in the snow and things like skiing or snowboarding there shouldn't be a problem with the snow if it remains frozen, problem is when you move indoors. This water could sip into the lens joints and other areas. So be careful of wiping your camera before you go indoors or putting it inside your coat.

    Condensation can also be a big problem. At best it is a nuisance. the lens becomes misted up and the camera body become damp. At worth though the condensation may penetrate the camera and damage the electronic if the camera is stored damp, cause mould and fungus to appear

    What you need to do is put the camera away in a bag or case before you bring it indoors, and then let it warm up naturally for an hour or so before opening up the bag, it doesn't have to be airtight because there is no pressure difference, you are simply preventing the warm air from circulating around cold equipment

    For hot weather

    When it comes to the sun, cameras are pretty hardy the only big nuisance is that the black plastic on which cameras are built, attract the hear, which could cause your camera to become so hot that it cannot be operated for a few minutes.

    For hot weather your worst enemies are moisture and dust

    Sand is a real killer when it comes to lenese, any grit can lock up a precise and delicate mechanism of the camera and or lens

    This is critical when trying to exchange lens in the middle of a dusty environment. If you have to, you should turn away from the wind, and face the camera downwards to minimize the risk of particles getting into the camera body.

    In some environments, fine dust particles are suspended in the air and will enter the camera body even if perfectly still conditions.

    Never put your camera away damp.

    Wednesday, August 27, 2008

    Tips on... <Urban Landscape>

    Early bird catches the worm

    Prospective perspectives

    Your perspective should differ depending on the shape and form of what's before you. For square buildings try to shot at a 40-60 degree angle to avoid a flat image, for domes or curved shapes its important to feature some background in order to the viewer to appreciate the form

    Up and coming

    Should not only be dedicated to the built environment, take a look around you and see what's happening construction wise. Documenting a building going up can make a for a great addition to your portfolio, while renovations are always an interesting subject to shoot

    Permission to shoot

    Be aware that many places require you to possess a licence before you can shoot on its grounds. Just like a model release form these building release forms cover how the images will be used and determines who holds the copyright. You can often negotiate to exchange images in return for a photo pass.

    Angle attack

    The best way to find new approaches to shooting well known buildings is to approach them from all angles, Search for unusual features or crevices that are rarely seen in the usual publicity shots of that place, and go in from that angle instead. Look out for patterns, reflections and textures to really bring out the buildings characteristics

    Once you have found a location the next stage is being able to approach your scene in a variety of ways photographically, playing on perspective, viewpoint and light. Look for places that will look great close up as abstract images but also will produce impact as a full frame image

    Some prefer to shoot from a distance some prefer to accentuate angles and other shoot for pattern or repetition.

    Place yourself where the reflective rays do not directly shine onto your lens, or else your images will be a complete whitewash. Sometimes a polarizing filter will help you manipulate reflective scenes to your advantage. It will enable you to suppress subtle reflections and darken any blue sky mirrored in the building's glass.

    Many prestigious buildings will be flood light at night, which represents some challenges, The bright light coupled with harsh shadows makes it a tricky subject to choose. Underexpose then tweak if needed. Is better also to bracket your shots. Find a midtone and then use spot metering

    Panoramas

    Lens selection

    Opt for a standard len to ensure threre is no distortion, Wide angle lenses are more susceptible to this than normal lenses

    Steady now

    Choose a tripod with a panning head to ensure a smooth transition that is level and lined up correctly for each shot

    Shoot in line

    Being taking your shots starting from one side and progressing to the other. Make sure you overlap your last shot by a third each time, to ensure they line up afterwards.

    Make it merge

    Upload your shots in Photoshop or a similar program. No matter the program, some editing will be required to make the images match

    Use manual

    To ensure that no readings are changed between lights, such as fstop, shutter speed, etc that could alter one of the shots you can use and make it look different from the rest

    del.icio.us Tags: ,,,

    Tips on...<Travel, Creative>

    Unforgettable Images..travel

    Heading off the beaten track is a guaranteed method for limiting your chances of cliched travel images, but remember that in this day and age you would have to be very quick to snap something that hasn't been photographed.

    Boosting creativity

    • The use of unusual perspective is an obvious option for boosting creativity. Getting down low with a wide-angle lens of 24-42mm will give an extreme edge to any landscape, as will using a fish eye lens which will work to distort the trye dimensions of the scene in front of you
    • Timing of photography is another key factor in determining the result image. You could for example wait for what is assumed to be a remote untouched location to become swamped in rush hour traffic and then shoot for impact.

    In detail

    • Homing in on small details is a superb stylistic point in many travel photography portfolios, whether it happens to be the people, a street sign, local product or something that springs to your attention just as you are about to the press the shutter button. Something as simple as a door knocker, a plate of food or even a ceramic tile provided it is photographed well and in focus, can reveal a lot about a different culture

    Avoid the crowds

    Get up early, the light is fantastic at sunrise.

    Create a contrast

    Always use a lens hoodon your camera lens. This way you will avoid flare and create better contrast in your photos, specially on hot sunny locations

    Back Up

    Remember to back up everything you shoot at least twice. If not you run the risk of losing your images.

    Get involved

    Aim to be part of your photographs specially when you are photographing people.Get them to react and relate to you and your personality and you will find creating unique pictures comes easier

    del.icio.us Tags: ,,

    Tips on...<Travel.. creativity>

    Heading off the beaten track is a guaranteed method for limiting your chances of cliched travel images, but remember that in this day and age you would have to be very quick to snap something that hasn't been photographed.

    Boosting creativity

    • The use of unusual perspective is an obvious option for boosting creativity. Getting down low with a wide-angle lens of 24-42mm will give an extreme edge to any landscape, as will using a fish eye lens which will work to distort the trye dimensions of the scene in front of you
    • Timing of photography is another key factor in determining the result image. You could for example wait for what is assumed to be a remote untouched location to become swamped in rush hour traffic and then shoot for impact.

    In detail

    • Homing in on small details is a superb stylistic point in man travel photography portfolios, whether it happens to be the people, a street sign, local craft product or something that springs to your attention just as you are about to the press the shutter button. Something as simple as a door knocker, a plate of food or even a ceramic tile provided it is photographed well and in focus, can reveal a lot about a different culture

    Exotic Landscapes

    Tricks of the light

    • If you are traveling anywhere near the coast or desert, the exotic idyll of white sands and turquoise skies although photogenic will present the photographer with a multitude of hazards. They key is to be aware of the suns position.
    • In locations where cloud cover is sparse, intense sunlight will be detrimental to the level of detail in your image.
    • Adjust EV compensation up by one or two stops, or use exposure bracketing to cover yourself against inaccurate metering in tricky lighting scenarios
    • Early morning light is perfect for highlighting contours and textural formations of a deser landscape, emphasized even more by a low shooting position and wide angle lens
    • The low position of the sun and quality of natural light later in the day will give shots an atmospheric appearance, casting long shadows and adding depth to scenes such as rock formations and layered landscapes. Landscapes will also take on a warmer color tone at the beginning and end of the day, compared with the cool blue cast of midday

    Wide Open

    • A standard wide angle lens at 35mm equivalent focal lent of 43-60mm or a super wide angle lens of 24-42mm will work to capture every last detail while making the most of the sjy and foreground
    • Place the horizon in your frame according to the interest that the sky and foreground each hold - they must wor kwell together or not at all-

    For coastal areas

    • Using fast shutter speeds higher than 1/250 secs will freezse the motion of waves and sea spray. In contrast, slow shutter speeds of less than half a second will blur the water and soften the scene. If this is where your traveling interest lues then the addition of a polarizing filter to your kit bag will help you improving the color and contrast of your images, and will reduce the glare caused by reflection. A tripod is a most on all of this situations
    • The inclusion of a human element into a typical landscape photograph can give a striking sense of scale to a place. Focus your lens on the person in the frame, but employ a wide aperture to ensure sharpness from front to back.

    del.icio.us Tags: ,,,

    Tips on...<Travel>

    Travel Photography tips

    Is good to go to a location and have a them around the photoshoot. Get an assignment

    • Working hands
    • Colorful
    • Street names
    • Vivid Colors
    • Close up Local architecture
    • Children
    • Keep it friendly when approaching people
    • Know when to back down. dont be upset by a refusal, just try somebody else
    • Learn the lingo:: learn a few basic words from the language of the country you are visiting, at least please and thanks
    • Understand the culture: research into local customs
    • Fill the frame: get in as close as possible to the subject
    • Research your destination thoroughly, if you get some research done it will tell you what kit to bring
    • Make the light work for you. Bring a reflector/diffuser kit and a flash with a diffuser. Controlling the light is key for a good portrait
    • Know the best time to shoot: Avoid harsh sunlight if possible move the subject to the shade
    • When shooting wildlife, preparation is key: Bring the longest lens you have
    • Consider composition carefully. Dead Center is deadly. Position the subject off-centerfor a more interesting composition
    • Experiment with filters: Use a polarizing filter, to reduce glare on water and foliage
    • Ask permission to take pictures of people:
    • Change your perspective, tell more of the story by using wider lenses.
    • For more marketable pictures, try writing, it helps selling a set for a certain location
    • Create a diary of your travels, this will help tell a story of your set

    Checklist before you go...

    • Do your research: read upon the area for things to shoot where to go and where not to
    • Check your documents
    • Equipment list
    • Clean Equipment
    • Check equipment (take a few test shots)
    • Charge batteries
    • Power (dont forget a travel adapter)
    • Check airline restrictions for carry-on on passport and electronics
    • Storage; enough memory cards and back up units in case those cards fill up

    Think Kit

    Make sure you pack the right equipment. Think about these filters, lenses and cameras to suit all the photographic situations you might encounter. A circular polarizer is a most

    Outside the box

    Capture not only buildings and locations but the locals while on your travels and you will have some outstanding shots

    Add context

    Although some shots look like they could have been taken anywhere in the world, make sure your shots dont. Add subtle touches like a local language sign pr native animal to your shot to give a little context

    Zoom In

    Great travel shots arent just sweeping vistas and huge buildings. Get up close and shoot individual hieroglyphs, single crucifixes or sained glass windows

    Colour composition

    Take advantage of local dress, landmarks and culture to take striking photos.. The rules of composition still apply, but you could try to vary your viewpoint to get more exciting frames

    After dark

    Wait until the lights go down brefore you get your camera outm Dusk and sunset hours are beautiful by the water. Look out for reflections, slow your shutter speed.

    Local people

    Landscapes may be the most common travel shots, but the ones if local people are often the shots that speak the loudest. Make sure you ask permission to take their photo

    In the wild

    Invest in a good telephoto lens as well as abean bag. Its essential for a safari

    Do your research

    Find out everything you can before travel. What events are going while yuou are there. Are there any high vantage points to shoot from?.

    Research what your destination has to offer and what makes it unique. Research travel brochures it can give you a good indication of whats been shot, so you dont repeat it, but it also is a good start

    Find out of any festivals as well as where the local markets are, this creates a huge opportunity. If you want to add some portraits to the mix, learning some of the local language helps

    Ideally you should carry 2 DSLR bodies and with them a collection of overlapping lenses a telephoto, tele-zoom and two wide-angle. Keeping lenses to a minimum will mean less switching and less risk to your sensor getting dirty or damaged.

    For shooting on the move a good back up unit is essential, there are several at different prices, I personally own this one. Some extras to pack on your bag are a tripod (carbon fiber would be ideal), cable release, USB cables and spare memory cards. Graduated filers could be consider a luxury if you want to travel light as some of this effect can be recreated in Photoshop

    Monday, August 25, 2008

    Tips on <Street, Candids>

    Less is more

    In terms of equipment less is more. If you are traipsing the streets of a city for hours on end you'll want to cut down on the baggage so a good pair of walking shoes and a comfortable camera strap should not be negotiated. Additionally youll want to blend in to catch subjects unawares; erecting a tripod or using a telephoto lens wont suggest sublety

    Off the beaten track

    Street photography is not tourist photography, so go off the beaten track and capture what us being done behind the scenes. Goung out an an unusual timecan help you find great shots and because street photography us nit dependent of perfect light settings, you have no excuse not to get out early and say out until late

    Stolen Moments

    The key to successful street shooting us to be on the lookout for an opportunity before it happens. Anticipate action by scouring groups of potential clashes or bonds, judge the atmosphere of a crowd and react to the body language and facial expressions

    True Colours

    Colorful clothing or backgrounds can sometimes be a distraction when you want to concentrate on facial expressions and gesture, and for this reason the genre blends itself to black and white. However, there will be opportunities where lurid and gaudy colours collide and it would be a crime to convert to B&W

    In the background

    By paying attention to the background, you can catch some stolen movements, Look for billboards. signs, graffiti or other visual elements that could be used to make humorous, ironic or incongruous statements

    Dare to go diagonal

    Exploit the diagonal lines and perspectives of the urban architecture. By playing with angles and available geometries you provide force and dynamism and a kind of harmony between the man and the urban architecture

    Opposites attract

    Look for compositions that reveal dichotomy to build a story or challenge and assumption. Try splitting the composition between the reflections on the ground and the scene above or capture part of a building half i nthe dark, half in the light

    Performance

    Street entertainers make ideal subjects, but try to capture from a different viewpoint, Wether its a parade, buskers, free runners, skateboarders, or breakdancers they offer something a little different to your average street scene. Experiment with your compositions and choose a high shutter speed to capture the action

    Off the Streets

    Despite its name the genre does lend itself to other recreational areas especially those where people expect cameras to be present. Seaside, fairgrounds, parks, zoo, sporting events or the zoo

    New angle

    Get down low or find a higher viewpoint for an unusual angle. Multi story car parks are great for this, as you dont have to shoot through glass and give a viewpoint in town centers. Be careful that your camera is secured; the last thing you want is to drop your camera and hurt someone.

    Practice makes perfect

    With your camera pre-set pick a spot on the street and proceed with calmness sesitivity and poise. With practice you will make great street photographs

    Fortune favors the brave

    If your pictures arent good enough, you are not close enough. Shots taken in the thich of the action will draw the viewer in. so force yourself to press the button and prepare to deal with the consequences, Better that than regretting missing an opportunity that will never happen again

    Fun in the Sun

    Use the sun's glare ti your advantage. When the sun is low in urban environments it produces long shadows and shafts if light, creating high contrast patch works, This can trouble a camera's meter. so make sure you use the manual mode and expose for the highlights

    Ready to pounce

    The opportunity for a great shot may be fleeting so be cued up and ready to shoot. Have your camera out, finger at the ready and for when the situation demands, matrix metering and autofocus activated

    Revise and Revisit

    If you see a scene that has potential dont be afraid of revisiting the same location and spend some time there to get a better shot. Revisit in different weather conditions and different times of the year to see a change

    Frozen motion

    Movement is a key part of capturing the human zoo. Keep shutter speeds fast and at hand steady or find something to support your camera. To capture people moving across af rame a minimum of 1/125 sec is recommend and an ISO not slower than 400

    Street wallpaper

    I prefer it if my subjects don’t know Im there, or else are too busy to be aware of my presence.

    Life trough a lense

    Exaggerating perspective will help set your subject in context and provide am more forgiving DOF thats why most street photographers say a lightweight wide angle lense is their weapon of choice Also consider fisheye lenses and the potential of panoramic shoots

    Expect the Expected

    People are generally more suspicious in today's social climate, which makes street photography a potential minefield of hot-tempered confrontation. Try shooting subjects in places where people expect shots to be taken, but be aware that you may be regarded with suspicion, Smile, be polite and be willing to delete images if the subject asks

    Location, Location, Location

    Places where people interact with one another are a prime target for street photography, street corners, pedestrian crossings, outside piublic houses, bus stops, woekers puring into the streets at rush hour, etc. As crowding increases people's personal space decreases allowing you and your camera to get much closer.

    Sign reds... Ministry of Culture...

    Taking a nap

    Tips on..<UK Shoot Ideas>

    Coastal Wildlife (UK/Ireland)

    • Wear appropriate clothing
      • Outdoor clothing should be both waterproof and windproof, as well as of colors that will blend in with your surroundings. I prefer to wear several layers, so that body temperature can be controlled
    • Use a Tripod
      • Use a a spirit level or look through the viewfinder to check horizons to make sure they are level.
    • Check tide times
      • Be aware of the time, what the tide's doing and be vigilant
      • You can buy tide tables for the area you are visiting, or go here. In summer, always check if times are corrected for BST.
    • Protect your kit
      • Use protection against sea spray on lensens and on camera bodies
    • Check your exposure
      • Look at your shots with the LCD as you go along to make use of your histogram
    • Be careful around steep cliffs
      • Its easy to step off teh edge when looking trough the viewfinder also remember you dont have to go far to lose cell reception
    • Do not approach seals on the beach
      • Pups may look cuddly but they have sharp teeth, and the consequences of a seal bite can be very unpleasant to say the least due to the bacteria they carry
    • At sea, use license commercial boat operators
      • If you are on a provate boat when approaching marine mammals and seals, follow any marine codes for the area. Also remember its an offence to cause deliberate or reckless disturbance to animals such as dolphins.
    • Recommended equipment
      • UV Filter.Protect from sand, wind and salty water
      • Linpix Photographic mat: Perfect for laying on sandy beaches, muddy places. This mat is lightweight, waterproof solution thay folds down small and can be hooked onto your camera bag when is not in use
      • Long Lense such as the Sigma 150-500.
    • Try shooting in Manual or Shutter Priority Mode. 1/500 sec will alleviate problems of camera shake

    del.icio.us Tags: ,,,

    Tips on...<Dragonflies>

    • Monitor how a dragonflie behave, they stop once in a while to catch sun rays, so check weather to see if it will be sunny that day
    • Dragonflies react to movement, look for a sunny spot on a flower and wait motionless, they will get close to the camera that way.
    • Late afternoon is the best time, as well as an abscence of wind
    • Use a macro lense makes sense but also an extension tube could be necesary
    • Manual focus is the way to go.
    • Pre-focus manually and move the camera to and from the subject.
    • Shutter Speeds at 1/80 with a 50 mm lense and ISO 400
    • Bring insect repellent for mosquitoes
    • Infrared beams can help to cut down on the wait
    • Set the camera to burst mode as well.Expect a low success rate, a professional gets 1 out of 30 shots.

    Places I've shot in